Hibernate之快速入门一
第一步:准备工作
1,创建一个Java Web工程
2,创建一个数据库表cst_customer
建表语句:
CREATE TABLE `cst_customer` (
  `cust_id` bigint(32) NOT NULL AUTO_INCREMENT COMMENT '客户编号(主键)',
  `cust_name` varchar(32) NOT NULL COMMENT '客户名称(公司名称)',
  `cust_source` varchar(32) CHARACTER SET utf8 COLLATE utf8_unicode_ci DEFAULT NULL COMMENT '客户信息来源',
  `cust_industry` varchar(32) DEFAULT NULL COMMENT '客户所属行业',
  `cust_level` varchar(32) DEFAULT NULL COMMENT '客户级别',
  `cust_phone` varchar(64) DEFAULT NULL COMMENT '固定电话',
  `cust_mobile` varchar(16) DEFAULT NULL COMMENT '移动电话',
  PRIMARY KEY (`cust_id`)
) ENGINE=InnoDB AUTO_INCREMENT=2 DEFAULT CHARSET=utf8;
3,在工程中创建一个Customer实体类
package com.myself.domain;

public class Customer {
      private Long custId;
      private String custName;
      private String custSource;
      private String custIndustry;
      private String custLevel;
      private String custPhone;
      private String custMobile;

    public Long getCustId() {
        return custId;
    }

    public void setCustId(Long custId) {
        this.custId = custId;
    }

    public String getCustName() {
        return custName;
    }

    public void setCustName(String custName) {
        this.custName = custName;
    }

    public String getCustSource() {
        return custSource;
    }

    public void setCustSource(String custSource) {
        this.custSource = custSource;
    }

    public String getCustIndustry() {
        return custIndustry;
    }

    public void setCustIndustry(String custIndustry) {
        this.custIndustry = custIndustry;
    }

    public String getCustLevel() {
        return custLevel;
    }

    public void setCustLevel(String custLevel) {
        this.custLevel = custLevel;
    }

    public String getCustPhone() {
        return custPhone;
    }

    public void setCustPhone(String custPhone) {
        this.custPhone = custPhone;
    }

    public String getCustMobile() {
        return custMobile;
    }

    public void setCustMobile(String custMobile) {
        this.custMobile = custMobile;
    }

    @Override
    public String toString() {
        return "Customer{" +
                "custId=" + custId +
                ", custName='" + custName + '\'' +
                ", custSource='" + custSource + '\'' +
                ", custIndustry='" + custIndustry + '\'' +
                ", custLevel='" + custLevel + '\'' +
                ", custPhone='" + custPhone + '\'' +
                ", custMobile='" + custMobile + '\'' +
                '}';
    }
}
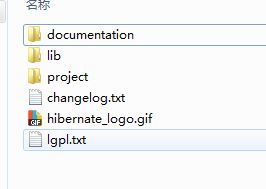
4,下载一个Hibernate压缩包并解压:本文用的是 hibernate-release-5.0.7.Final,解压后的目录结构为:
documentation:hibernate的相关说明文档
lib:hibernate的jar包,进入lib文件下的目录结构为:
a,required文件下,为hibernate必须要导入的包
b,optional文件下,扩展包,包括c3p0连接池包,二级缓存ehcahe包等
c,jpa文件夹下,hibernate注解需要导入的包
project:hibernate的demo工程
5,mysql数据库启动包
![]()
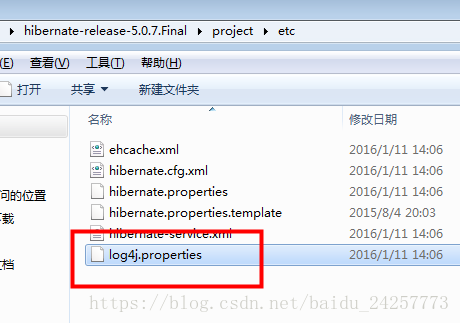
6,日志包和log4j日志配置文件
![]()
配置文件:log4j.properties--放到src目录下,该文件可以在hibernate包的project-->etc下找到
第二步:配置hibernate配置文件
1,hibernate的映射文件(实体类名.hbm.xml--Customer.hbm.xml)
该文件主要配置实体类和数据库表的映射关系,见代码:
注意点:
A,约束--hibernate-core-5.0.7.Final.jar-->org.hibernate-->hibernate-mapping-3.0.dtd 打开此文件便能找到;
B,class:用来配置实体类和表的映射关系,name属性为类的全路径名,table为数据库表名,catalog为数据库名(可省略);
C,class标签里面配置的是类属性和表字段的映射:
id:配置数据库表中的主键,属性特殊,单独配置,name为类属性名,column为数据库表字段名;id里面的generator配置的是主键生成策略:native是使用当前数据库底层的生成策略,mysql:主键自增策略,相关知识在此不做过多赘述,可以自行查阅。
property:配置其他的类属性和表字段的映射,name为属性名,column为表字段名,type数据类型(hibernate写法,java写法,sql写法(sql-type)三种--string,java.lang.String,varchar),length数据的长度。当类属性和数据表字段名一样的时候,column属性可以省略。
2,hibernate的配置文件(hibernate.cfg.xml)--src目录下
该文件主要配置数据库连接,数据库其他配置和加载映射文件三部分,见代码:
        com.mysql.jdbc.Driver
        jdbc:mysql:///myself
        root
        123456

        org.hibernate.dialect.MySQLDialect
        true
        true
        update

        org.hibernate.c3p0.internal.C3P0ConnectionProvider
        thread
注意点:
A,约束--hibernate-core-5.0.7.Final.jar-->org.hibernate-->hibernate-configuration-3.0.dtd 打开此文件便能找到;
B,该配置文件中的配置内容可以在hibernate.properties文件中找到,即hibernate解压包project文件-->etc-->hibernate.properties
数据库相关配置不做过多解释:数据库驱动,数据库,数据库用户名,数据库密码;不同数据库配置不一样;
mapping,加载映射文件。resource:加载映射文件,class:加载映射实体类;
hibernate.dialect:数据库方言,如mysql limit 分页;
hibernate.show_sql:在控制台(日志)显示sql语句;
hibernate.format_sql:sql语句输出时,格式化sql语句;
hibernate.hbm2ddl.auto:自动建表配置-->update 每次执行时,发现有表就使用,没有表就自行创建;create 每次加载配置文件的时候都创建新的表;create-drop 每次使用时都创建新的表,用完就删除;validate 每次加载配置文件的时候,校验是否存在表或者表和映射文件是否一致,不一致或不存在就报错。update+validate适合上线用,另外两种仅使用测试。
hibernate.connection.provider_class:配置连接池,不配置,默认使用hibernate自己连接池;
hibernate.current_session_context_class:session与当前线程绑定;原因service控制事务,dao执行sql,两者必须使用同一个connection,而把connection放到service层容易代码侵入,所以将connection绑定到当前线程上,在dao层取出开启事务的connection。
第三步:创建一个HibernateUtils工具包,用于获取Session
package com.myself.utils;

import org.hibernate.Session;
import org.hibernate.SessionFactory;
import org.hibernate.cfg.Configuration;

public class HibernateUtils {
    private static Configuration configuration = null;
    private static SessionFactory sessionFactory = null;

    static {
        configuration = new Configuration().configure();
        sessionFactory = configuration.buildSessionFactory();
    }

    public static Session getSession(){
        return sessionFactory.getCurrentSession();
    }
    public static Session openSession(){
        return sessionFactory.openSession();
    }
}
第四步:测试
package com.myself.test;

import com.myself.domain.Customer;
import com.myself.utils.HibernateUtils;
import org.hibernate.Session;
import org.hibernate.Transaction;
import org.junit.Test;

public class HibernateTest {
    @Test
    public void testAdd(){
        Session session = HibernateUtils.openSession();
        Transaction transaction = session.beginTransaction();
        Customer customer = new Customer();
        customer.setCustName("add001");
        customer.setCustPhone("13888886666");
        customer.setCustIndustry("Baidu");
        customer.setCustSource("adlet");
        session.save(customer);
        transaction.commit();
        session.close();
    }
    @Test
    public void getObject(){
        Session session = HibernateUtils.openSession();
        Customer customer_get = session.get(Customer.class,1L);
        Customer customer_load = session.load(Customer.class,1L);
        System.out.println(customer_get);
        System.out.println(customer_load);
        session.close();
    }
    @Test
    public void updateObject(){
        Session session = HibernateUtils.openSession();
        Transaction transaction = session.beginTransaction();

//        Customer customer_get = session.get(Customer.class,1L);
//        customer_get.setCustSource("adlet");
//        session.update(customer_get);

        Customer custom = new Customer();
        custom.setCustId(1L);
        custom.setCustName("John");
        session.update(custom);

        transaction.commit();
        session.close();
    }
    @Test
    public void deleteObject(){
        Session session = HibernateUtils.openSession();
        Transaction transaction = session.beginTransaction();

//        Customer customer = new Customer();
//        customer.setCustId(1L);

        Customer customer = session.get(Customer.class,1L);
        session.delete(customer);

        transaction.commit();
        session.close();
    }
}
注意点:
get与load区别:get是立即查询 立即发送sql语句;load是延迟加载,只有实体被真正使用的时候才发送sql语句;
总结:该篇仅为一个简单的单表的hibernate快速入门的案例,以及关于hibernate两个相关配置文件的初略了解,有什么不对的地方或者不足之处,望大家能够指出,谢谢!


