副本集Oplog同步原理
副本集是mongodb的基础组件,是实现高可用、自动选主、读写分离以及数据一致性的基础。 比较概括的说, 副本集是将同一份数据保存在不同的节点上面, 这些节点通过一致性的协议(RAFT), 实现数据的同步, 并且选出一个主节点, 该节点对外提供读写服务, 当该主节点发生故障的时候, 自动从剩余的从节点内选出新的主节点。
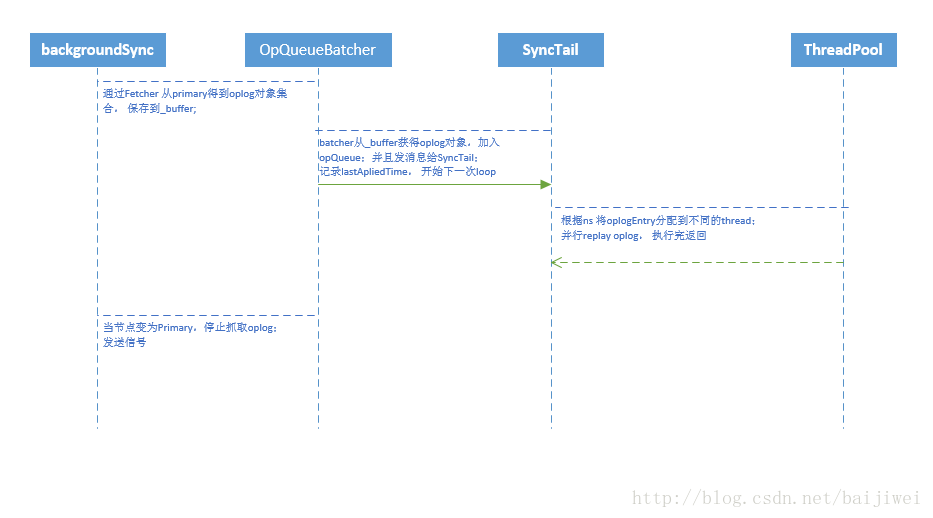
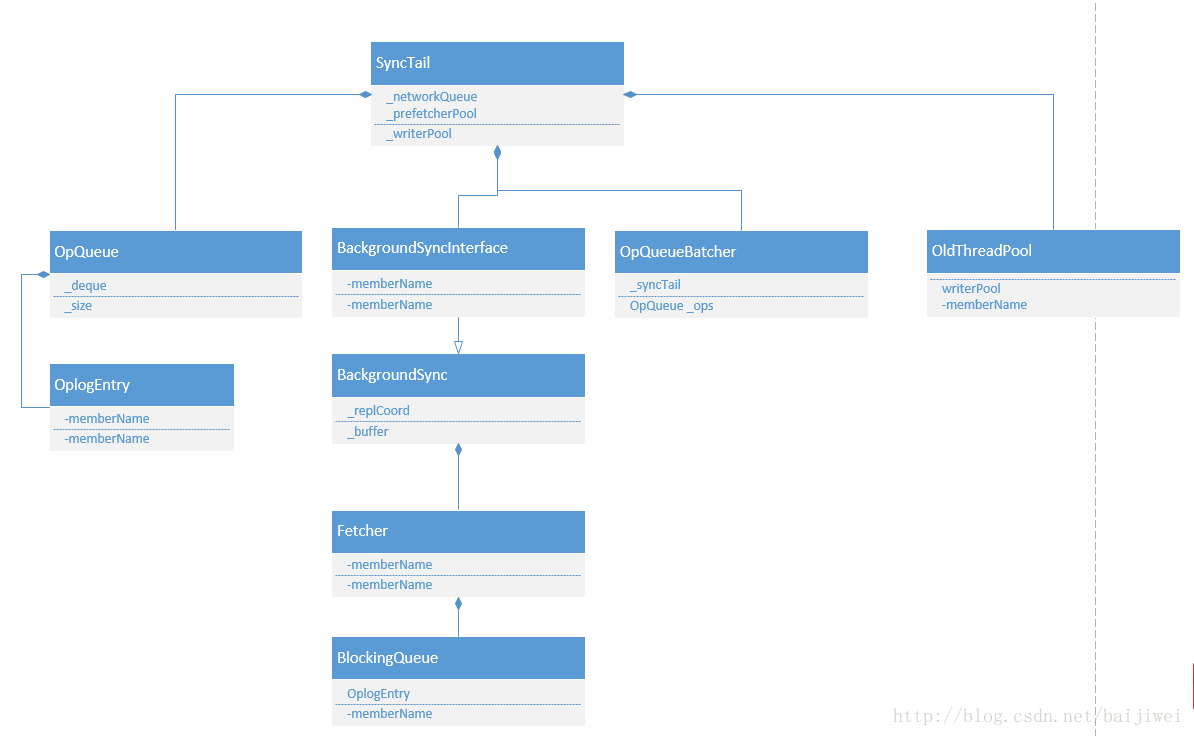
从这里, 我们可以看到, oplog 的整个从Primary 到Second的 sync 过程, 主要是通过SyncTail类来完成的, 其中用到几个重要的类来协助完成: BackgroundSync, OpQueueBatcher, ThreadPool。
这个的流程如下流程图:

BackgroundSync 类
该类的实现在: src/mongo/db/repl/bgsync.cpp.
每一个Secondary节点都会启动一个名为rsBackgroundSync的线程, 专门负责从Primary 抓取Oplog, 并且把抓取的结果放进buffer里面。
这个类主要负责的工作:
- 创建从secondary 到Primary的连接类: OplogReader;
- 更新记录当前抓取的oplog的时间点lastOpTimeFetched等;
- 创建Fetcher 类来调用Remote Command 抓取oplog;
- 调用getMore 命令从oplog collection 获得下一批的oplog;
OpQueueBatcher 类
该类是SyncTail的一个子类, 主要是起一个名叫:ReplBatcher 的线程, 不断地把BackgroundSync得到的全部的oplog 集合, 分成一个个的batch进行处理, 每处理掉一个batch, BackgroundSync的buffer就被腾出了相应的空间, 可以继续从远端获得更多的oplog对象。
每个batch 最多是512M或者5000条oplog, 每当batcher 内有新的数据, 就会发返回给SyncTail, ReplBatcher线程继续准备下一个batch的数据。
SyncTail类
每个Secondary节点都有一个名为: rsSync的线程, 它负责得到并且更新本地的oplog。
它会检查本地的oplog状况, 决定是要全量同步oplog, 还是增量同步。
增量同步的代码在: src/mongo/db/repl/sync_tail.cpp。
SyncTail从OpQueueBatcher得到OpQueue 类型的ops, 需要把他们进行replay, 但是, 如果使用当前线程执行的话, 有可能执行的时间很长。
这里, SyncTail 通过ThreadPool的方式, 一次创建16个线程, 并行的replay这些oplog。那么, 这些的oplog是怎么分配到不同的线程里面的? 它是通过oplog的namespace。
void fillWriterVectors(OperationContext* txn,
const std::dequeoplog分配到不同的线程以后, 就是replay该线程分配到的oplog, replay oplog的实现过程在SyncTail::MultiSyncApplyFunc里面, 我们后面会用单独一小节来讨论。
void applyOps(const std::vector<std::vector执行完oplog, 我们需要把oplog更新到本地的oplog 集合里面。
OpTime writeOpsToOplog(OperationContext* txn, const std::vectoroplog的replay过程
在同步oplog的时候, 需要创建一个SyncTail对象, 来进行增量同步。
void runSyncThread() {
      ...
      SyncTail tail(BackgroundSync::get(), multiSyncApply);
      tail.oplogApplication();
 }
SyncTail 的构造函数, 需要传入一个函数指针MultiSyncApplyFunc, 它是用来replay oplog的callback 函数。
SyncTail::SyncTail(BackgroundSyncInterface* q, MultiSyncApplyFunc func);
OpTime SyncTail::multiApply(OperationContext* txn,
                              const OpQueue& ops,
                              boost::optional boundaries) {
    ...
    //这里_applyFunc 就是传入的MultiSyncApplyFunc指针
    applyOps(writerVectors, &_writerPool, _applyFunc, this);
}
我们可以看到, 真个replay的入口在multiSyncApply, 接下来顺着代码看一下整个实现的过程:
void multiSyncApply(const std::vector这里, oplog的replay分为两类: command和一般的增删改查。具体的实现oplog.cpp里面。
command的oplog回放是将当前支持的command以及对应的处理函数放进一个map里面, 通过每一个oplog的类型找到相应的处理函数:
std::map<std::string, ApplyOpMetadata> opsMap = {
    {"create",
     {[](OperationContext* txn, const char* ns, BSONObj& cmd)
          -> Status { return createCollection(txn, NamespaceString(ns).db().toString(), cmd); },
      {ErrorCodes::NamespaceExists}}},
    {"collMod",
     {[](OperationContext* txn, const char* ns, BSONObj& cmd) -> Status {
         BSONObjBuilder resultWeDontCareAbout;
         return collMod(txn, parseNs(ns, cmd), cmd, &resultWeDontCareAbout);
     }}},
    {"dropDatabase",
     {[](OperationContext* txn, const char* ns, BSONObj& cmd)
          -> Status { return dropDatabase(txn, NamespaceString(ns).db().toString()); },
      {ErrorCodes::NamespaceNotFound}}},
      ...
}
Status applyCommand_inlock(OperationContext* txn, const BSONObj& op) {
    while (!done) {
        auto op = opsMap.find(o.firstElementFieldName());
        if (op == opsMap.end()) {
            return Status(ErrorCodes::BadValue,
                          mongoutils::str::stream() << "Invalid key '" << o.firstElementFieldName()
                                                    << "' found in field 'o'");
        }
        ApplyOpMetadata curOpToApply = op->second;
        Status status = Status::OK();
        try {
            status = curOpToApply.applyFunc(txn, ns, o);
        } catch (...) {
            status = exceptionToStatus();
        }
    }
 }
另外一种增删改查的oplog relay, 处理了index, insert, update, create的场景, 代码不复杂, 在applyOperation_inlock里面, 可以自己查看。
// See replset initial sync code.
Status applyOperation_inlock(OperationContext* txn,
                             Database* db,
                             const BSONObj& op,
                             bool convertUpdateToUpsert) {
}
到这里, 一次oplog的更新就完成了, 循环上面的过程, 我们就可以把primary上面新的oplog更新到secondary节点上。 当primary掉线或者故障, 某个节点从secondary变为primary的时候, BackgroundSync 停止sync oplog, 并且通知Synctail 结束工作。
