Pixhawk飞控开发环境配置
ArduPilot自驾仪手册网址:http://ardupilot.com/
Pixhawk开发者网址(自驾仪源代码开发):http://dev.ardupilot.com/
第一部分,环境配置
环境配置步骤,主要参考http://dev.ardupilot.com/wiki/building-the-code/building-px4-with-make/
1、下载安装 GitHub for Windows
Install GitHub for Windows
2、注册,并且登录你的github账号(原文中是在Git shell中执行git config --global core.autocrlf false,但是其实并没有什么用,你登录自己的账号后是会自动生成ssh秘钥的)
3、复制ardupilot的仓库到你的电脑上
Clone the ardupilot repository onto your machine
进入下面网页,点击“Clone in Desktop”按钮,GitHub/diydrones/ardupilot web page and click the “Clone in Desktop” button
4、按照下面的链接下载安装PX4 toolchain
Download and install the PX4 toolchain by running the px4_toolchain_installer_v14_win.exe
5、打开PX4的控制台,输入命令行切入到ardupilot目录下
Open the PX4Console and navigate to the target vehicle directory
- Start the PX4Console which can be found under Start | All Programs | PX4 Toolchain on Windows 7 machine or you can directly run C:\px4\toolchain\msys\1.0\px4_console.bat
- Navigate to the vehicle-specific ArduPilot directory in the PX4Console. For example, to build Copter, navigate to:
cd /c/Users/
/Documents/GitHub/ardupilot/ArduCopter - (上面的命令行是正确的,不需要考虑Windows下文件件的反斜杠)
make px4-clean “clean” the PX4Firmware and PX4NuttX directories so the next build will completely rebuild them
make px4-v2 Build the Pixhawk2/Pixhawk firmware (identical) for a quad
make px4-v2-upload Build and upload the Pixhawk firmware for a quad (i.e. no need to do step #7 below)
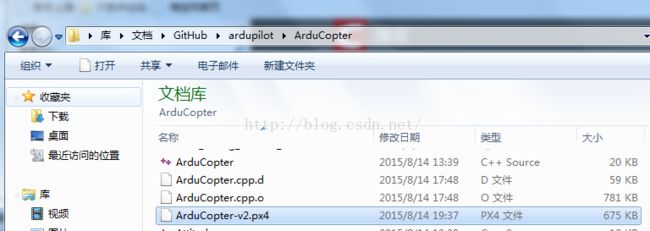
经过上面的命令make px4-clean,make px4-v2后,如果正确就会产生下面的文件
关键就是那个红色的,如果有这个出现就算是编译成功了
7、通过MissionPlanner中的上传固件-->Load custom firmware(下载本地固件,浏览找到刚才编译成功的ArduCopter.px4文件即可)
Upload the firmware using the Mission Planner’s Initial Setup | Install Firmware screen’s Load custom firmware link
第二部分,出现的错误
以上是编译环境的配置,下面说明几个出现的问题
1、第3步中“复制ardupilot的仓库到你的电脑”后,在文件夹ardupilot/modules中出现下面3个文件夹(这3个文件夹事实上是可以删除的),其中PX4Firmware文件夹中应该有.git文件夹,而另外两个文件夹是空的,这个时候不要再去网上的ardupilot对应的git去clone了,直接执行第5,第6步,先用make clean删除以上3个文件夹中的东西,再make px4-v2进行编译,但是这次编译只是生成了这3个文件夹,而没有建立仓库,所以一定要在px4_console进入每个文件夹执行git init命令,否则会出现fatal: Not a git repository (or any of the parent directories): .git错误,如果还有类似的错误,请在错误提示的文件夹中执行git init命令
2、编译过程也可能出现,生成了ArduCopter.px4文件但是出现下列错误,failed to get px4 hash,如上所说,只要出现了ArduCopter.px4文件就是编译成功了,failed to get px4 hash只是没有校验而已,所以可以执行第7步进行程序烧录,可以参见http://ardupilot.com/forum/viewtopic.php?t=13002&p=35322

也可能出现下面的文件名,也是正确的
第三部分,配置eclipse开发环境
官方参考网址http://dev.ardupilot.com/wiki/editing-the-code/editing-the-code-with-eclipse/