SpringCloud2.0快速搭建入门教程,详细代码和讲解,基于SpringBoot2.x,包含负载均衡Feign使用,新手福利
简介:目前2.x版本的springcloud和以前1.x版本在依赖、注解有一些区别,以下是用2.1.7版本的springboot,2.0.0的springcloud,这里简单介绍搭建springcloud入门。
1.建立注册中心项目(eureka-server)
idea建立步骤:File ->New -> project -> Spring initializr ->点击next->填写artifactId> (原作者为2.0.3版本,最后有原文链接)

点击next,选择上图中选项,finish。
1)引入依赖包:
    4.0.0

        org.springframework.boot
        spring-boot-starter-parent
        2.1.7.RELEASE


    com.ali77
    eureka-server
    0.0.1-SNAPSHOT
    eureka-server
    Demo project for Spring Boot


        1.8
        Greenwich.SR2


            org.springframework.cloud
            spring-cloud-starter-netflix-eureka-server


            org.springframework.boot
            spring-boot-starter-test
            test


                org.springframework.cloud
                spring-cloud-dependencies
                ${spring-cloud.version}
                pom
                import


                org.springframework.boot
                spring-boot-maven-plugin
2)启动类加上@EnableEurekaServer表示这是一个注册中心项目:
@EnableEurekaServer
@SpringBootApplication
public class EurekaApplication {

    public static void main(String[] args) {
        SpringApplication.run(EurekaApplication.class, args);
    }
}
3)application.yml配置
server:
  port: 8761
eureka:
  instance:
    hostname: localhost
  client:
    register-with-eureka: false
    fetch-registry: false
    service-url:
      defaultZone: http://${eureka.instance.hostname}:${server.port}/eureka/
配置端口为8761,register-with-eureka:false表示本身不注册,fetch-registry:fasle表示不从Eureka server获取注册信息,
配置的defaultZone为注册地址和交互地址(若部署多台注册中心,配置用“,”分割)。
4)启动项目,访问http://localhost:8761,可以看到这样的界面,

表示成功。
2.建立eureka-client接口服务提供项目(生产者)
1)项目建立步骤和第一步相似,pom依赖为:
            org.springframework.cloud
            spring-cloud-starter-netflix-eureka-client


            org.springframework.boot
            spring-boot-starter-web


            org.springframework.boot
            spring-boot-starter-test
            test


            com.ali77
            eureka-client
            0.0.1-SNAPSHOT


            com.ali77
            eureka-client
            0.0.1-SNAPSHOT
2)启动类代码
@EnableDiscoveryClient
@SpringBootApplication
public class EurekaClientApplication {

    public static void main(String[] args) {
        SpringApplication.run(EurekaClientApplication.class, args);
    }

}
加入EnableDiscoveryClient注解表示向注册中心注册。
3)建立一个TestController,代码为:
@RestController
public class TestController {

    @Value("${server.port}")
    String port;
    @RequestMapping("/hello")
    public String home(@RequestParam String name) {
        return "hi "+name+",i am  from port:" +port;
    }
}
提供一个接口用来测试。
4)application.yml配置
eureka:
  client:
    serviceUrl:
      defaultZone: http://localhost:8761/eureka/
server:
  port: 8762
spring:
  application:
    name: eureka-client
配置注册中心地址和自己的项目名称和端口。
5)启动项目,然后刷新第一步注册中心地址:http://localhost:8761,可以看到:
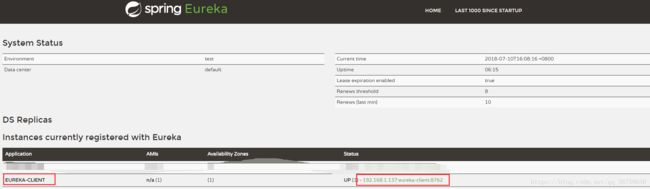
说明已经注册成功了。
3.建立第二个client项目
为了方便后面测试负载均衡,拷贝第二步生成的项目,或者重复建立上一个项目,只改项目名和端口,将application.yml配置的端口改为8763,其余不变,然后启动。
可以看到:
![]()
说明已经有两台EUREKA-CLIENT项目注册到注册中心。
4.使用Feign做负载均衡
1)建立步骤相似,项目名称为:eureka-feign
2)pom依赖
            org.springframework.cloud
            spring-cloud-starter-netflix-eureka-client


            org.springframework.boot
            spring-boot-starter-web


            org.springframework.boot
            spring-boot-starter-test
            test

            org.springframework.cloud
            spring-cloud-starter-openfeign
3)启动类
@EnableDiscoveryClient//向服务中心注册
@SpringBootApplication
@EnableFeignClients
public class EurekaRibbonApplication {

    public static void main(String[] args) {
        SpringApplication.run(EurekaRibbonApplication.class, args);
    }
}
EnableFeignClients表示开启FeignClients,后面会在接口上用到@FeignClient
4)application.yml配置
eureka:
  client:
    serviceUrl:
      defaultZone: http://localhost:8761/eureka/
server:
  port: 8764
spring:
  application:
    name: eureka-feign
同样注册到注册中心,端口为8764
5)准备调用client中的接口
建立一个接口HelloRemote,用来调用eureka-client里的接口
@FeignClient(name= "eureka-client")
public interface HelloRemote {
    @RequestMapping(value = "/hello")
    public String hello(@RequestParam(value = "name") String name);
}
一个控制层类HelloController,暴露接口:(如果Autowired报错helloRemote,是idea的检查错误,百度方法去掉就好,不影响)
@RestController
public class HelloController {

    @Autowired
    HelloRemote helloRemote;

    @RequestMapping("/hello/{name}")
    public String index(@PathVariable("name") String name) {
        return helloRemote.hello(name);
    }
}
启动项目,可以看到注册中心中多了一个eureka-feign项目
6)调用接口
访问 http://localhost:8764/hello/Capricornce,可以看到:

多次刷新,还能看到:

这样就使用feign达到了负载均衡的效果。
后续的熔断监控、springboot admin 这边先不加了。
本文为转载,参照操作,基本很顺利,特意转载,记录一下,本人参照实现版本为SpringBoot2.1.7,原文为2.0.3,没什么影响,感谢原创。
转载请标注原文地址:https://blog.csdn.net/qq_36758630/article/details/80986902
版权声明:本文为CSDN博主「汪牵牵」的原创文章,遵循CC 4.0 by-sa版权协议,转载请附上原文出处链接及本声明。
原文链接:https://blog.csdn.net/qq_36758630/article/details/80986902