SpringCloud02之Eureka注册和发现案例(基于IDEA)
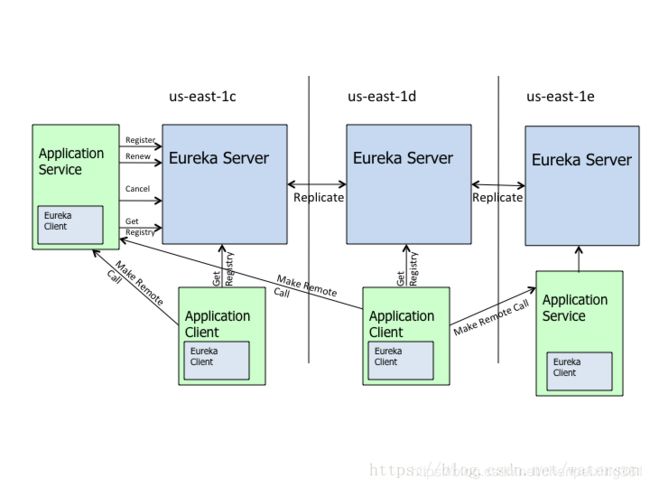
本次讲解的主题为Eureka的注册和发现,首先介绍一下Eureka,Eureka是基于REST服务,主要以AWS云服务为支撑,提供服务发现并实现负载均衡和故障转移,我们称此服务为Eureka服务。Eureka提供了Java客户端组件Eureka Client,方便与服务端的交互。另外客户端内置了基于round-robin实现的简单负载均衡。Eureka的架构示意图如下所示:
上面的架构图中,Eureka Server代表注册中心服务端,用于维护和管理注册服务列表。Eureka Client代表注册中心客户端,向注册中心注册服务的应用都可以叫做Eureka Client。好了,简单的介绍结束了,接下来正式进入本次的小案例了。本次的案例基于上一篇博客,不清楚的可以查看,链接为https://blog.csdn.net/chenpeixing361/article/details/88672478。本次案例分为以下模块:
- spring-cloud,项目父工程;
- spring-cloud-api,接口子模块;
- spring-cloud-eureka,Eureka服务端模块;
- spring-cloud-provider,Eureka客户端模块。
其中spring-cloud与spring-cloud-api与上一篇博客代码一样,此处不再叙述,不清楚的可以查看我的上一篇博客。
spring-cloud-eureka
我们在spring-cloud下新建一个Maven模块,命名为spring-cloud-eureka,首先是在pom.xml中添加相关配置,代码如下:
        spring-cloud
        com.chen
        1.0-SNAPSHOT
        ../spring-cloud/pom.xml

    4.0.0

    spring-cloud-eureka


            org.springframework.cloud
            spring-cloud-starter-netflix-eureka-server


            org.springframework.boot
            spring-boot-devtools
然后就是在src/main/resources新建application.yml文件,代码如下:
server:
  port: 7001
eureka:
  instance:
    hostname: localhost #eureka服务端的实例名称
  client:
    register-with-eureka: false  #false表示不向注册中心注册自己
    fetch-registry: false        #false表示自己端就是注册中心,职责就是维护实例,不需要自己检索服务
    service-url:
defaultZone: http://${eureka.instance.hostname}:${server.port}/eureka/ #设置与Eureka Server交互的地址查询服务和注册服务都需要依赖这个地址其中server.port代表端口号为7001,eureka.instance.hostname代表eureka服务端的实例名称,这里即为本地的localhost,client的几个属性注释我都写在后面,大家可以自己查看。
接着,我们新建启动类进行测试,我们需要添加一个注解@EnableEurekaServer,就可以调用Eureka的服务了,代码如下:
package com.chen;

import org.springframework.boot.SpringApplication;
import org.springframework.boot.autoconfigure.SpringBootApplication;
import org.springframework.cloud.netflix.eureka.server.EnableEurekaServer;

@SpringBootApplication
@EnableEurekaServer //EurekaServer服务器端启动类,接收其它微服务注册进来
public class EurekaServer_7001 {

    public static void main(String[] args){

        SpringApplication.run(EurekaServer_7001.class,args);
    }
}
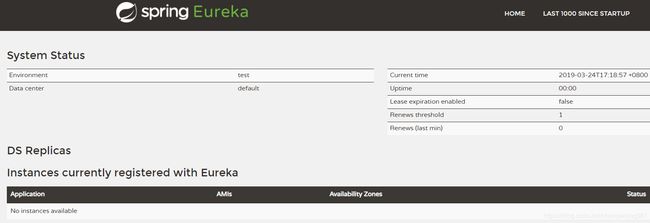
到这儿我们就可以测试Eureka服务了,运行截图如下:
此时Application没有任何内容,因为我们还没有添加事务,接下来我们编写spring-cloud-provider模块。
spring-cloud-provider
我们在上一篇博客该模块的基础上,在pom.xml添加如下配置信息:
            org.springframework.cloud
            spring-cloud-starter-netflix-eureka-client


            org.springframework.cloud
            spring-cloud-starter-config


            org.springframework.boot
            spring-boot-starter-actuator
然后又是修改application.yml了,我们在末尾添加如下代码:
eureka:
  client: #客户端注册进eureka服务类表中
    service-url:
        defaultZone: http://localhost:7001/eureka
  instance:
    instance-id: springcloud-user8081 #改变instance的名称
    prefer-ip-address: true #访问路径可以显示IP地址


info:
  app.name: spring-cloud
  company.name: www.baidu.com
  build.artifactId: ${project.artifactId}
  build.version: ${project.version}
其中eureka.client代表把客户端注册进Eureka服务中去,client.instance.instance-id代表新的instance名称,prefer-ip-address为true则表示可以显示IP地址,接下来的info配置是给当前的服务进行说明,后面会谈及。完整的application.yml文件如下:
#端口
server:
  port: 8081

#spring连接数据库配置
spring:
  application:
    name: spring-cloud-user
  datasource:
    username: root
    password: 123456
    url: jdbc:mysql://localhost:3306/springdatajpa?serverTimezone=GMT%2B8&characterEncoding=utf8
    driver-class-name: com.mysql.cj.jdbc.Driver
  cloud:
    config:
      enabled: false

#mybatis配置环境
mybatis:
  mapper-locations: classpath:mapping/*Mapper.xml
  type-aliases-package: com.chen.entity

#显示sql
logging:
  level:
    com:
      chen:
        dao : debug
eureka:
  client: #客户端注册进eureka服务类表中
    service-url:
        defaultZone: http://localhost:7001/eureka
  instance:
    instance-id: springcloud-user8081 #改变instance的名称
    prefer-ip-address: true #访问路径可以显示IP地址


info:
  app.name: spring-cloud
  company.name: www.baidu.com
  build.artifactId: ${project.artifactId}
  build.version: ${project.version}
好了,和刚才一样,接下来又到了启动类了,启动类我们需要添加注解@EnableEurekaClient,代码如下:
package com.chen;

import org.springframework.boot.SpringApplication;
import org.springframework.boot.autoconfigure.SpringBootApplication;
import org.springframework.cloud.netflix.eureka.EnableEurekaClient;

@SpringBootApplication
@EnableEurekaClient //本服务启动后会自动注册进eureka服务中
public class UserProvider_8081 {

    public static void main(String[] args){
        SpringApplication.run(UserProvider_8081.class,args);
    }

}
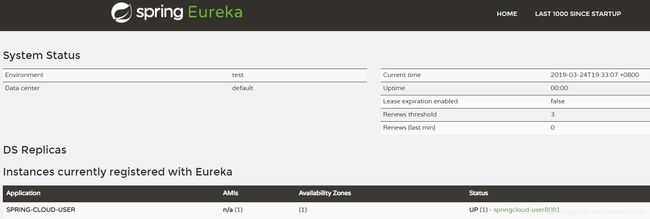
到这儿我们就要进行测试了,我们先运行spring-cloud-eureka的启动类,然后再运行spring-cloud-provider的启动类,运行后截图如下:
我们可以发现,此时因为加入了客户端,所以Application显示了我们添加的spring-cloud-user服务,我们点击后面的status链接,运行结果如下:
这边链接出现以上内容,是因为我们在application.yml添加了info配置,以及在pom.xml中添加了actuator的依赖,好了,接下来我们进一步的完善Eureka的发现机制。我们在controller里面注入DiscoveryClient,并写一个函数测试,完整代码如下:
package com.chen.controller;

import com.chen.entity.User;
import com.chen.service.UserService;
import org.springframework.beans.factory.annotation.Autowired;
import org.springframework.cloud.client.ServiceInstance;
import org.springframework.cloud.client.discovery.DiscoveryClient;
import org.springframework.web.bind.annotation.GetMapping;
import org.springframework.web.bind.annotation.PathVariable;
import org.springframework.web.bind.annotation.RestController;

import java.util.List;

/**
 * @Author:autumn_leaf
 * @Date:2019/03/19
 * 提供者控制类
 */
@RestController
public class UserController {

    @Autowired
    private UserService userService;

    @Autowired
    private DiscoveryClient client;

    @GetMapping("/user/{id}")
    public User findById(@PathVariable("id") int id){
        return userService.findById(id);
    }

    @GetMapping("/user/list")
    public List findAll(){
        return userService.findAll();
    }

    @GetMapping("/user/discovery")
    public Object discovery(){
        List list = client.getServices();
        System.out.println("********"+list);
        List srvList = client.getInstances("spring-cloud-user");
        for(ServiceInstance element : srvList){
            System.out.println(element.getServiceId()+"\t"+element.getHost()+"\t"+element.getPort()+"\t"+element.getUri());
        }
        return this.client;
    }

}
相似的,在启动类中我们也要添加@EnableDiscoveryClient的注解,完整代码如下:
package com.chen;

import org.springframework.boot.SpringApplication;
import org.springframework.boot.autoconfigure.SpringBootApplication;
import org.springframework.cloud.client.discovery.EnableDiscoveryClient;
import org.springframework.cloud.netflix.eureka.EnableEurekaClient;

@SpringBootApplication
@EnableEurekaClient //本服务启动后会自动注册进eureka服务中
@EnableDiscoveryClient //服务发现
public class UserProvider_8081 {

    public static void main(String[] args){
        SpringApplication.run(UserProvider_8081.class,args);
    }

}
好了,到这儿已经快结束了,我们依然是先运行7001的Eureka服务端口,然后再运行客户端口8081,运行截图如下:
我们得到了当前的IP地址以及应用服务的端口信息,到这儿Eureka的基础也就讲解结束了,接下来我会继续更新Spring Cloud的新知识,敬请期待!


