eureka--注册中心
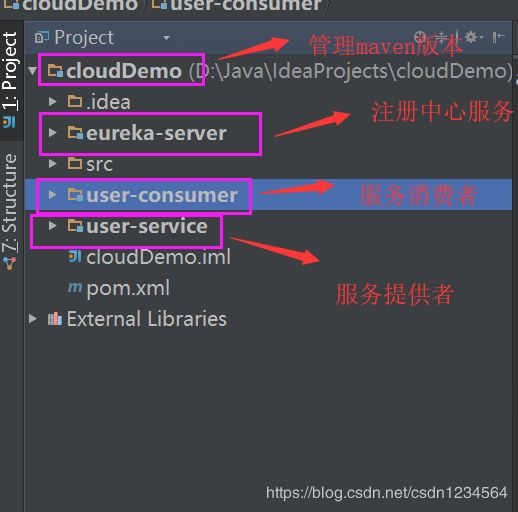
项目结构:
创建maven聚合工程,分别新建module, 注册中心:eureka-server 、服务提供者:user-service 、服务消费者:user-consumer
1、eureka使用步骤:
1.1、注册中心
1.1.1、在注册中心eureka-server项目中添加spring-cloud-starter-netflix-eureka-server依赖
            org.springframework.cloud
            spring-cloud-starter-netflix-eureka-server
1.1.2、在application.yml中添加相关配置
server:
  port: 8082
spring:
  application:
    name: eureka-service
eureka:
  client:
    service-url:
      defaultZone: http://localhost:8082/eureka
    #不注册自身
register-with-eureka: false1.1.3、在启动类中添加@EnableDiscoveryClient或者@EnableEurekaServer
package com.example;

import org.springframework.boot.SpringApplication;
import org.springframework.boot.autoconfigure.SpringBootApplication;
import org.springframework.cloud.netflix.eureka.server.EnableEurekaServer;

/**
 * Created by 91062 on 2019/5/10.
 */
@EnableEurekaServer
@SpringBootApplication
public class EurekaServer {
    public static void main(String[] args) {
        SpringApplication.run(EurekaServer.class);
    }
}@EnableDiscoveryClient:还可以支持其他注册中心服务
@EnableEurekaServer:只能支持eureka注册中心
1.2、服务提供者
1.2.1、在user-service项目中添加spring-cloud-starter-netflix-eureka-client依赖
            org.springframework.cloud
            spring-cloud-starter-netflix-eureka-client
1.2.2、在application.yml中添加相关配置
server:
  port: 8081

spring:
  application:
  #服务名称
    name: user-service
  #数据源相关配置
  datasource:
    driverClassName: com.mysql.jdbc.Driver
    url: jdbc:mysql://192.168.158.133:3306/travel
    username: root
    password: mysql123
#mybatis别名配置
mybatis:
  type-aliases-package: com.example.domain

#eureka注册中心url
eureka:
  client:
    service-url:
      defaultZone: http://192.168.158.3:8082/eureka
1.2.3、在启动类中添加@EnableEurekaClient
@EnableEurekaClient
@SpringBootApplication
@MapperScan(basePackages = "com.example.mapper")
public class UserApplication {
    public static void main(String[] args) {
        SpringApplication.run(UserApplication.class);
    }

}
1.3、服务消费者
1.3.1、在user-consumer项目中添加spring-cloud-starter-netflix-eureka-client
            org.springframework.cloud
            spring-cloud-starter-netflix-eureka-client
1.3.2、在application.yml文件中配置
server:
  port: 8080

spring:
  application:
    name: consumer-server

eureka:
  client:
    service-url:
      defaultZone: http://192.168.158.3:8082/eureka
1.3.3、在启动类中添加
@EnableEurekaClient
@SpringBootApplication
public class UserApplication {
    public static void main(String[] args) {
        SpringApplication.run(UserApplication.class);
    }

    @Bean
    public RestTemplate restTemplate(){
        return new RestTemplate();
    }

}
1.3.4、服务消费者需要远程调用服务提供者提供的相关服务(在controller类中实现相关调用)
@RestController
@RequestMapping("/user")
public class UserController {
@Autowired
private RestTemplate restTemplate;
@GetMapping("{id}")
public User getUser(@PathVariable("id") String id){
String url = "http://192.168.158.3:8081/user/" + id;
return restTemplate.getForObject(url,User.class);
}
}
注意:上述代码使用restTemplate进行远程调用,但是URL是写死的,这样的硬编码导致代码不灵活,且不优雅。
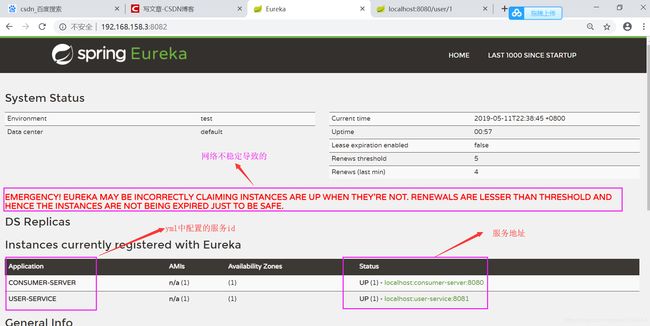
2、三个项目启动后效果图:
打开http://192.168.158.3:8082/查看注册中心详情页面
3、总结:
配置eureka基本分为三步:
一、添加相关依赖,eureka服务添加 ***server依赖,服务提供/调用者添加 ***client 依赖
二、在application.yml文件中配置
三、在启动类上添加相关注解,eureka服务添加 @EnableEurekaServer,服务提供/调用者添加@EnableDiscoveryClient
另外在服务调用者的controller类中添加调用代码

