SpringCloud实践(二) 微服务核心组件Eureka
本节进入SpringCoud的核心组件Eureka的学习实践。
Spring Cloud Eureka是Spring Cloud Netflix 微服务套件中的一部分,基于Netflix Eureka做了二次封装,主要是负责完成微服务中服务治理功能。本节主要是通过实践来学习以下二点:
构建微服务注册中心
服务注册和服务发现demo
在下一节,将学高可用的服务注册以及原理
服务治理中最核心的就是服务注册和服务发现。在微服务的框架中,一般会有一个注册中心(注册中心也可以是集群,以防止注册中心崩溃,微服务的核心就是去中心化),每个服务想注册中心登记自己的服务,通过主机、端口、通信协议等信息通知注册中心,服务注册中心通过心跳的方式去监测清单中的服务是否可用,如果不可用则从服务清单中剔除。
服务发现:服务调用不再通过具体的实例地址来调用,而是通过服务名发起请求,由注册中心依据配置的服务发现策略,如轮换、负载均衡等进行服务调用,实际框架为了性能等因素,不会每次都想注册中心获取服务的方式,会有一些实现策略来处理。
一、实践环境说明
1、IDEA环境
2、jdk 1.7
3、目标:构建1个注册中心,发布相同的2个服务,1个消费者。用户通过消费者来分别调用相同的2个服务。
二、搭建服务注册中心
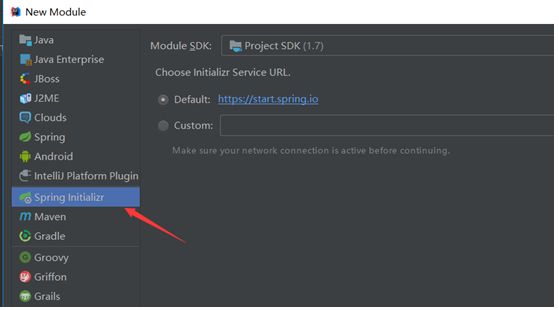
1、创建注册中,创建一个Spring Boot工程,与上节内容类似,取名为SpringCloudEurekaServer,
接着跟着向导进行如下设置
一路继续后完成,这个时候会自动下载springcloud依赖
在pom.xml 中引入必要的依赖:
	4.0.0

	com.study
	springcloud
	0.0.1-SNAPSHOT
	jar

	springcloud
	Demo project for Spring Boot


		org.springframework.boot
		spring-boot-starter-parent
		2.0.0.RELEASE


		UTF-8
		UTF-8
		1.8
		Finchley.M8


			org.springframework.boot
			spring-boot-starter-web


			org.springframework.cloud
			spring-cloud-starter-netflix-eureka-server


			org.springframework.boot
			spring-boot-starter-test
			test


				org.springframework.cloud
				spring-cloud-dependencies
				${spring-cloud.version}
				pom
				import


				org.springframework.boot
				spring-boot-maven-plugin


			spring-milestones
			Spring Milestones
			https://repo.spring.io/milestone

				false
2、添加EurekaServer启动入口
在创建的工程中,找到SpringcloudApplication.java,加入注解@EnableEurekaServer,以确保启动这个应用的时候,启动服务注册中心服务:
package com.study.springcloud;

import org.springframework.boot.SpringApplication;
import org.springframework.boot.autoconfigure.SpringBootApplication;
import org.springframework.cloud.netflix.eureka.server.EnableEurekaServer;

@EnableEurekaServer
@SpringBootApplication
public class SpringcloudApplication {

	public static void main(String[] args) {
		SpringApplication.run(SpringcloudApplication.class, args);

	}
}
3、修改应用的配置文件:application.properties
server.port=11111

spring.application.name=Sping-Boot-Admin-Web
eureka.instance.hostname=localhost
#true表示将自己注册为一个服务,否则是启动了一个注册中心
eureka.client.register-with-eureka=false
eureka.client.fetch-registry=false
eureka.client.service-url.defaultZone=http://${eureka.instance.hostname}:${server.port}/eureka/ 4、启动注册中心
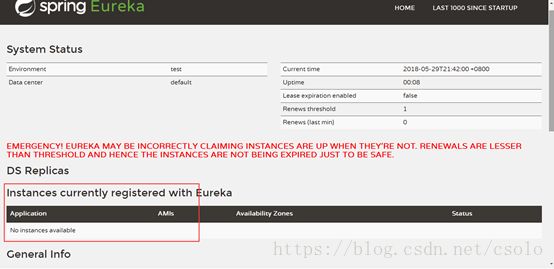
将工程启动起来后,通过下面URL访问: http://localhost:11111/
这里可以看到,当前的注册服务还全是空白。
三、创建一个服务
下面我们将创建一个服务应用,并向注册中心进行注册。
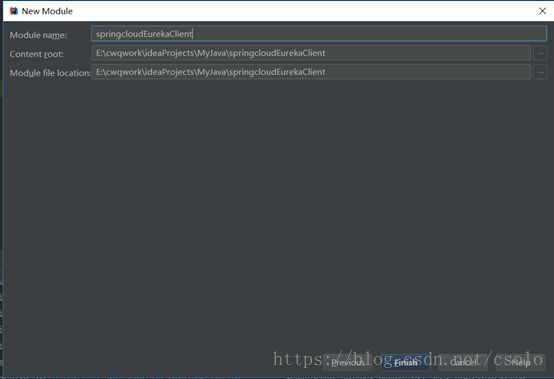
创建一个新Module,创建的过程与上面类似,在设置工程名称时,我们用 springcloudEurekaClient 来标识
工程结构也很简单,都是创建后自带的:
接着,我们编写一个服务,这个服务是一个REST风格的接口,还是用helloworld来做接口吧:
package com.study.springcloud;


import org.springframework.beans.factory.annotation.Autowired;
import org.springframework.beans.factory.annotation.Value;
import org.springframework.boot.SpringApplication;
import org.springframework.boot.autoconfigure.SpringBootApplication;
import org.springframework.cloud.client.ServiceInstance;
import org.springframework.cloud.client.discovery.DiscoveryClient;
import org.springframework.cloud.netflix.eureka.EnableEurekaClient;
import org.springframework.web.bind.annotation.RequestMapping;
import org.springframework.web.bind.annotation.RestController;

import java.util.List;

@SpringBootApplication
@RestController
@EnableEurekaClient
public class SpringcloudApplication {

	@Autowired
	private DiscoveryClient discoveryClient;

	@Value("${server.port}")
	String port;


	@RequestMapping("/hello")
	String sayHello() {

		return "Hello World!" + "I am calling from "+"port:"+port;
	}

	@RequestMapping("/getRegistered")
	public String getRegistered(){
		String rst="";
		List list = discoveryClient.getInstances("STORES");
		System.out.println( "discoveryClient.getInstances().size()=" + list.size());
		if (list != null && list.size() > 0 ) {
			System.out.println( list.get(0).getUri()  );
		}

		for( String s :  discoveryClient.getServices()){
			System.out.println("services " + s);
			List serviceInstances =  discoveryClient.getInstances(s);
			for(ServiceInstance si : serviceInstances){

				rst=rst + "    services:" + s + ":getHost()=" + si.getHost()+":getPort()=" + si.getPort()+":getServiceId()=" + si.getServiceId()   ;
				System.out.println("    services:" + s + ":getHost()=" + si.getHost());
				System.out.println("    services:" + s + ":getPort()=" + si.getPort());
				System.out.println("    services:" + s + ":getServiceId()=" + si.getServiceId());
				System.out.println("    services:" + s + ":getUri()=" + si.getUri());
				System.out.println("    services:" + s + ":getMetadata()=" + si.getMetadata());
			}

		}


		return rst;
	}


	//这是一个注册客户端,向注册中心进行注册一个服务
	public static void main(String[] args) {
		SpringApplication.run(SpringcloudApplication.class, args);
	}
}
@RestController 和@EnableEurekaClient 注解,来引入这个应用是EurekaClient和Rest风格的接口,其他的注解也很容易懂,基本就是: 自动装配一个DiscoveryClient对象,对两个方法,sayHello和getRegistered 标注为请求映射。
比较重要的是看一下配置文件:application.properties
server.port=31111

eureka.instance.hostname=localhost
eureka.client.service-url.defaultZone=http://${eureka.instance.hostname}:11111/eureka/
# 重点需要注意spring.application.name,这个是在以后服务与服务之间相互调用是根据这个name
spring.application.name=service-sayHello
第一个端口 31111,标识这个服务是 localhost 的31111端口,
eureka.client.service-url.defaultZone=http://${eureka.instance.hostname}:11111/eureka/ 表示注册中心为本机的11111端口
spring.application.name=service-sayHello 表示注册的服务为 service-sayHello 前面说过,微服务架构里面,发现服务是通过服务名来发现。
下面启动这个服务,在看看注册中心:
上面看到一个服务, service-sayhello 已经启动,并且绑定的端口是31111。 我们可以再注册一个同样的服务 绑定端口是21111,修改一下配置文件,再启动一次,这下看到 http://localhost:11111/ 已经注册了两个服务:
由于服务名都是 service-sayhello,所以Availability Zones里面体现有2个服务,Status 列出了对应的端口。
好了现在我们拥有了一个注册中心,相同服务名的2个应用也注册成功了,下一步,我们就是要创建服务的消费者来看如何调用服务。
四、服务消费者
服务消费者的工程也和前面类似,在输入Module名称的时候,输入 springcloudEurekaConsumer
下面,我们将创建一个http应用,这个应用输入URL,会调用到我们前面发布的2个服务。因为简单起见,我们将这个consuemr应用也注册为一个服务,只是这个服务是面向http调用。 用户---通过URL调用--consumer---调用服务SERVICE-SAYHELLO--
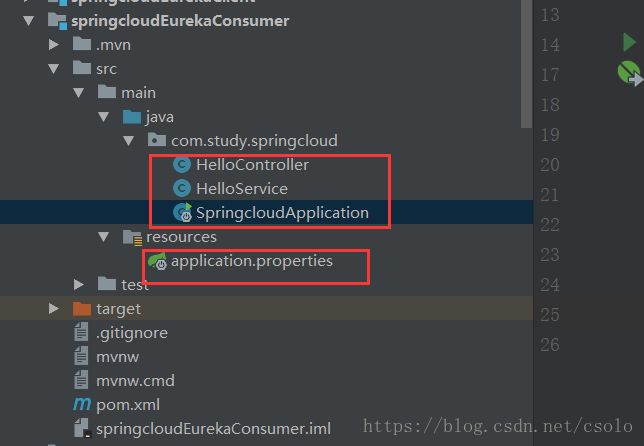
返回数据---consumer--返回给浏览器。工程如下图所示
HelloService.java 这个类是对外服务类,被controller 调用,被调用后将调用微服务 service-sayhello.
package com.study.springcloud;

import org.springframework.beans.factory.annotation.Autowired;
import org.springframework.stereotype.Service;
import org.springframework.web.client.RestTemplate;

@Service
public class HelloService {

    @Autowired
    private RestTemplate restTemplate;

    public String  sayHello(){
        String str= restTemplate.getForObject("http://SERVICE-SAYHELLO/hello", String.class);
        return str;

    }

    public String  getRegistered(){
        String str= restTemplate.getForObject("http://SERVICE-SAYHELLO/getRegistered", String.class);
        return str;

    }
}
HelloController.java 这个类捕捉http请求,并调用HelloService的接口
package com.study.springcloud;

import org.springframework.beans.factory.annotation.Autowired;
import org.springframework.web.bind.annotation.RequestMapping;
import org.springframework.web.bind.annotation.RestController;

@RestController
public class HelloController {
    @Autowired
    private  HelloService helloService;

    @RequestMapping("/hi")
    public  String hello(){
        String str=  helloService.sayHello();
        System.out.println("call  hello service:"+str);
        return str;

    }

    @RequestMapping("/getRegistered")
    public  String getRegistered(){
        String str=  helloService.getRegistered();
        System.out.println("call  hello service:"+str);
        return str;

    }

}
当然,上面例子中,我们也可以不要HelloService,直接在helloController中自动装配RestTemplate。
SpringcloudApplication.java 这个类负责启动当前consumer服务,通过RestTemplate的Spring Bean实例,并通过@LoadBalanced标识来开启客户端负载均衡
package com.study.springcloud;

import org.springframework.boot.SpringApplication;
import org.springframework.boot.autoconfigure.SpringBootApplication;
import org.springframework.cloud.client.discovery.EnableDiscoveryClient;
import org.springframework.cloud.client.loadbalancer.LoadBalanced;
import org.springframework.context.annotation.Bean;
import org.springframework.web.client.RestTemplate;

@SpringBootApplication
@EnableDiscoveryClient  //向服务中心注册
public class SpringcloudApplication {

	public static void main(String[] args) {
		SpringApplication.run(SpringcloudApplication.class, args);
	}
	@Bean
	@LoadBalanced //表示下列方法开启负载均衡
	RestTemplate  restApiHello(){
		return new RestTemplate ();
	}

}
配置文件如下:
server.port=31311

eureka.client.service-url.defaultZone=http://localhost:11111/eureka/
# 重点需要注意spring.application.name,这个是在以后服务与服务之间相互调用是根据这个name
spring.application.name=service-consumer
还有需要注意的是,因为用了负载均衡,在pom.xml中应该要引入ribbon组件:
	4.0.0

	com.study
	springcloud
	0.0.1-SNAPSHOT
	jar

	springcloud
	Demo project for Spring Boot


		org.springframework.boot
		spring-boot-starter-parent
		2.0.1.RELEASE


		UTF-8
		UTF-8
		1.8
		Finchley.M9


			org.springframework.cloud
			spring-cloud-starter-netflix-eureka-server


			org.springframework.boot
			spring-boot-starter-test
			test


			org.springframework.boot
			spring-boot-starter-web


			org.springframework.cloud
			spring-cloud-starter-ribbon


				org.springframework.cloud
				spring-cloud-dependencies
				${spring-cloud.version}
				pom
				import


				org.springframework.boot
				spring-boot-maven-plugin


			spring-milestones
			Spring Milestones
			https://repo.spring.io/milestone

				false
这个时候,我们调用consumer的http接口, http://localhost:31311/hi,会发现,由于采用了负载均衡方式,每次刷新,浏览器答应的端口都在变化,21111或者31111,说明每次调用的服务是不同的。同样,也可用通过http://localhost:31311/getRegistered来调用提供的另外一个接口,下图为调用http://localhost:31311/hi返回的情况:


