一、前言
进行业务开发时,推荐使用Docker形式来进行部署,请参见【猪齿鱼_01_环境搭建(二)_微服务支撑组件部署(Docker形式)】
这一节我们来部署下猪齿鱼微服务的支撑组件。
二、环境准备
需要准备如下程序:
Git
JDK 1.8.0 及以上
maven 3.3 及以上
Docker for Windows
IDEA
1.Docker for Windows的安装
1.1 注意事项
- dokcer for windows 的下载需要能科学上网
- dokcer for windows 的安装需要确保系统是win10专业版、教育版。
1.2下载地址
docker for windows
1.3安装
执行可执行文件,一路默认安装即可。
安装dokcer的过程中,可能会重启2次电脑。
启动Docker,然后会提示启用Hyper-V需要重启。
1.4 验证
打开 git bash ,执行如下命令,会显示dokcer的版本号
docker -v
三、下载源码
1.下载源码
前往 git hub 下载对应版本的源码
| 序号 | 项目名 | 正式版本 | 描述 |
|---|---|---|---|
| 1 | choerodon-starters | 0.6.0 | 提供自动化配置 |
| 2 | eureka-server | 0.8.0 | 注册中心,也可用register server |
| 3 | config-server | 0.9.0 | 配置中心 |
| 4 | manager service | 0.9.0 | 管理服务 |
| 5 | asgard service | 0.9.0 | 分布式事务,数据最终一致性 |
| 6 | iam service | 0.9.0 | IAM服务 |
| 7 | api gateway | 0.9.0 | 网关服务 |
| 8 | gateway helper | 0.9.0 | 网关helper |
| 9 | oauth server | 0.9.0 | 认证服务 |
这里各项目的版本信息来自官方文档:
Choerodon服务列表
2.目录结构
建议的目录结构如下: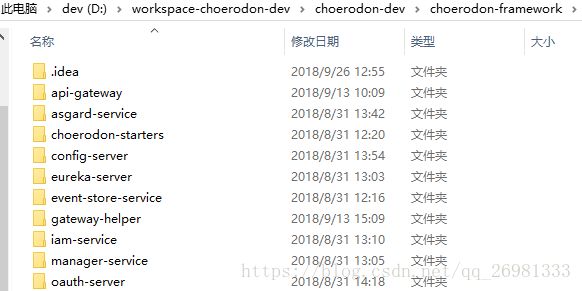
3.导入到idea中
(1)去掉版本号
参考2中建议的目录结构,下载源码之后解压,去掉解压后文件夹的版本号。如下图,需要将eureka-server-0.8.0 改为eureka-server。
(2)导入Idea中
然后在idea中依次选择 file -> open -> choerodon-framwork,即可将项目导入到idea中。
四、编译项目
1.导入maven项目
在上一步,将上述下载好的项目导入到Idea中之后,Maven还没有发现它。得将其导入进来才行。
点击下图中Add Maven Projects,然后选择对应项目的pom.xml,即可导入进来。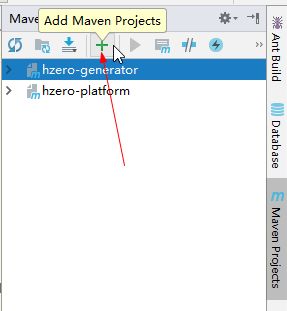
2.choerodon-starters
完成了上一步之后,会发现项目依赖会飘红,不用担心,下面,我们将一步一步来解决他们。
由于其他项目依赖了choerodon-starters,因此需要将choerodon-starters安装到本地maven仓库。
打开git bash命令行,切换到choerodon-starters项目根目录,执行如下命令:
mvn clean install
2.InitRoleCode
在InitRoleCode类中缺少开发者角色,而其他很多类中使用到了开发者角色,导致报错。而由于数据库中,也没有开发者角色,因此,我们直接在这个类中定义一个开发者角色,并指向管理员角色。(这是个骚操作,后面需要改成正确的)
在类中增加如下代码:
  /**
     * 全局层开发者
     */
    public static final String SITE_DEVELOPER = "role/site/default/administrator";
    public static String[] values () {
        return new String[] {
                SITE_ADMINISTRATOR,
                SITE_DEVELOPER,
                ORGANIZATION_ADMINISTRATOR,
                PROJECT_ADMINISTRATOR,
                DEPLOY_ADMINISTRATOR,
                PROJECT_MEMBER,
                PROJECT_OWNER
        };
    }
五、启动docker镜像
1.docker-compose.yaml
# docker-compose.yaml
version: "3"
services:
  zookeeper-0:
    container_name: zookeeper-0
    image: registry.cn-hangzhou.aliyuncs.com/choerodon-tools/zookeeper:3.4.10
    hostname: zookeeper-0
    environment:
    - ZK_REPLICAS=1
    - ZK_HEAP_SIZE=2G
    - ZK_TICK_TIME=2000
    - ZK_INIT_LIMIT=10
    - ZK_SYNC_LIMIT=5
    - ZK_MAX_CLIENT_CNXNS=60
    - ZK_SNAP_RETAIN_COUNT=3
    - ZK_PURGE_INTERVAL=1
    - ZK_LOG_LEVEL=INFO
    - ZK_CLIENT_PORT=2181
    - ZK_SERVER_PORT=2888
    - ZK_ELECTION_PORT=3888
    ports:
    - "2181:2181"
    - "2888:2888"
    - "3888:3888"
    command:
    - sh
    - -c
    - zkGenConfig.sh && exec zkServer.sh start-foreground
    volumes:
    - "./kafka/zk:/var/lib/zookeeper"
  kafka-0:
    container_name: kafka-0
    image: registry.cn-hangzhou.aliyuncs.com/choerodon-tools/kafka:1.0.0
    hostname: 127.0.0.1
    depends_on:
    - zookeeper-0
    links:
    - zookeeper-0
    ports:
      - "9092:9092"
    command:
    - sh
    - -c
    - "/opt/kafka/bin/kafka-server-start.sh config/server.properties \
           --override zookeeper.connect=zookeeper-0:2181 \
           --override log.dirs=/opt/kafka/data/logs \
           --override broker.id=0 "
    volumes:
    - "./kafka/kafka:/opt/kafka/data"
  mysql:
    container_name: mysql
    hostname: mysql
    image: registry.cn-hangzhou.aliyuncs.com/choerodon-tools/mysql:5.7.17
    ports:
    - "3306:3306"
    environment:
      MYSQL_ROOT_PASSWORD: root
    volumes:
    - ./mysql/mysql_data:/var/lib/mysql
    - ./mysql/mysql_db.cnf:/etc/mysql/conf.d/mysql_db.cnf
2.启动镜像
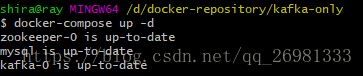
在 docker-compose.yaml 所在目录,打开 git bash 执行如下命令:
docker-compose up -d
注意:
(1)为确保三个镜像都已启动,可以重复执行如上命令,直至出现下图所示日志:(2)若是镜像无法启动,可以尝试重启docker.然后执行如上操作。
(3)如果还是不行,则需要删除掉docker中原有的镜像,再执行如上操作
3.相关命令
3.1 查看容器中正在运行的镜像
docker ps 或docker-compose ps
3.1 停止镜像
docker-compose down
六、数据库准备
1.root登录数据库
以root用户登录到docker容器中正在运行的数据库中
docker exec -ti mysql mysql -u root -p
root用户的密码为 root
2.创建数据库并授权
在mysql命令行,执行以下命令,来创建用户、数据库,并进行数据库授权
CREATE USER IF NOT EXISTS 'choerodon'@'%' IDENTIFIED BY "123456";
CREATE DATABASE IF NOT EXISTS iam_service DEFAULT CHARACTER SET utf8;
CREATE DATABASE IF NOT EXISTS manager_service DEFAULT CHARACTER SET utf8;
CREATE DATABASE IF NOT EXISTS asgard_service DEFAULT CHARACTER SET utf8;
CREATE DATABASE IF NOT EXISTS notify_service DEFAULT CHARACTER SET utf8;
GRANT ALL PRIVILEGES ON iam_service.* TO choerodon@'%';
GRANT ALL PRIVILEGES ON manager_service.* TO choerodon@'%';
GRANT ALL PRIVILEGES ON asgard_service.* TO choerodon@'%';
GRANT ALL PRIVILEGES ON notify_service.* TO choerodon@'%';
FLUSH PRIVILEGES;
3.数据库数据导入
3.1 数据库建表和数据
3.2 数据导入
将iam_service、manager_service数据导入 2 中创建的数据库中。
- 在对应数据库上右键
- 选择 “运行SQL文件”
- 选择 3.1中导出的SQL文件,点击开始,即可
3.3 asgard-service数据库准备
(1) 确保 asgard-service 项目根目录下
init-local-database.sh脚本文件内容为
#!/usr/bin/env bash
mkdir -p choerodon_temp
if [ ! -f choerodon_temp/choerodon-tool-liquibase.jar ]
then
    curl http://nexus.choerodon.com.cn/repository/choerodon-release/io/choerodon/choerodon-tool-liquibase/0.5.2.RELEASE/choerodon-tool-liquibase-0.5.2.RELEASE.jar -L  -o choerodon_temp/choerodon-tool-liquibase.jar
fi
java -Dspring.datasource.url="jdbc:mysql://localhost/asgard_service?useUnicode=true&characterEncoding=utf-8&useSSL=false" \
 -Dspring.datasource.username=root \
 -Dspring.datasource.password=root \
 -Ddata.drop=false -Ddata.init=true \
 -Ddata.dir=src/main/resources \
 -jar choerodon_temp/choerodon-tool-liquibase.jar
(2)打开
git bash,切换到 asgard-service 项目根目录,执行如下命令:
sh ./init-local-database.sh
七、启动服务
1.启动docker镜像
需要确保docker镜像已经全部启动,参考第五小节 五、启动docker镜像
2.按顺序启动服务
将每个服务中的数据库连接信息改成正确的
需要按顺序启动如下服务,请确保一个服务启动成功之后,再启动下一个服务。
2.1 注册中心
启动 eureka-server ( 或者是 register server)。
(1)点击
Edit Configurations ...

(2)点击“+”,选择Spring boot

(3)填写相关信息,点击 apply ,然后OK即可
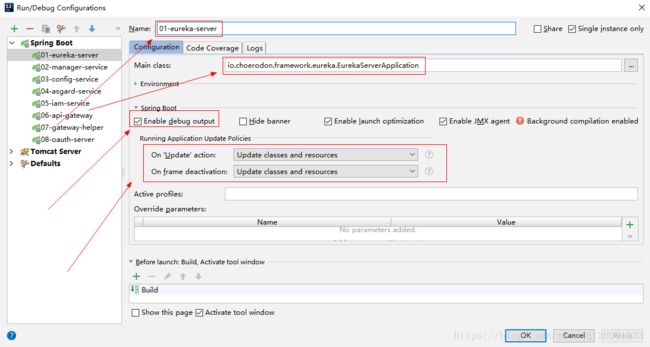
(3)点击debug按钮,启动 eureka

(3)验证。
访问网址 http://localhost:8000/,出现下图,说明注册中心成功启动。

2.2 manager service
启动步骤同 2.1,启动成功后效果如下图。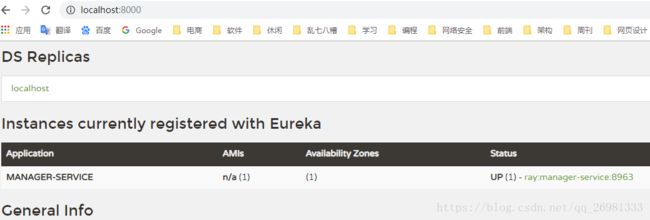
2.3 config server
启动步骤同 2.1 ,启动成功后效果如下图。
2.4 asgard service
启动步骤同上
2.5 iam service
启动步骤同上
2.6 api gateway
启动步骤同上
2.7 gateway helper
启动步骤同上
2.8 oauth server
启动步骤同上
八、启动成功效果
1.注册中心
将以上8个服务运行起来之后,打开如下网址,会发现服务列表中有七个服务。
http://localhost:8000/

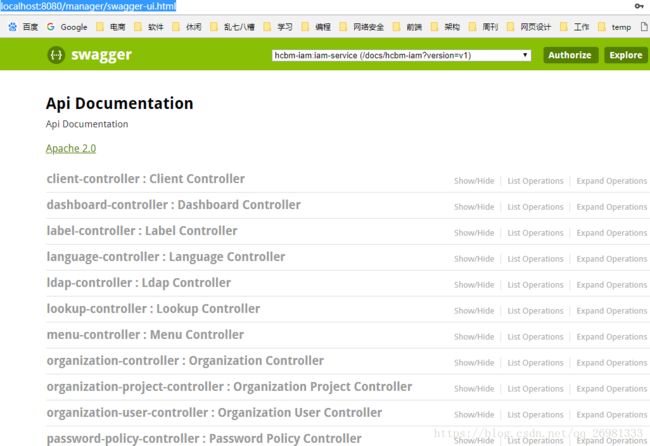
2.API接口列表
打开如下网址进行登录,登录账号密码为:admin/admin
http://localhost:8020/oauth
将跳转到如下页面,在此页面中会显示可用的API列表
http://localhost:8080/manager/swagger-ui.html
九、常见异常
1.root密码无效
1.1 异常信息
ERROR 1045 (28000): Access denied for user 'root'@'localhost' (using password: YES)

1.2 异常解决
直接将docker恢复出厂设置,然后重新执行上述操作即可。
2.kafka连接超时
2.1 异常信息
启动config server时,出现kafka连接超时异常。异常信息如下:
org.springframework.context.ApplicationContextException: Failed to start bean 'outputBindingLifecycle'; nested exception is org.springframework.cloud.stream.binder.BinderException: Cannot initialize binder:
    at org.springframework.context.support.DefaultLifecycleProcessor.doStart(DefaultLifecycleProcessor.java:176) ~[spring-context-4.3.18.RELEASE.jar:4.3.18.RELEASE]
    at org.springframework.context.support.DefaultLifecycleProcessor.access$200(DefaultLifecycleProcessor.java:50) ~[spring-context-4.3.18.RELEASE.jar:4.3.18.RELEASE]
    at org.springframework.context.support.DefaultLifecycleProcessor$LifecycleGroup.start(DefaultLifecycleProcessor.java:346) ~[spring-context-4.3.18.RELEASE.jar:4.3.18.RELEASE]
    at org.springframework.context.support.DefaultLifecycleProcessor.startBeans(DefaultLifecycleProcessor.java:149) ~[spring-context-4.3.18.RELEASE.jar:4.3.18.RELEASE]
    at org.springframework.context.support.DefaultLifecycleProcessor.onRefresh(DefaultLifecycleProcessor.java:112) ~[spring-context-4.3.18.RELEASE.jar:4.3.18.RELEASE]
    at org.springframework.context.support.AbstractApplicationContext.finishRefresh(AbstractApplicationContext.java:880) ~[spring-context-4.3.18.RELEASE.jar:4.3.18.RELEASE]
    at org.springframework.boot.context.embedded.EmbeddedWebApplicationContext.finishRefresh(EmbeddedWebApplicationContext.java:144) ~[spring-boot-1.5.14.RELEASE.jar:1.5.14.RELEASE]
    at org.springframework.context.support.AbstractApplicationContext.refresh(AbstractApplicationContext.java:546) ~[spring-context-4.3.18.RELEASE.jar:4.3.18.RELEASE]
    at org.springframework.boot.context.embedded.EmbeddedWebApplicationContext.refresh(EmbeddedWebApplicationContext.java:122) ~[spring-boot-1.5.14.RELEASE.jar:1.5.14.RELEASE]
    at org.springframework.boot.SpringApplication.refresh(SpringApplication.java:693) [spring-boot-1.5.14.RELEASE.jar:1.5.14.RELEASE]
    at org.springframework.boot.SpringApplication.refreshContext(SpringApplication.java:360) [spring-boot-1.5.14.RELEASE.jar:1.5.14.RELEASE]
    at org.springframework.boot.SpringApplication.run(SpringApplication.java:303) [spring-boot-1.5.14.RELEASE.jar:1.5.14.RELEASE]
    at org.springframework.boot.SpringApplication.run(SpringApplication.java:1118) [spring-boot-1.5.14.RELEASE.jar:1.5.14.RELEASE]
    at org.springframework.boot.SpringApplication.run(SpringApplication.java:1107) [spring-boot-1.5.14.RELEASE.jar:1.5.14.RELEASE]
    at io.choerodon.gateway.helper.GatewayHelperApplication.main(GatewayHelperApplication.java:30) [classes/:na]
Caused by: org.springframework.cloud.stream.binder.BinderException: Cannot initialize binder:
    at org.springframework.cloud.stream.binder.kafka.provisioning.KafkaTopicProvisioner.getPartitionsForTopic(KafkaTopicProvisioner.java:271) ~[spring-cloud-stream-binder-kafka-core-1.2.1.RELEASE.jar:1.2.1.RELEASE]
    at org.springframework.cloud.stream.binder.kafka.KafkaMessageChannelBinder.createProducerMessageHandler(KafkaMessageChannelBinder.java:149) ~[spring-cloud-stream-binder-kafka-1.2.1.RELEASE.jar:1.2.1.RELEASE]
    at org.springframework.cloud.stream.binder.kafka.KafkaMessageChannelBinder.createProducerMessageHandler(KafkaMessageChannelBinder.java:88) ~[spring-cloud-stream-binder-kafka-1.2.1.RELEASE.jar:1.2.1.RELEASE]
    at org.springframework.cloud.stream.binder.AbstractMessageChannelBinder.doBindProducer(AbstractMessageChannelBinder.java:112) ~[spring-cloud-stream-1.2.2.RELEASE.jar:1.2.2.RELEASE]
    at org.springframework.cloud.stream.binder.AbstractMessageChannelBinder.doBindProducer(AbstractMessageChannelBinder.java:57) ~[spring-cloud-stream-1.2.2.RELEASE.jar:1.2.2.RELEASE]
    at org.springframework.cloud.stream.binder.AbstractBinder.bindProducer(AbstractBinder.java:152) ~[spring-cloud-stream-1.2.2.RELEASE.jar:1.2.2.RELEASE]
    at org.springframework.cloud.stream.binding.BindingService.bindProducer(BindingService.java:124) ~[spring-cloud-stream-1.2.2.RELEASE.jar:1.2.2.RELEASE]
    at org.springframework.cloud.stream.binding.BindableProxyFactory.bindOutputs(BindableProxyFactory.java:238) ~[spring-cloud-stream-1.2.2.RELEASE.jar:1.2.2.RELEASE]
    at org.springframework.cloud.stream.binding.OutputBindingLifecycle.start(OutputBindingLifecycle.java:57) ~[spring-cloud-stream-1.2.2.RELEASE.jar:1.2.2.RELEASE]
    at org.springframework.context.support.DefaultLifecycleProcessor.doStart(DefaultLifecycleProcessor.java:173) ~[spring-context-4.3.18.RELEASE.jar:4.3.18.RELEASE]
    ... 14 common frames omitted
Caused by: org.apache.kafka.common.errors.TimeoutException: Failed to update metadata after 60000 ms.

Disconnected from the target VM, address: '127.0.0.1:59328', transport: 'socket'

Process finished with exit code -1
2.2 异常原因
kafka没启动
2.3 异常解决
重复执行docker-compose up -d , 确保kafka启动即可。
3. choerodon.default.redirect.url有误
3.1 异常信息
启动 0.9.0的oauth-server时,出现如下异常信息
2018-09-26 14:58:53.932 ERROR [oauth-server,,,] 1780 --- [           main] o.s.boot.SpringApplication               : Application startup failed

org.springframework.beans.factory.BeanCreationException: Error creating bean with name 'customAuthenticationSuccessHandler': Invocation of init method failed; nested exception is java.lang.IllegalArgumentException: defaultTarget must start with '/' or with 'http(s)'
	at org.springframework.beans.factory.annotation.InitDestroyAnnotationBeanPostProcessor.postProcessBeforeInitialization(InitDestroyAnnotationBeanPostProcessor.java:137) ~[spring-beans-4.3.18.RELEASE.jar:4.3.18.RELEASE]
	at org.springframework.beans.factory.support.AbstractAutowireCapableBeanFactory.applyBeanPostProcessorsBeforeInitialization(AbstractAutowireCapableBeanFactory.java:409) ~[spring-beans-4.3.18.RELEASE.jar:4.3.18.RELEASE]
	at org.springframework.beans.factory.support.AbstractAutowireCapableBeanFactory.initializeBean(AbstractAutowireCapableBeanFactory.java:1626) ~[spring-beans-4.3.18.RELEASE.jar:4.3.18.RELEASE]
	at org.springframework.beans.factory.support.AbstractAutowireCapableBeanFactory.doCreateBean(AbstractAutowireCapableBeanFactory.java:555) ~[spring-beans-4.3.18.RELEASE.jar:4.3.18.RELEASE]
	at org.springframework.beans.factory.support.AbstractAutowireCapableBeanFactory.createBean(AbstractAutowireCapableBeanFactory.java:483) ~[spring-beans-4.3.18.RELEASE.jar:4.3.18.RELEASE]
	at org.springframework.beans.factory.support.AbstractBeanFactory$1.getObject(AbstractBeanFactory.java:312) ~[spring-beans-4.3.18.RELEASE.jar:4.3.18.RELEASE]
	at org.springframework.beans.factory.support.DefaultSingletonBeanRegistry.getSingleton(DefaultSingletonBeanRegistry.java:230) ~[spring-beans-4.3.18.RELEASE.jar:4.3.18.RELEASE]
	at org.springframework.beans.factory.support.AbstractBeanFactory.doGetBean(AbstractBeanFactory.java:308) ~[spring-beans-4.3.18.RELEASE.jar:4.3.18.RELEASE]
	at org.springframework.beans.factory.support.AbstractBeanFactory.getBean(AbstractBeanFactory.java:197) ~[spring-beans-4.3.18.RELEASE.jar:4.3.18.RELEASE]
	at org.springframework.beans.factory.support.DefaultListableBeanFactory.preInstantiateSingletons(DefaultListableBeanFactory.java:761) ~[spring-beans-4.3.18.RELEASE.jar:4.3.18.RELEASE]
	at org.springframework.context.support.AbstractApplicationContext.finishBeanFactoryInitialization(AbstractApplicationContext.java:867) ~[spring-context-4.3.18.RELEASE.jar:4.3.18.RELEASE]
	at org.springframework.context.support.AbstractApplicationContext.refresh(AbstractApplicationContext.java:543) ~[spring-context-4.3.18.RELEASE.jar:4.3.18.RELEASE]
	at org.springframework.boot.context.embedded.EmbeddedWebApplicationContext.refresh(EmbeddedWebApplicationContext.java:122) ~[spring-boot-1.5.14.RELEASE.jar:1.5.14.RELEASE]
	at org.springframework.boot.SpringApplication.refresh(SpringApplication.java:693) [spring-boot-1.5.14.RELEASE.jar:1.5.14.RELEASE]
	at org.springframework.boot.SpringApplication.refreshContext(SpringApplication.java:360) [spring-boot-1.5.14.RELEASE.jar:1.5.14.RELEASE]
	at org.springframework.boot.SpringApplication.run(SpringApplication.java:303) [spring-boot-1.5.14.RELEASE.jar:1.5.14.RELEASE]
	at org.springframework.boot.SpringApplication.run(SpringApplication.java:1118) [spring-boot-1.5.14.RELEASE.jar:1.5.14.RELEASE]
	at org.springframework.boot.SpringApplication.run(SpringApplication.java:1107) [spring-boot-1.5.14.RELEASE.jar:1.5.14.RELEASE]
	at io.choerodon.oauth.OauthServerApplication.main(OauthServerApplication.java:30) [classes/:na]
Caused by: java.lang.IllegalArgumentException: defaultTarget must start with '/' or with 'http(s)'
	at org.springframework.util.Assert.isTrue(Assert.java:92) ~[spring-core-4.3.18.RELEASE.jar:4.3.18.RELEASE]
	at org.springframework.security.web.authentication.AbstractAuthenticationTargetUrlRequestHandler.setDefaultTargetUrl(AbstractAuthenticationTargetUrlRequestHandler.java:151) ~[spring-security-web-4.2.7.RELEASE.jar:4.2.7.RELEASE]
	at io.choerodon.oauth.infra.common.util.CustomAuthenticationSuccessHandler.init(CustomAuthenticationSuccessHandler.java:46) ~[classes/:na]
	at sun.reflect.NativeMethodAccessorImpl.invoke0(Native Method) ~[na:1.8.0_161]
	at sun.reflect.NativeMethodAccessorImpl.invoke(NativeMethodAccessorImpl.java:62) ~[na:1.8.0_161]
	at sun.reflect.DelegatingMethodAccessorImpl.invoke(DelegatingMethodAccessorImpl.java:43) ~[na:1.8.0_161]
	at java.lang.reflect.Method.invoke(Method.java:498) ~[na:1.8.0_161]
	at org.springframework.beans.factory.annotation.InitDestroyAnnotationBeanPostProcessor$LifecycleElement.invoke(InitDestroyAnnotationBeanPostProcessor.java:366) ~[spring-beans-4.3.18.RELEASE.jar:4.3.18.RELEASE]
	at org.springframework.beans.factory.annotation.InitDestroyAnnotationBeanPostProcessor$LifecycleMetadata.invokeInitMethods(InitDestroyAnnotationBeanPostProcessor.java:311) ~[spring-beans-4.3.18.RELEASE.jar:4.3.18.RELEASE]
	at org.springframework.beans.factory.annotation.InitDestroyAnnotationBeanPostProcessor.postProcessBeforeInitialization(InitDestroyAnnotationBeanPostProcessor.java:134) ~[spring-beans-4.3.18.RELEASE.jar:4.3.18.RELEASE]
	... 18 common frames omitted

Disconnected from the target VM, address: '127.0.0.1:56562', transport: 'socket'

Process finished with exit code 1
3.2 异常原因
配置文件中 choerodon.default.redirect.url 需要以"/"或者"http(s)"开头。错误的url如下:
  default:
    redirect:
      url: localhost:8080/manager/swagger-ui.html
3.3 异常解决
将配置文件中 choerodon.default.redirect.url 修改为下面的即可
  default:
    redirect:
      url: http://localhost:8080/manager/swagger-ui.html
八、参考资料
- 猪齿鱼官方文档
- 猪齿鱼GitHub
- 猪齿鱼后台登录
- 猪齿鱼视频
- HZero文档平台