最新版的树莓派4b今年6月末发布,目前只有官方的Raspbian-Buster系统支持,其他系统均只支持到树莓派3b+,这对于树莓派4b的玩家非常不方便,所以下面教大家如何修改配置文件,使得ubuntu也能够在树莓派4b上运行。
一、安装
本文用的是32G内存卡,安装ubuntu-18.04.3-preinstalled-server-armhf+raspi3系统,是32位系统,64位系统安装之后会有内存限制,所以目前还没有去安装。
从官方下载镜像:https://wiki.ubuntu.com/ARM/RaspberryPi
或者从这里下载: http://cdimage.ubuntu.com/releases/18.04/release/
从官方下载树莓派4b的Boot引导:https://github.com/raspberrypi/firmware/archive/master.zip
以上的文件都已经上传到百度网盘:
链接:https://pan.baidu.com/s/1N4qG6ZZNE18GFhYcaj85hA
提取码:x572
工具准备:
大于8G的内存卡
Win32DiskImager
ubuntu-18.04.3-preinstalled-server-armhf+raspi3.img
firmware-master.zip
首先把下载好的镜像用Win32DiskImager烧录到准备好的U盘里面,用其它烧录软件都可以。
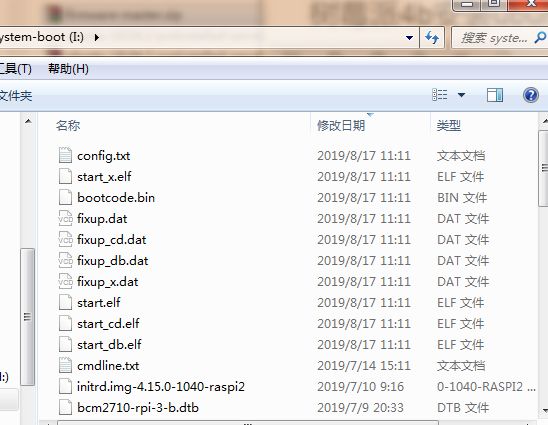
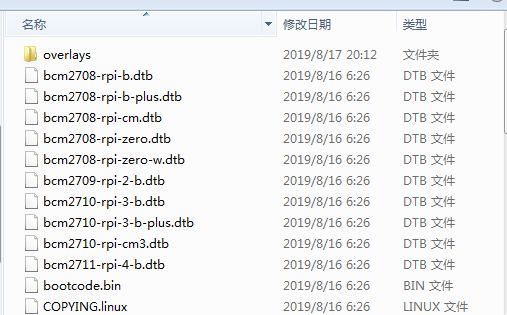
烧录完成之后,打开U盘,把里面的文件全部删除,再将从firmware-master.zip中解压得到的Boot文件夹里面的所有文件复制到U盘里面,这样树莓派3b+的boot文件被替换成树莓派4b的boot文件,
替换前:
替换后
在U盘根目录下创建两个文件(cmdline.txt和config.txt),并分别复制相应的内容,写入文件并保存,也可以将百度网盘已经写好的文件下载后拷贝到U盘根目录。
创建cmdline.txt ,将下面的内容复制到文件里面并保存
dwc_otg.fiq_fix_enable=2 console=ttyAMA0,115200 kgdboc=ttyAMA0,115200 console=tty1 root=/dev/mmcblk0p2 rootfstype=ext4 rootwait rootflags=noload net.ifnames=0
创建config.txt,将下面的内容复制到文件里面并保存
# Enable audio (loads snd_bcm2835)
dtparam=audio=on[pi4]
[all]
到目前为止,就可以将内存卡插入到你的树莓派4b,启动系统了,首次启动时间比较长,需要2-3分钟,请耐心等待。
默认的登陆用户名和密码都为:ubuntu
其他具体内容可以参考来源:https://jamesachambers.com/raspberry-pi-ubuntu-server-18-04-2-installation-guide/
二、换源
先执行一下sudo apt-get update看是否能够成功,如果成功,等待更新完成,不会太久,确定能构正常更新,就执行一下步骤进行换源
sudo nano /etc/apt/sources.list
## Note, this file is written by cloud-init on first boot of an instance
## modifications made here will not survive a re-bundle.
## if you wish to make changes you can:
## a.) add 'apt_preserve_sources_list: true' to /etc/cloud/cloud.cfg
## or do the same in user-data
## b.) add sources in /etc/apt/sources.list.d
## c.) make changes to template file /etc/cloud/templates/sources.list.tmpl# See http://help.ubuntu.com/community/UpgradeNotes for how to upgrade to
# newer versions of the distribution.
deb https://mirrors.tuna.tsinghua.edu.cn/ubuntu-ports bionic main restricted
deb-src https://mirrors.tuna.tsinghua.edu.cn/ubuntu-ports bionic main restricted## Major bug fix updates produced after the final release of the
## distribution.
deb https://mirrors.tuna.tsinghua.edu.cn/ubuntu-ports bionic-updates main restricted
deb-src https://mirrors.tuna.tsinghua.edu.cn/ubuntu-ports bionic-updates main restricted## N.B. software from this repository is ENTIRELY UNSUPPORTED by the Ubuntu
## team. Also, please note that software in universe WILL NOT receive any
## review or updates from the Ubuntu security team.
deb https://mirrors.tuna.tsinghua.edu.cn/ubuntu-ports bionic universe
deb-src https://mirrors.tuna.tsinghua.edu.cn/ubuntu-ports bionic universe
deb https://mirrors.tuna.tsinghua.edu.cn/ubuntu-ports bionic-updates universe
deb-src https://mirrors.tuna.tsinghua.edu.cn/ubuntu-ports bionic-updates universe## N.B. software from this repository is ENTIRELY UNSUPPORTED by the Ubuntu
## team, and may not be under a free licence. Please satisfy yourself as to
## your rights to use the software. Also, please note that software in
## multiverse WILL NOT receive any review or updates from the Ubuntu
## security team.
deb https://mirrors.tuna.tsinghua.edu.cn/ubuntu-ports bionic multiverse
deb-src https://mirrors.tuna.tsinghua.edu.cn/ubuntu-ports bionic multiverse
deb https://mirrors.tuna.tsinghua.edu.cn/ubuntu-ports bionic-updates multiverse
deb-src https://mirrors.tuna.tsinghua.edu.cn/ubuntu-ports bionic-updates multiverse## N.B. software from this repository may not have been tested as
## extensively as that contained in the main release, although it includes
## newer versions of some applications which may provide useful features.
## Also, please note that software in backports WILL NOT receive any review
## or updates from the Ubuntu security team.
deb https://mirrors.tuna.tsinghua.edu.cn/ubuntu-ports bionic-backports main restricted universe multiverse
deb-src https://mirrors.tuna.tsinghua.edu.cn/ubuntu-ports bionic-backports main restricted universe multiversedeb https://mirrors.tuna.tsinghua.edu.cn/ubuntu-ports bionic-security main restricted
deb-src https://mirrors.tuna.tsinghua.edu.cn/ubuntu-ports bionic-security main restricted
deb https://mirrors.tuna.tsinghua.edu.cn/ubuntu-ports bionic-security universe
deb-src https://mirrors.tuna.tsinghua.edu.cn/ubuntu-ports bionic-security universe
deb https://mirrors.tuna.tsinghua.edu.cn/ubuntu-ports bionic-security multiverse
deb-src https://mirrors.tuna.tsinghua.edu.cn/ubuntu-ports bionic-security multiverse## Uncomment the following two lines to add software from Canonical's
## 'partner' repository.
## This software is not part of Ubuntu, but is offered by Canonical and the
## respective vendors as a service to Ubuntu users.
# deb http://archive.canonical.com/ubuntu bionic partner
# deb-src http://archive.canonical.com/ubuntu bionic partner
执行下面的语句,以免安装的时候出现错误:dpkg returned an error code (1)
进入目录
cd /var/lib/dpkg
删除文件
sudo mv info info.baksudo
重新创建
sudo mkdir info
喜欢桌面操作的可以安装官方推荐的桌面,以下三个安装其中一个即可:
sudo apt-get install xubuntu-desktop
sudo apt-get install lubuntu-desktop
sudo apt-get install kubuntu-desktop
三、使用xrdp远程桌面连接
sudo apt-get install tightvncserver xrdp
安装完后,执行以下指令
echo xfce4-session >~/.xsession
将xfce4-session写入到文件.xsession中
修改 /etc/xrdp/startwm.sh 文件
sudo nano /etc/xrdp/startwm.sh
在 /etc/X11/Xsession 上边添加 xfce4-session
修改配置文件 /etc/X11/Xsession
sudo nano /etc/X11/Xsession
在文件最上面添加 xfce4-session
重新启动xrdp服务
sudo service xrdp restart
然后我们就可以使用Windows的mstsc登录了,界面如下


