Android7.0 启动Launcher流程
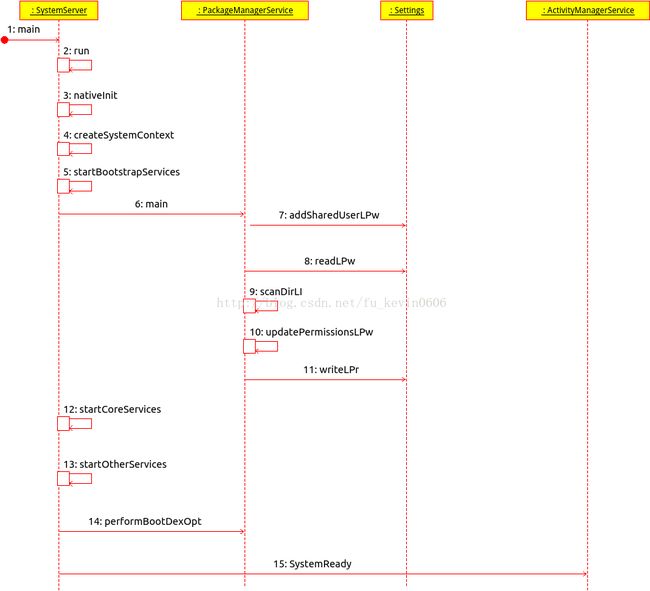
在前文分析启动SystemServer流程可以知道在ZygoteInit中通过反射机制执行SystemServer的main函数,从而进入到SystemServer中。在SystemServer的main函数中所做的事情很简单,就是创建SystemServer对象并调用它的run函数进一步处理。
如果设备的时间为1970年之前的话,就会将手机时间设置为1970年。为SystemServer创建主线程的Looper,并且进入消息循环。加载一个叫做android_servers的本地库,它提供本地方法的接口。之后调用本地函数启动sensor service。为系统进行创建Context,创建SystemServiceManager进行管理系统服务。
            // Mmmmmm... more memory!
            VMRuntime.getRuntime().clearGrowthLimit();   //每次开机都会清理一下内存, 获取更多的内存空间

            VMRuntime.getRuntime().setTargetHeapUtilization(0.8f);   //内存使用相关

            Build.ensureFingerprintProperty();    //指纹配置

            // Within the system server, it is an error to access Environment paths without
            // explicitly specifying a user.
            Environment.setUserRequired(true);

            // Within the system server, any incoming Bundles should be defused
            // to avoid throwing BadParcelableException.
            BaseBundle.setShouldDefuse(true);

            // Ensure binder calls into the system always run at foreground priority.
            BinderInternal.disableBackgroundScheduling(true);

            BinderInternal.setMaxThreads(sMaxBinderThreads);     //增加Binder数量

            android.os.Process.setThreadPriority(
                android.os.Process.THREAD_PRIORITY_FOREGROUND);   //设置systemserver为前台进程
            android.os.Process.setCanSelfBackground(false);    //不能自己变为后台进程
            Looper.prepareMainLooper();      //准备main looper

            System.loadLibrary("android_servers");     //初始化本地的服务

            performPendingShutdown();    //检查上次是否关机发生问题

            createSystemContext();   //初始化上下文
以上处理完后就开始启动Java层的各个服务首先将一些比较重要并且比较复杂相互之间有依赖的服务统一启动,而大部分系统服务的启动是由SystemServiceManager进行统一管理,仍然基于反射等机制,根据启动类的class name进行创建类的实例。例如启动 PowerManagerService过程:
mPowerManagerService = mSystemServiceManager.startService(PowerManagerService.class); /**
* Creates and starts a system service. The class must be a subclass of
* {@link com.android.server.SystemService}.
*
* @param serviceClass A Java class that implements the SystemService interface.
* @return The service instance, never null.
* @throws RuntimeException if the service fails to start.
*/
@SuppressWarnings("unchecked")
public T startService(Class serviceClass) {
try {
final String name = serviceClass.getName(); //获取class的name
Slog.i(TAG, "Starting " + name);
Trace.traceBegin(Trace.TRACE_TAG_SYSTEM_SERVER, "StartService " + name);
// Create the service.
if (!SystemService.class.isAssignableFrom(serviceClass)) {
throw new RuntimeException("Failed to create " + name
+ ": service must extend " + SystemService.class.getName());
}
final T service;
try {
Constructor constructor = serviceClass.getConstructor(Context.class); //获取class的构造函数
service = constructor.newInstance(mContext); //创建service实例
} catch (InstantiationException ex) {
throw new RuntimeException("Failed to create service " + name
+ ": service could not be instantiated", ex);
} catch (IllegalAccessException ex) {
throw new RuntimeException("Failed to create service " + name
+ ": service must have a public constructor with a Context argument", ex);
} catch (NoSuchMethodException ex) {
throw new RuntimeException("Failed to create service " + name
+ ": service must have a public constructor with a Context argument", ex);
} catch (InvocationTargetException ex) {
throw new RuntimeException("Failed to create service " + name
+ ": service constructor threw an exception", ex);
}
mServices.add(service); //将新创建的service放入mServices列表记录下来
try {
service.onStart(); //调用Service色onStart函数, 启动Service
} catch (RuntimeException ex) {
throw new RuntimeException("Failed to start service " + name
+ ": onStart threw an exception", ex);
}
return service; //将新创建的service返回
} finally {
Trace.traceEnd(Trace.TRACE_TAG_SYSTEM_SERVER);
}
} @Override
public void onStart() {
publishBinderService(Context.POWER_SERVICE, new BinderService()); //发布远程service, 都可以访问
publishLocalService(PowerManagerInternal.class, new LocalService()); //发布本地Service
Watchdog.getInstance().addMonitor(this); //注册watchdog监听
Watchdog.getInstance().addThread(mHandler);
} /**
* Publish the service so it is accessible to other services and apps.
*/
protected final void publishBinderService(String name, IBinder service) {
publishBinderService(name, service, false);
}
/**
* Publish the service so it is accessible to other services and apps.
*/
protected final void publishBinderService(String name, IBinder service,
boolean allowIsolated) {
ServiceManager.addService(name, service, allowIsolated); //将services注册在ServiceManager中,以供别的模块获取.
} mPackageManagerService = PackageManagerService.main(mSystemContext, installer,
mFactoryTestMode != FactoryTest.FACTORY_TEST_OFF, mOnlyCore);
mFirstBoot = mPackageManagerService.isFirstBoot();
mPackageManager = mSystemContext.getPackageManager();调用PackageManagerService的main函数来创建package。
    public static PackageManagerService main(Context context, Installer installer,
            boolean factoryTest, boolean onlyCore) {
        // 对设置属性自我检测
        PackageManagerServiceCompilerMapping.checkProperties();

        PackageManagerService m = new PackageManagerService(context, installer,
                factoryTest, onlyCore);   //创建PackageManagerService
        m.enableSystemUserPackages();
        ServiceManager.addService("package", m);  //将Package添加到ServiceManager中供其他模块获取
        return m;
} mSettings = new Settings(mPackages); //创建Settings对象
mSettings.addSharedUserLPw("android.uid.system", Process.SYSTEM_UID,
ApplicationInfo.FLAG_SYSTEM, ApplicationInfo.PRIVATE_FLAG_PRIVILEGED); //system
mSettings.addSharedUserLPw("android.uid.phone", RADIO_UID,
ApplicationInfo.FLAG_SYSTEM, ApplicationInfo.PRIVATE_FLAG_PRIVILEGED); //radio
mSettings.addSharedUserLPw("android.uid.log", LOG_UID,
ApplicationInfo.FLAG_SYSTEM, ApplicationInfo.PRIVATE_FLAG_PRIVILEGED); //log
mSettings.addSharedUserLPw("android.uid.nfc", NFC_UID,
ApplicationInfo.FLAG_SYSTEM, ApplicationInfo.PRIVATE_FLAG_PRIVILEGED); //nfc
mSettings.addSharedUserLPw("android.uid.bluetooth", BLUETOOTH_UID,
ApplicationInfo.FLAG_SYSTEM, ApplicationInfo.PRIVATE_FLAG_PRIVILEGED); //bluetooth
mSettings.addSharedUserLPw("android.uid.shell", SHELL_UID,
ApplicationInfo.FLAG_SYSTEM, ApplicationInfo.PRIVATE_FLAG_PRIVILEGED); //shellpackages.xml:用于记录系统中所安装apk信息
packages-backup.xml:对文件packages.xml的备份
packages.list:保存系统中存在的所有非系统自带的APK信息,即UID大于10000的apk
packages-stopped.xml:记录系统中强制停止运行的apk信息,在强制停止某个应用时会将该应用的信息记录该文件中。
packages-stopped-backup.xml:对packages-stopped.xml文件的备份。这些文件下面会用到。
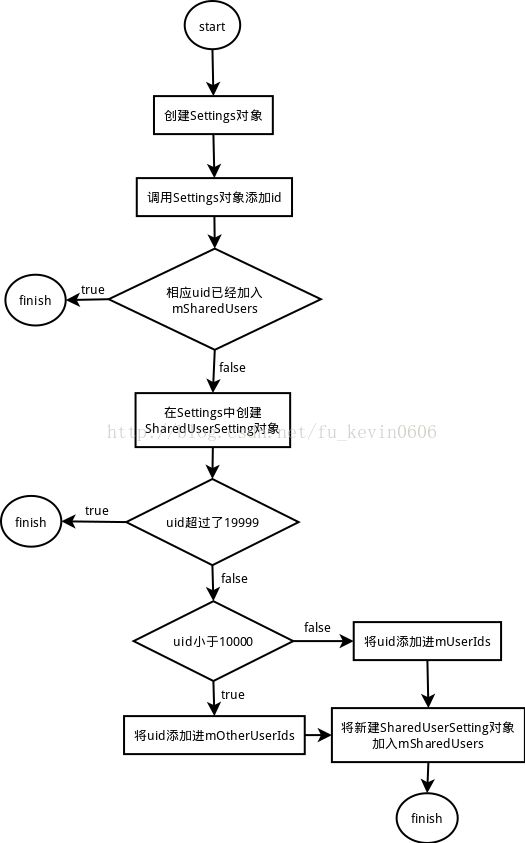
创建完成Settings后调用addSharedUserLPw向Settings类的成员变量mSharedUsers中添加SharedUserSetting对象。如下图:
SharedUserSetting对象保存同一共享进程UID的所有包信息, Settings对象用于管理Android系统运行过程中的一些设置信息,Settings的成员变量mSharedUsers以键值对的方式保存UID对应的SharedUserSetting对象。函数首先根据字符串名称从成员变量mSharedUsers哈希表中查找对应的SharedUserSetting对象,如果表中不存在对应的SharedUserSetting对象,则创建一个新的SharedUserSetting对象,并初始化该对象的域,然后根据UID的大小通过函数addUserIdLPw添加到mUserIds或mOtherUserIds中,同时以键值对的形式保存在mSharedUsers中。
建立并启动PackageHandler消息循环,用于请求apk安装卸载请求,如adb install,package install安装apk时就是发送消息。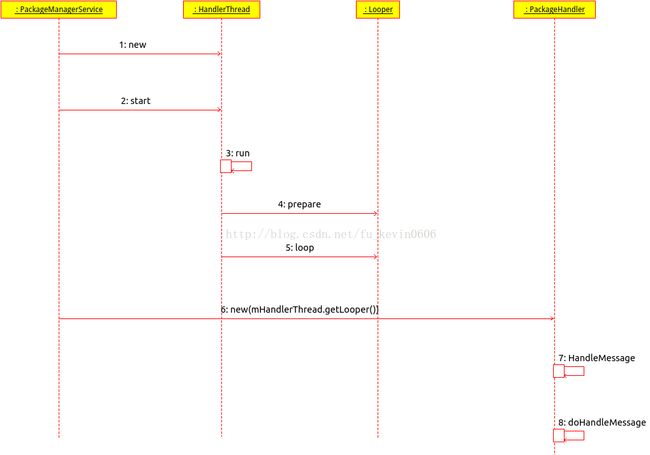
解析system/etc/permission/下面的的xml文件,主要解析的是platform.xml,建立permission与gid之间的关系,可以指定一个权限有几个组对应,当一个apk被赋予这个权限时,它也同时属于这几个组,读取的permission name与gid添加到mSettings.mPermissions中进行保存。
通过Settings的readLPw函数来检查data/system/package.xml文件是否存在,该文件里面记录了系统的permission,以及每个apk的name,codePath,flag,userid等信息。这些信息主要是在安装apk时通过解析应用的AndroidManifest.xml来获得的,解析完apk将更新的信息写入这个文件。再次开机时就会读取该文件中的相关信息,将信息添加到内存中的相关列表中。当有apk增删,升级时会更新这个文件。最后将解析的permissions添加到列表mPermissions中,将package信息加入mPackages中。将shared-user通过addSharedUserLP添加到列表mSharedUsers列表中。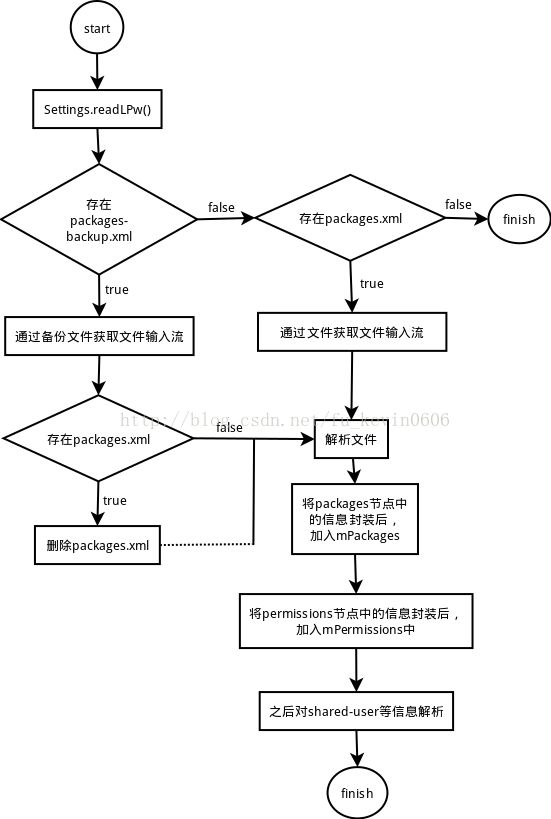
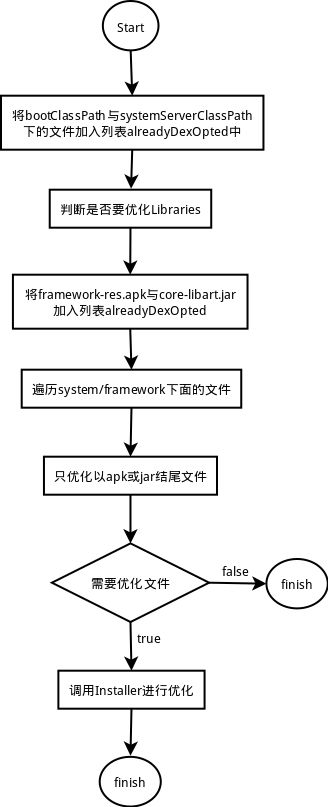
检查相关需要优化的目录,主要是对mSharedLibraries,system/framework等的检查优化。首先检查boot path下面的class有没有被优化,如果已经优化过了就加入alreadyDexOpted列表中。由于framework-res.apk里面主要是一些资源文件,没有代码所以不需要进行优化,并且core-libart.jar为boot启动路径下的一部分不需要对其进行优化。如果在framework/base下面的文件如果为apk或jar结尾的,如果需要优化就调用Installer的dexopt函数进行优化。
调用scanDirLI启动apk解析,主要扫描system/app, system/vital-app, data/app system/priv-app等目录下的apk.system/app,system/priv-app是系统级以及某些特权级别的应用,这部分可以理解为google原生的一些应用。 system/preloadapp目录下预置的是厂家的第三方应用,即非系统应用,例如cmcc相关的第三方应用,这部分是仿照sd卡上应用流程设计的,因此放到异步线程处理,system/app,system/priv-app目录不能放到system/preloadapp目录。system/vital-app目录下预置的apk类型和preloadapp是一样的,只是有些应用放到异步线程去扫会有问题,例如防火墙,因此放到vital-app下在主线程去扫描.但是那些应用可以放到system/vital-app下,目前不可预知,只有在第三方应用放到preloadapp下出现问题时,才会放到system/vital-app下。
由于在system/app,system/priv-app,system/vital-app下面的app是在SystemServer主线程中进行扫描解析,所以如果在这些目录下的app过多会影响开机时间,尽量将第三方的app预置在preloadapp下面,可以提供开机速度.
在扫描时会先判断文件夹下的是否为apk,之后会调用scanPackageLI进行安装,安装失败就会将还会将该文件删除。
调用函数updatePermissionsLPw,赋予package相应请求的权限,如果允许授予相应的权限,则添加到grantedPermissions中。

调用startCoreServices函数启动一些必须的服务,将管理LCD,backlight的LightService启动起来,之后,将监测battery level的BatteryService启动起来,BatteryService的工作也是需要LightService的。启动监测应用运用率的服务UsageStatsService,并将与AMS进行关联。在将UsageStatsService启动起来之后,调用PackageManagerService将其更新一下,在调用函数performBootDexOpt做优化时可能需要。
调startOtherServices函数将一些主要的服务启动起来后,就开始启动剩余的一些系统服务,如ContentService,Alarm,MountService等,并对watchdog进行初始化。启动服务大部分还是使用SystemServiceManager进行管理,然后将创建的服务加入ServiceManager中,执行速度都是比较快的。
执行Dexopt优化
在startOtherServices过程中主要调用PackageManagerService进行dexopt优化时较耗时,具体将详细讲解。
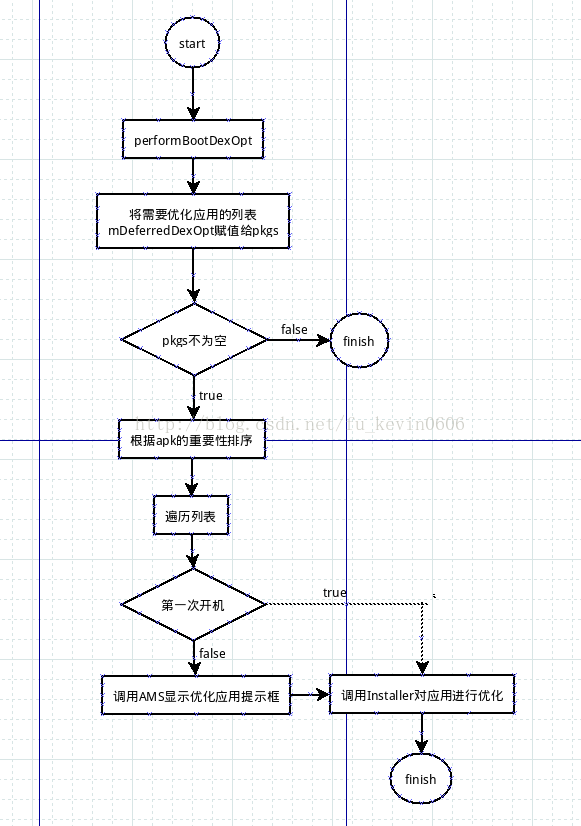
PackageManager通过底层art进行判断是否需要进行优化应用,并将需要优化的应用加入列表mDeferredDexOpt中,当从SystemServer中调用过来请求优化应用后,会重新将该列表赋值给列表pkgs,之后会判断,如果pkgs列表为空,就证明不需要优化应用就会结束。如果需要进行优化应用,会根据dexopt的重要性重新将列表pkgs进行排序,比较重要的app会给比较高的优先级。如果有的应用最近没有被使用就会将其过滤掉不会对其进行优化。将需要优化的应用排好序后,就开始遍历列表,调用函数performBootDexOpt一个一个的进行优化应用。如果不是第一次开机的话就会显示一个提示框显示正在优化第几个应用,一共有多少个应用需要优化。
            if (showDialog) {
                try {
                    ActivityManagerNative.getDefault().showBootMessage(
                            mContext.getResources().getString(R.string.android_upgrading_apk,
                                    numberOfPackagesVisited, numberOfPackagesToDexopt), true);
                } catch (RemoteException e) {
                }
}当所有的应用优化完成之后,就会重新回到SystemServer中继续向下执行。之后就开始准备启动应用,对LockSettingsService,Status Bar,Network等的创建。其中在创建NetworkManagementService的时候需要等待socket的连接可能会耗时。
启动Launcher
最后回到AMS的SystemReady函数中进行启动Launcher,下面将分析一下Launcher的启动过程。在前面PackageManager对应用进行扫描后安装,这些应用程序安装完成后,还需要一个Home应用程序来负责把他们在桌面上显示出来。在Android中这个默认的Home应用就是Launcher了。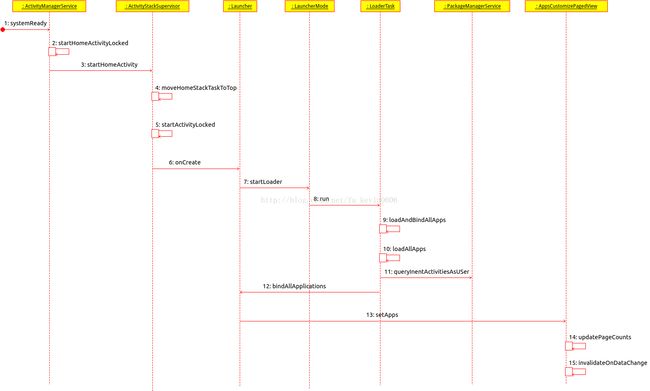
在SystemServer中将所有系统的Service都启动起来后,就会通过调用AMS的systemReady函数将Launcher启动起来。在AMS中通过startHomeActivityLocked函数启动Launcher,函数首先创建一个CATEGORY_HOME类型的intent。
    Intent getHomeIntent() {
        Intent intent = new Intent(mTopAction, mTopData != null ? Uri.parse(mTopData) : null);
        intent.setComponent(mTopComponent);
        intent.addFlags(Intent.FLAG_DEBUG_TRIAGED_MISSING);
        if (mFactoryTest != FactoryTest.FACTORY_TEST_LOW_LEVEL) {
            intent.addCategory(Intent.CATEGORY_HOME);
        }
        return intent;
}在Launcher的onCreate函数中,通过调用LauncherMode的startLoader函数来执行加载应用程序的操作。这里并不是直接加载应用程序,而是把加载应用程序的操作作为一个消息来处理,将消息通过post的方式放入消息队列中,然后系统就会调用LoaderTask的run函数来处理这个消息。在run函数中主要就是加载app,只需要调用LauncherAppsService的getLauncherActivities函数来获取所有需要Launcher显示的Activity,首先创建action为ACTION_MAIN的Intent,之后设置CATEGORY_LAUNCHER为category
        @Override
        public ParceledListSlice getLauncherActivities(String packageName, UserHandle user)
                throws RemoteException {
            ensureInUserProfiles(user, "Cannot retrieve activities for unrelated profile " + user);
            if (!isUserEnabled(user)) {
                return null;
            }

            final Intent mainIntent = new Intent(Intent.ACTION_MAIN, null);
            mainIntent.addCategory(Intent.CATEGORY_LAUNCHER);
            mainIntent.setPackage(packageName);
            long ident = Binder.clearCallingIdentity();
            try {
                List apps = mPm.queryIntentActivitiesAsUser(mainIntent,
                        PackageManager.MATCH_DIRECT_BOOT_AWARE
                                | PackageManager.MATCH_DIRECT_BOOT_UNAWARE,
                        user.getIdentifier());
                return new ParceledListSlice<>(apps);
            } finally {
                Binder.restoreCallingIdentity(ident);
            }
} 获得系统中app后就开始bindAllApplication了,到了这里,系统默认的Home应用程序Launcher就把PackageManagerService中的应用程序加载进来了,当我们在屏幕上点击下面这个图标时,就会把刚才加载好的应用程序以图标的形式展示出来了。
