用sockets打造自己的Android聊天app(安卓篇)
用sockets打造自己的Android聊天app(安卓篇)
翻译自http://www.androidhive.info/2014/10/android-building-group-chat-app-using-sockets-part-2/
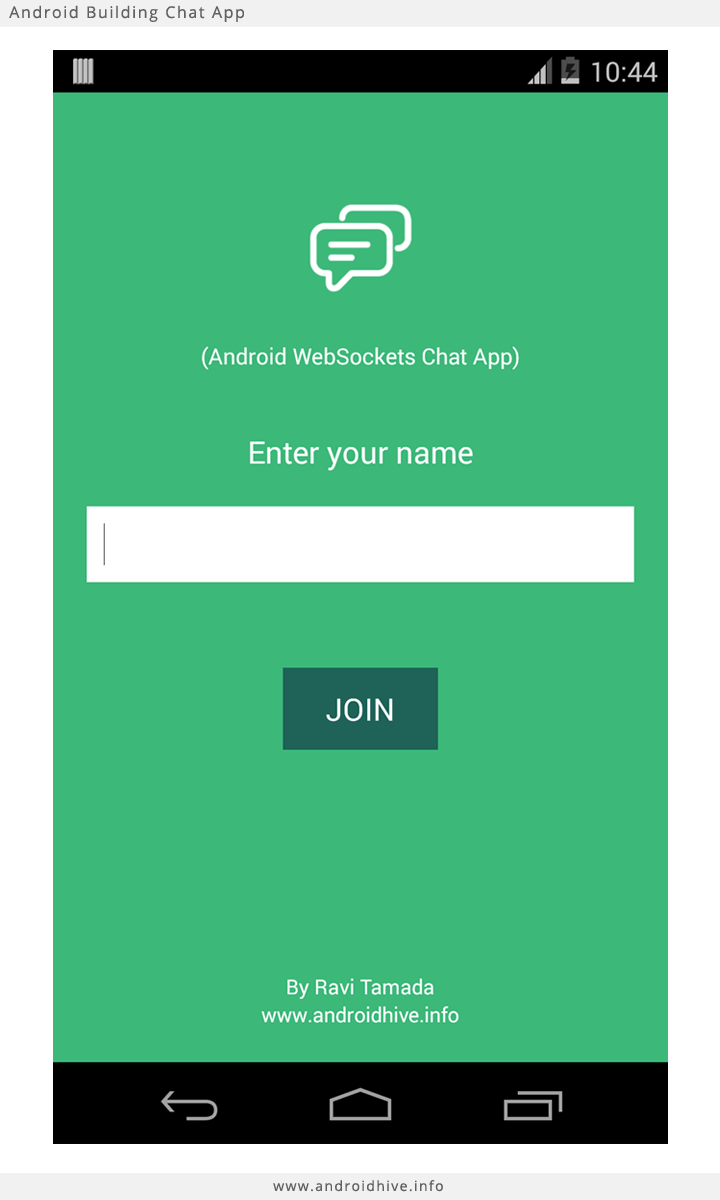
在上一篇文章中我们介绍了web sockets,搭建好了web环境,这篇文章我们开始安卓app的开发。同web应用一样,有两个屏幕,第一个是输入名字,第二个就是显示和发送消息。OK,我们这次的开发环境依然是Eclipse IDE.
6 建立Android App
首先定义一下我们所用到的颜色res ⇒ values ⇒ colors.xml
<resources>
    <color name="actionbar">#3cb879color>
    <color name="body_background">#e8e8e8color>
    <color name="body_background_green">#82e783color>
    <color name="server_status_bar">#2b2b2bcolor>
    <color name="title_gray">#434343color>
    <color name="white">#ffffffcolor>
    <color name="bg_msg_you">#5eb964color>
    <color name="bg_msg_from">#e5e7ebcolor>
    <color name="msg_border_color">#a1a1a1color>
    <color name="bg_btn_join">#1e6258color>
    <color name="bg_msg_input">#e8e8e8color>
    <color name="text_msg_input">#626262color>
    <color name="lblFromName">#777777color>
resources>
再定义我们所用到的字符串res ⇒ values ⇒ strings.xml
<resources>

    <string name="app_name">WebMobileGroupChatstring>
    <string name="title">(Android WebSockets Chat App)string>
    <string name="author_name">By Ravi Tamadastring>
    <string name="author_url">www.androidhive.infostring>
    <string name="enter_name">Enter your namestring>
    <string name="btn_join">JOINstring>
    <string name="btn_send">Sendstring>

resources>
再增加样式文件res ⇒ values ⇒ styles.xml
<resources>
<style name="ChatAppTheme" parent="@android:style/Theme.Holo.Light">
<item name="android:actionBarStyle">@style/MyActionBarTheme
style>
<style name="MyActionBarTheme" parent="@android:style/Widget.Holo.Light.ActionBar">
<item name="android:background">@color/actionbar
- "android:titleTextStyle"
>@style/TitleTextStyle
style>
<style name="TitleTextStyle" parent="android:TextAppearance.Holo.Widget.ActionBar.Title">
<item name="android:textColor">@color/white
style>
resources>下面这个布局文件是第一个屏幕,让用户输入用户名:
<RelativeLayout xmlns:android="http://schemas.android.com/apk/res/android"
    android:layout_width="match_parent"
    android:layout_height="match_parent"
    android:background="@color/actionbar"
    android:orientation="vertical" >

    <ImageView
        android:id="@+id/imgLogo"
        android:layout_width="60dp"
        android:layout_height="60dp"
        android:layout_alignParentTop="true"
        android:layout_centerHorizontal="true"
        android:layout_gravity="center_horizontal"
        android:layout_marginBottom="10dp"
        android:layout_marginTop="60dp"
        android:src="@drawable/ic_launcher" />

    <TextView
        android:layout_width="wrap_content"
        android:layout_height="wrap_content"
        android:layout_below="@id/imgLogo"
        android:layout_centerHorizontal="true"
        android:layout_marginTop="15dp"
        android:text="@string/title"
        android:textColor="@color/white"
        android:textSize="13dp" />

    <LinearLayout
        android:layout_width="fill_parent"
        android:layout_height="wrap_content"
        android:layout_centerInParent="true"
        android:gravity="center_horizontal"
        android:orientation="vertical"
        android:padding="20dp" >

        <TextView
            android:layout_width="wrap_content"
            android:layout_height="wrap_content"
            android:layout_marginBottom="10dp"
            android:layout_marginTop="15dp"
            android:text="@string/enter_name"
            android:textColor="@color/white"
            android:textSize="18dp" />

        <EditText
            android:id="@+id/name"
            android:layout_width="fill_parent"
            android:layout_height="wrap_content"
            android:layout_marginBottom="10dp"
            android:layout_marginTop="10dp"
            android:background="@color/white"
            android:inputType="textCapWords"
            android:padding="10dp" />

        <Button
            android:id="@+id/btnJoin"
            android:layout_width="wrap_content"
            android:layout_height="wrap_content"
            android:layout_marginTop="40dp"
            android:background="@color/bg_btn_join"
            android:paddingLeft="25dp"
            android:paddingRight="25dp"
            android:text="@string/btn_join"
            android:textColor="@color/white" />
    LinearLayout>


    <LinearLayout
        android:layout_width="fill_parent"
        android:layout_height="wrap_content"
        android:layout_alignParentBottom="true"
        android:layout_marginBottom="20dp"
        android:gravity="center_horizontal"
        android:orientation="vertical" >

        <TextView
            android:layout_width="wrap_content"
            android:layout_height="wrap_content"
            android:text="@string/author_name"
            android:textColor="@color/white"
            android:textSize="12dp" />

        <TextView
            android:layout_width="wrap_content"
            android:layout_height="wrap_content"
            android:text="@string/author_url"
            android:textColor="@color/white"
            android:textSize="12dp" />
    LinearLayout>

RelativeLayout>
下面是对应的Activity,很简单,就是传递数据
NameActivity.java
package info.androidhive.webgroupchat;

import android.app.Activity;
import android.content.Intent;
import android.os.Bundle;
import android.view.View;
import android.widget.Button;
import android.widget.EditText;
import android.widget.Toast;

public class NameActivity extends Activity {

    private Button btnJoin;
    private EditText txtName;

    @Override
    protected void onCreate(Bundle savedInstanceState) {
        super.onCreate(savedInstanceState);
        setContentView(R.layout.activity_name);

        btnJoin = (Button) findViewById(R.id.btnJoin);
        txtName = (EditText) findViewById(R.id.name);

        // Hiding the action bar
        getActionBar().hide();

        btnJoin.setOnClickListener(new View.OnClickListener() {

            @Override
            public void onClick(View v) {
                if (txtName.getText().toString().trim().length() > 0) {

                    String name = txtName.getText().toString().trim();

                    Intent intent = new Intent(NameActivity.this,
                            MainActivity.class);
                    intent.putExtra("name", name);

                    startActivity(intent);

                } else {
                    Toast.makeText(getApplicationContext(),
                            "Please enter your name", Toast.LENGTH_LONG).show();
                }
            }
        });
    }
}
不要忘记在清单文件中加上网络权限
在做完这些之后你的app应该是这样子

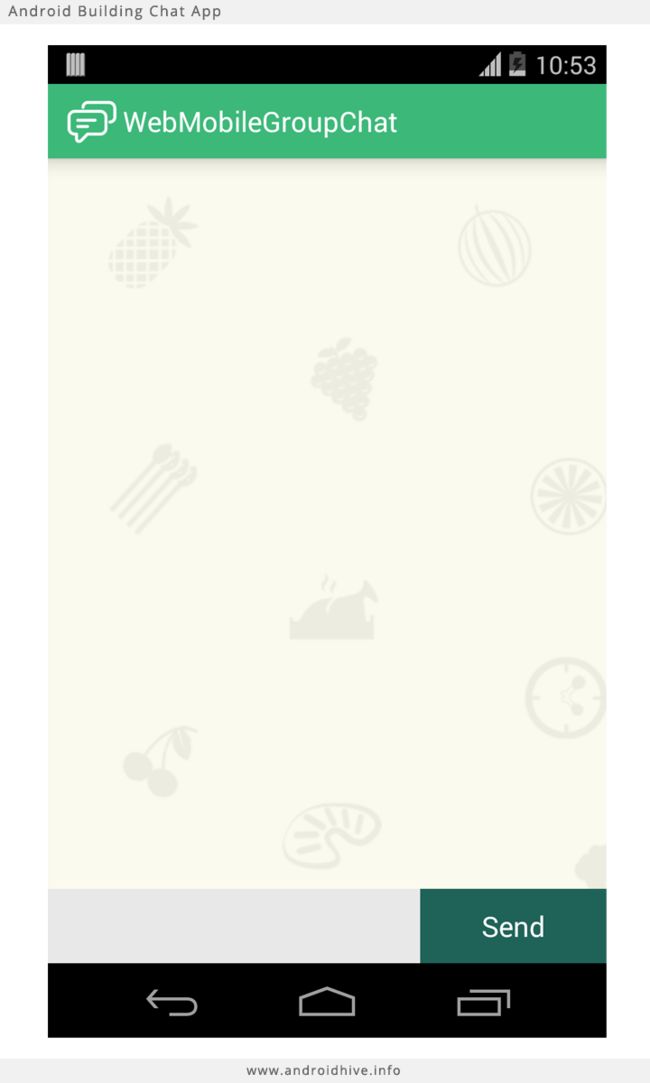
在实现sockets之前,我们还需要定义一些资源,用来显示聊天界面
下载background图片放到drawable目录下。
定义如下三个drawable文件,这些用作聊天的背景tile_bg.xml, bg_msg_from.xml and bg_msg_you.xml
tile_bg.xml

<bitmap xmlns:android="http://schemas.android.com/apk/res/android"
  android:src="@drawable/bg_messages"
  android:tileMode="repeat" />
bg_msg_from.xml
<shape xmlns:android="http://schemas.android.com/apk/res/android"
android:shape="rectangle" >
<solid android:color="@color/bg_msg_from" >
solid>
<corners android:radius="5dp" >
corners>
shape>bg_msg_you.xml
<shape xmlns:android="http://schemas.android.com/apk/res/android"
android:shape="rectangle" >
<solid android:color="@color/bg_msg_you" >
solid>
<corners android:radius="5dp" >
corners>
shape>然后我们在定义两个布局文件,分别是聊天的条目(自己的和别人的)
list_item_message_left.xml

<LinearLayout xmlns:android="http://schemas.android.com/apk/res/android"
    android:layout_width="match_parent"
    android:layout_height="match_parent"
    android:orientation="vertical"
    android:paddingBottom="5dp"
    android:paddingTop="5dp"
    android:paddingLeft="10dp">

    <TextView
        android:id="@+id/lblMsgFrom"
        android:layout_width="wrap_content"
        android:layout_height="wrap_content"
        android:textSize="12dp"
        android:textColor="@color/lblFromName"
        android:textStyle="italic"
        android:padding="5dp"/>

    <TextView
        android:id="@+id/txtMsg"
        android:layout_width="wrap_content"
        android:layout_height="wrap_content"
        android:textSize="16dp"
        android:layout_marginRight="80dp"
        android:textColor="@color/title_gray"
        android:paddingLeft="10dp"
        android:paddingRight="10dp"
        android:paddingTop="5dp"
        android:paddingBottom="5dp"
        android:background="@drawable/bg_msg_from"/>

LinearLayout>
list_item_message_right.xml

<LinearLayout xmlns:android="http://schemas.android.com/apk/res/android"
    android:layout_width="match_parent"
    android:layout_height="match_parent"
    android:gravity="right"
    android:orientation="vertical"
    android:paddingBottom="5dp"
    android:paddingRight="10dp"
    android:paddingTop="5dp" >

    <TextView
        android:id="@+id/lblMsgFrom"
        android:layout_width="wrap_content"
        android:layout_height="wrap_content"
        android:padding="5dp"
        android:textColor="@color/lblFromName"
        android:textSize="12dp"
        android:textStyle="italic" />

    <TextView
        android:id="@+id/txtMsg"
        android:layout_width="wrap_content"
        android:layout_height="wrap_content"
        android:layout_marginLeft="80dp"
        android:background="@drawable/bg_msg_you"
        android:paddingBottom="5dp"
        android:paddingLeft="10dp"
        android:paddingRight="10dp"
        android:paddingTop="5dp"
        android:textColor="@color/white"
        android:textSize="16dp" />

LinearLayout>
接下来的这个布局文件就是我们聊天的主界面
activity_main.xml
<LinearLayout xmlns:android="http://schemas.android.com/apk/res/android"
    xmlns:tools="http://schemas.android.com/tools"
    android:layout_width="match_parent"
    android:layout_height="match_parent"
    android:background="@drawable/tile_bg"
    android:orientation="vertical" >

    <ListView
        android:id="@+id/list_view_messages"
        android:layout_width="fill_parent"
        android:layout_height="0dp"
        android:layout_weight="1"
        android:background="@null"
        android:divider="@null"
        android:transcriptMode="alwaysScroll"
        android:stackFromBottom="true">
    ListView>

    <LinearLayout
        android:id="@+id/llMsgCompose"
        android:layout_width="fill_parent"
        android:layout_height="wrap_content"
        android:background="@color/white"
        android:orientation="horizontal"
        android:weightSum="3" >

        <EditText
            android:id="@+id/inputMsg"
            android:layout_width="0dp"
            android:layout_height="fill_parent"
            android:layout_weight="2"
            android:background="@color/bg_msg_input"
            android:textColor="@color/text_msg_input"
            android:paddingLeft="6dp"
            android:paddingRight="6dp"/>

        <Button
            android:id="@+id/btnSend"
            android:layout_width="0dp"
            android:layout_height="wrap_content"
            android:layout_weight="1"
            android:background="@color/bg_btn_join"
            android:textColor="@color/white"
            android:text="@string/btn_send" />
    LinearLayout>

LinearLayout>
接下来是两个帮助类,第一个Utils类有两个功能,第一个是存储Session id,第二个就是把消息转换成一个JSON字符串,如下
Utils.java
package info.androidhive.webgroupchat.other;

import org.json.JSONException;
import org.json.JSONObject;

import android.content.Context;
import android.content.SharedPreferences;
import android.content.SharedPreferences.Editor;

public class Utils {

    private Context context;
    private SharedPreferences sharedPref;

    private static final String KEY_SHARED_PREF = "ANDROID_WEB_CHAT";
    private static final int KEY_MODE_PRIVATE = 0;
    private static final String KEY_SESSION_ID = "sessionId",
            FLAG_MESSAGE = "message";

    public Utils(Context context) {
        this.context = context;
        sharedPref = this.context.getSharedPreferences(KEY_SHARED_PREF,
                KEY_MODE_PRIVATE);
    }

    public void storeSessionId(String sessionId) {
        Editor editor = sharedPref.edit();
        editor.putString(KEY_SESSION_ID, sessionId);
        editor.commit();
    }

    public String getSessionId() {
        return sharedPref.getString(KEY_SESSION_ID, null);
    }

    public String getSendMessageJSON(String message) {
        String json = null;

        try {
            JSONObject jObj = new JSONObject();
            jObj.put("flag", FLAG_MESSAGE);
            jObj.put("sessionId", getSessionId());
            jObj.put("message", message);

            json = jObj.toString();
        } catch (JSONException e) {
            e.printStackTrace();
        }

        return json;
    }

}
下面是JavaBean对象
Message.java
package info.androidhive.webgroupchat.other;

public class Message {
    private String fromName, message;
    private boolean isSelf;

    public Message() {
    }

    public Message(String fromName, String message, boolean isSelf) {
        this.fromName = fromName;
        this.message = message;
        this.isSelf = isSelf;
    }

    public String getFromName() {
        return fromName;
    }

    public void setFromName(String fromName) {
        this.fromName = fromName;
    }

    public String getMessage() {
        return message;
    }

    public void setMessage(String message) {
        this.message = message;
    }

    public boolean isSelf() {
        return isSelf;
    }

    public void setSelf(boolean isSelf) {
        this.isSelf = isSelf;
    }

}
下面这个类是配置对象
WsConfig.java
package info.androidhive.webgroupchat.other;

public class WsConfig {
    public static final String URL_WEBSOCKET = "ws://192.168.0.102:8080/WebMobileGroupChatServer/chat?name=";
}
下面这个是ListView的适配器,主要就是判断是自己的消息还是别人的消息,在getView中分别填充
package info.androidhive.webgroupchat;

import info.androidhive.webgroupchat.other.Message;

import java.util.List;

import android.annotation.SuppressLint;
import android.app.Activity;
import android.content.Context;
import android.view.LayoutInflater;
import android.view.View;
import android.view.ViewGroup;
import android.widget.BaseAdapter;
import android.widget.TextView;

public class MessagesListAdapter extends BaseAdapter {

    private Context context;
    private List messagesItems;

    public MessagesListAdapter(Context context, List navDrawerItems) {
        this.context = context;
        this.messagesItems = navDrawerItems;
    }

    @Override
    public int getCount() {
        return messagesItems.size();
    }

    @Override
    public Object getItem(int position) {
        return messagesItems.get(position);
    }

    @Override
    public long getItemId(int position) {
        return position;
    }

    @SuppressLint("InflateParams")
    @Override
    public View getView(int position, View convertView, ViewGroup parent) {

        /**
         * The following list not implemented reusable list items as list items
         * are showing incorrect data Add the solution if you have one
         * */

        Message m = messagesItems.get(position);

        LayoutInflater mInflater = (LayoutInflater) context
                .getSystemService(Activity.LAYOUT_INFLATER_SERVICE);

        // Identifying the message owner
        if (messagesItems.get(position).isSelf()) {
            // message belongs to you, so load the right aligned layout
            convertView = mInflater.inflate(R.layout.list_item_message_right,
                    null);
        } else {
            // message belongs to other person, load the left aligned layout
            convertView = mInflater.inflate(R.layout.list_item_message_left,
                    null);
        }

        TextView lblFrom = (TextView) convertView.findViewById(R.id.lblMsgFrom);
        TextView txtMsg = (TextView) convertView.findViewById(R.id.txtMsg);

        txtMsg.setText(m.getMessage());
        lblFrom.setText(m.getFromName());

        return convertView;
    }
}
下载android websockets library,感谢 Koush大神
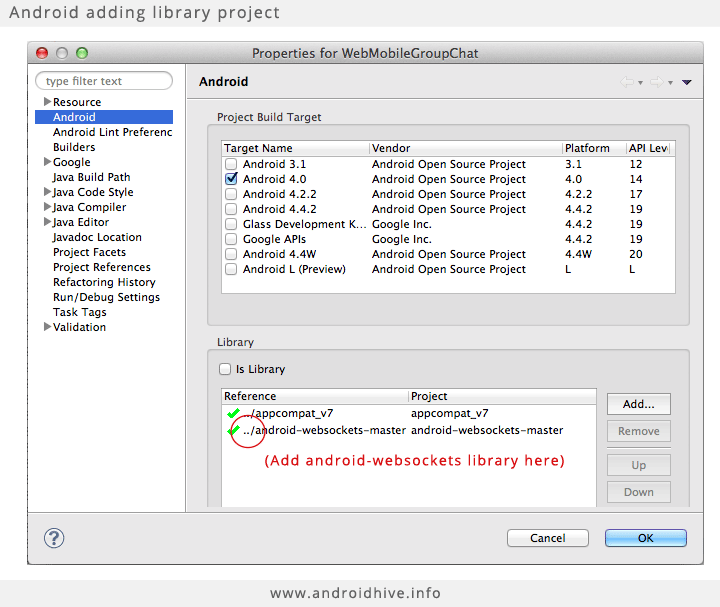
将下载的代码导入到eclipse中,并且在自己的项目中引用它

开始最重要的了。。。。
同js代码作为sockets客户端类似,WebSocketClient 也有一些回调函数,onConnect, onMessage and onDisconnect.
parseMessage() 函数用作解析从server中获得的Json字符串
在parseMessage()方法中,json的目的有flag表示
当新的消息收到时,要调用adapter.notifyDataSetChanged() 方法去更新列表
sendMessageToServer()发送到服务器
playBeep() 播放声音
package info.androidhive.webgroupchat;

import info.androidhive.webgroupchat.other.Message;
import info.androidhive.webgroupchat.other.Utils;
import info.androidhive.webgroupchat.other.WsConfig;

import java.net.URI;
import java.net.URLEncoder;
import java.util.ArrayList;
import java.util.List;
import java.util.Locale;

import org.json.JSONException;
import org.json.JSONObject;

import android.app.Activity;
import android.content.Intent;
import android.media.Ringtone;
import android.media.RingtoneManager;
import android.net.Uri;
import android.os.Bundle;
import android.util.Log;
import android.view.View;
import android.widget.Button;
import android.widget.EditText;
import android.widget.ListView;
import android.widget.Toast;

import com.codebutler.android_websockets.WebSocketClient;

public class MainActivity extends Activity {

    // LogCat tag
    private static final String TAG = MainActivity.class.getSimpleName();

    private Button btnSend;
    private EditText inputMsg;

    private WebSocketClient client;

    // Chat messages list adapter
    private MessagesListAdapter adapter;
    private List listMessages;
    private ListView listViewMessages;

    private Utils utils;

    // Client name
    private String name = null;

    // JSON flags to identify the kind of JSON response
    private static final String TAG_SELF = "self", TAG_NEW = "new",
            TAG_MESSAGE = "message", TAG_EXIT = "exit";

    @Override
    protected void onCreate(Bundle savedInstanceState) {
        super.onCreate(savedInstanceState);
        setContentView(R.layout.activity_main);

        btnSend = (Button) findViewById(R.id.btnSend);
        inputMsg = (EditText) findViewById(R.id.inputMsg);
        listViewMessages = (ListView) findViewById(R.id.list_view_messages);

        utils = new Utils(getApplicationContext());

        // 从上一个屏幕获取姓名
        Intent i = getIntent();
        name = i.getStringExtra("name");

        btnSend.setOnClickListener(new View.OnClickListener() {

            @Override
            public void onClick(View v) {
                // Sending message to web socket server
                sendMessageToServer(utils.getSendMessageJSON(inputMsg.getText()
                        .toString()));

                // Clearing the input filed once message was sent
                inputMsg.setText("");
            }
        });

        listMessages = new ArrayList();

        adapter = new MessagesListAdapter(this, listMessages);
        listViewMessages.setAdapter(adapter);

        /**
         * 创建web sockets客户端,有如下的回调函数
         * */
        client = new WebSocketClient(URI.create(WsConfig.URL_WEBSOCKET
                + URLEncoder.encode(name)), new WebSocketClient.Listener() {
            @Override
            public void onConnect() {

            }

            /**
             * 从服务端接受消息
             * */
            @Override
            public void onMessage(String message) {
                Log.d(TAG, String.format("Got string message! %s", message));

                parseMessage(message);

            }

            @Override
            public void onMessage(byte[] data) {
                Log.d(TAG, String.format("Got binary message! %s",
                        bytesToHex(data)));

                // Message will be in JSON format
                parseMessage(bytesToHex(data));
            }

            /**
             * 连接中断
             * */
            @Override
            public void onDisconnect(int code, String reason) {

                String message = String.format(Locale.US,
                        "Disconnected! Code: %d Reason: %s", code, reason);

                showToast(message);

                // clear the session id from shared preferences
                utils.storeSessionId(null);
            }

            @Override
            public void onError(Exception error) {
                Log.e(TAG, "Error! : " + error);

                showToast("Error! : " + error);
            }

        }, null);

        client.connect();
    }

    /**
     * 发送消息
     * */
    private void sendMessageToServer(String message) {
        if (client != null && client.isConnected()) {
            client.send(message);
        }
    }

    /**
     * 解析从服务端收到的json 消息的目的由flag字段所指定,flag=self,消息属于指定的人,
     * new:新人加入   *    到对话中,message:新的消息,exit:退出
     *
     *
     *
     *
     * */
    private void parseMessage(final String msg) {

        try {
            JSONObject jObj = new JSONObject(msg);

            // JSON node 'flag'
            String flag = jObj.getString("flag");

            // 如果是self,json中包含sessionId信息
            if (flag.equalsIgnoreCase(TAG_SELF)) {

                String sessionId = jObj.getString("sessionId");

                // Save the session id in shared preferences
                utils.storeSessionId(sessionId);

                Log.e(TAG, "Your session id: " + utils.getSessionId());

            } else if (flag.equalsIgnoreCase(TAG_NEW)) {
                // If the flag is 'new', new person joined the room
                String name = jObj.getString("name");
                String message = jObj.getString("message");

                // number of people online
                String onlineCount = jObj.getString("onlineCount");

                showToast(name + message + ". Currently " + onlineCount
                        + " people online!");

            } else if (flag.equalsIgnoreCase(TAG_MESSAGE)) {
                // if the flag is 'message', new message received
                String fromName = name;
                String message = jObj.getString("message");
                String sessionId = jObj.getString("sessionId");
                boolean isSelf = true;

                // Checking if the message was sent by you
                if (!sessionId.equals(utils.getSessionId())) {
                    fromName = jObj.getString("name");
                    isSelf = false;
                }

                Message m = new Message(fromName, message, isSelf);

                // 把消息加入到arraylist中
                appendMessage(m);

            } else if (flag.equalsIgnoreCase(TAG_EXIT)) {
                // If the flag is 'exit', somebody left the conversation
                String name = jObj.getString("name");
                String message = jObj.getString("message");

                showToast(name + message);
            }

        } catch (JSONException e) {
            e.printStackTrace();
        }

    }

    @Override
    protected void onDestroy() {
        super.onDestroy();

        if(client != null & client.isConnected()){
            client.disconnect();
        }
    }

    /**
     * 把消息放到listView里
     * */
    private void appendMessage(final Message m) {
        runOnUiThread(new Runnable() {

            @Override
            public void run() {
                listMessages.add(m);

                adapter.notifyDataSetChanged();

                // Playing device's notification
                playBeep();
            }
        });
    }

    private void showToast(final String message) {

        runOnUiThread(new Runnable() {

            @Override
            public void run() {
                Toast.makeText(getApplicationContext(), message,
                        Toast.LENGTH_LONG).show();
            }
        });

    }

    /**
     * 播放默认的通知声音
     * */
    public void playBeep() {

        try {
            Uri notification = RingtoneManager
                    .getDefaultUri(RingtoneManager.TYPE_NOTIFICATION);
            Ringtone r = RingtoneManager.getRingtone(getApplicationContext(),
                    notification);
            r.play();
        } catch (Exception e) {
            e.printStackTrace();
        }
    }

    final protected static char[] hexArray = "0123456789ABCDEF".toCharArray();

    public static String bytesToHex(byte[] bytes) {
        char[] hexChars = new char[bytes.length * 2];
        for (int j = 0; j < bytes.length; j++) {
            int v = bytes[j] & 0xFF;
            hexChars[j * 2] = hexArray[v >>> 4];
            hexChars[j * 2 + 1] = hexArray[v & 0x0F];
        }
        return new String(hexChars);
    }

}
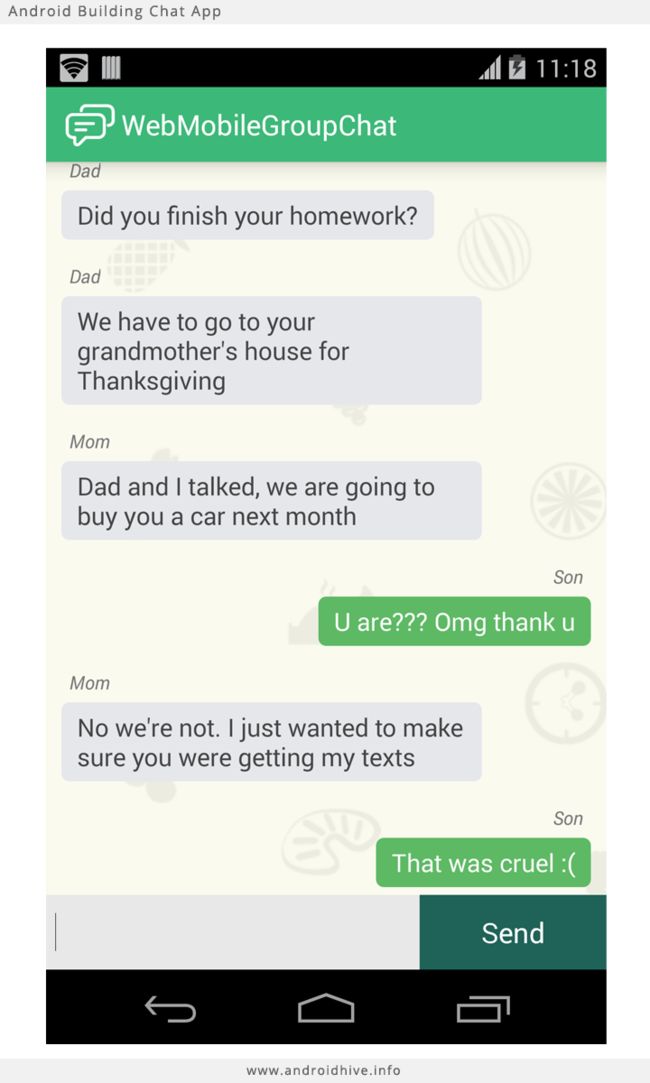
最终结果应该是这样的

