(二)linux基于rhel7.0的Apache使用 | 访问限制 | apache帮助文件 | 解析到多个页面,虚拟主机 | HTTPS,证书|
一,配置实验环境(实验环境延续上一篇幅)
[root@localhost ~]# vim /etc/httpd/conf/httpd.conf #DocumentRoot "/var/www/html"
DocumentRoot "/westos/html"
require all granted
DirectoryIndex test.html
DirectoryIndex index.html
改回初始状态,注释或者直接删除
DocumentRoot "/var/www/html"
#DocumentRoot "/westos/html"
#
#       require all granted
#       DirectoryIndex test.html
#
#
#
#       DirectoryIndex index.html
#
重启服务,关闭防火墙
[root@localhost ~]# systemctl stop firewalld
[root@localhost ~]# systemctl restart httpd
二,基于ip的访问拒绝
只拒绝某个用户,其他人正常访问
1,建立新的目录
[root@localhost ~]# cd /var/www/html/
[root@localhost html]# ls
index.html  test.html
[root@localhost html]# mkdir westos
[root@localhost html]# ls
index.html  test.html  westos
[root@localhost westos]# vim index.html
[root@localhost westos]# cat index.html
ip pages[root@localhost westos]# vim /etc/httpd/conf/httpd.conf
<<<<<<加入该语句块
Order Allow,Deny <<<<<<顺序,先读Allow,再读Deny
Allow from ALL <<<<<<允许所有人访问
Deny from 172.25.254.100 <<<<<<拒绝172.25.254.100这个用户
[root@localhost westos]# systemctl restart httpd.service 3,172.25.254.100访问
4,172.25.254.156访问
只允许某位用户访问,其他用户不允许访问
1,建立新的目录
[root@localhost ~]# cd /var/www/html/
[root@localhost html]# ls
index.html  test.html
[root@localhost html]# mkdir westos
[root@localhost html]# ls
index.html  test.html  westos
[root@localhost westos]# vim index.html
[root@localhost westos]# cat index.html
ip pages
2,修改配置文件,重启
        Order Deny,Allow                           <<<<<注意顺序
        Allow from 172.25.254.100                  <<<<<先拒绝所有,然后允许某一个
        Deny from ALL
[root@localhost ~]# systemctl restart httpd.service
3,172.25.254.100访问
4,172.25.254.156访问
三,基于用户的访问拒绝
恢复实验环境,将基于ip的访问控制语句块注释掉。
只允许某位用户访问
1,切换目录,建立用户
[root@localhost ~]# cd /etc/httpd/
[root@localhost httpd]# ls
conf  conf.d  conf.modules.d  logs  modules  run
[root@localhost httpd]# htpasswd -cm apacheuser admin             <<<<<-c创建文件apacheuser -m强制密码的MD5加密 admin是用户
New password:
Re-type new password:
Adding password for user admin
[root@localhost httpd]# htpasswd -m apacheuser tom                <<<<< !!!再次创建用户时,不用加-c,否则会覆盖原来数据
New password:
Re-type new password:
Adding password for user tom
[root@localhost httpd]# ls
apacheuser  conf  conf.d  conf.modules.d  logs  modules  run       <<<<出现文件
[root@localhost httpd]# cat apacheuser                             <<<<查看文件,密码是加密了,不义明文显示
admin:$apr1$QrFgPxrK$2KfV.cXBwYDbAhRM7Rm6A1
tom:$apr1$DB9MSQc1$Xx7HNowPuR9DmsmNnC3s.1
2,修改配置文件,加入下面语句块,重启服务
[root@localhost httpd]# vim /etc/httpd/conf/httpd.conf


        AuthUserFile /etc/httpd/apacheuser                    <<<<<<指定认证用户文件
        AuthName "Please input user and password !!! "        <<<<<<浏览器打开时的提示
        AuthType basic                                        <<<<<<认证方式 基础认证
        Require user admin                                    <<<<<<允许用户 admin
[root@localhost httpd]# systemctl restart httpd.service
3,访问测试
如果是admin访问就能通过
如果是tom访问就无法通过
如果点击cancel就验证失败
允许所有创建的用户成功访问
1,修改配置文件,重启服务
[root@localhost httpd]# vim /etc/httpd/conf/httpd.conf


        AuthUserFile /etc/httpd/apacheuser
        AuthName "Please input user and password !!! "
        AuthType basic
#       Require user admin                                            <<<<<<注释掉
        Require valid-user                                            <<<<<<允许所有有效用户访问


[root@localhost httpd]# systemctl restart httpd.service
2,清除浏览器缓存!!!!访问测试
所有用户都可正常访问
四,Apache的帮助文件需要手动下载
[root@localhost httpd]# man 5 httpd.conf
No manual entry for httpd.conf in section 5
[root@localhost httpd]# yum install httpd-manual -y
[root@localhost html]# systemctl restart httpd.service

五,一个ip解析到多个界面
1,做本地解析,浏览器在哪就在哪做解析
[root@foundation156 ~]# vim /etc/hosts
172.25.254.100 www.westos.com music.westos.com news.westos.com login.westos.com
2,此时在浏览器中输入以上域名都会显示同一个页面
3,建立虚拟主机
[root@localhost ~]# cd /etc/httpd/
[root@localhost httpd]# ls
apacheuser  conf  conf.d  conf.modules.d  logs  modules  run
[root@localhost httpd]# cd conf.d/                                         <<<<<<<存放辅配置文件
[root@localhost conf.d]# ls
autoindex.conf  manual.conf  README  userdir.conf  welcome.conf
[root@localhost conf.d]# vim default.conf                                  <<<<<
                                    <<<<<<<指定虚拟主机的端口
        DocumentRoot /var/www/html                            <<<<<<<虚拟机主机的默认发布目录是/var/www/html
        CustomLog "logs/default.log" combined     <<<<<<<指定登陆产生的日志=/etc/httpd/logs/default.log ,combined是把正确和错误信息都结合,重启服务,就可以看到该文件
注意:如果把combined改为error,那么日志里面就会只存错误信息,如果把combined改为access,那么日志里面就会只存通过信息
4,分别建立news,music的发布目录
[root@localhost conf.d]# ls
autoindex.conf  default.conf  manual.conf  README  userdir.conf  welcome.conf
[root@localhost conf.d]# mkdir /var/www/virtual/westos.com/news -p           <<<<
5,建立news的配置文件
[root@localhost conf.d]# vim news.conf

                                                   >>>>>端口号
	ServerName news.westos.com                                   >>>>>服务器名称
	DocumentRoot "/var/www/virtual/westos.com/news/"             >>>>>指定news的默认发布目录
	Customlog "logs/news.log" combined                           >>>>>登陆产生的日志


	Require all granted                                          >>>>>授权
6,建立music的配置文件
[root@localhost conf.d]# ls
autoindex.conf  default.conf  manual.conf  news.conf  README  userdir.conf  welcome.conf
[root@localhost conf.d]# cp news.conf music.conf                 >>>>>格式一样,直接复制
[root@localhost conf.d]# vim music.conf
全局替换:%s/news/music/g
7,重启服务,测试
六,http的安全版——https(https的端口号是443)
如果一个网站没有进行认证,地址栏输入https:// 会显示找不到信息
1,安装ssl加密模块
[root@localhost ~]# yum install mod_ssl.x86_64 -y
[root@localhost ~]# ls /etc/httpd/conf.d/
autoindex.conf  manual.conf  news.conf  ssl.conf      welcome.conf           <<<<<出现了ssl.conf文件
default.conf    music.conf   README     userdir.conf
[root@localhost ~]# yum install crypto-utils -y
3,加密
[root@localhost westos]# genkey www.westos.com <<<<<<对这个域名加密
密码长度就默认2048就好
随机字符输入或者移动鼠标
由于我们只是做实验,所以不发送认证到CA
不勾选开启服务器输入密码
编写证书信息
Country Name (ISO 2 letter code) CN_                            │
      │        State or Province Name (full name) Shannxi_____________           │
      │                 Locality Name (e.g. city) xi'an_______________           │
      │           Organization Name (eg, company) westos________________________ │
      │    Organizational Unit Name (eg, section) linux_________________________ │
      │                                                                          │
      │ Common Name (fully qualified domain name) www.westos.com____________
3,将密码和证书写入ssl.conf文件
[root@localhost ~]# cd /etc/httpd/conf.d/
[root@localhost conf.d]# ls
autoindex.conf  manual.conf  news.conf  ssl.conf      welcome.conf
default.conf    music.conf   README     userdir.conf
[root@localhost conf.d]# vim ssl.conf

#SSLCertificateFile /etc/pki/tls/certs/localhost.crt
SSLCertificateFile /etc/pki/tls/certs/www.westos.com.crt              <<<<<证书
#   Server Private Key:
#   If the key is not combined with the certificate, use this
#   directive to point at the key file.  Keep in mind that if
#   you've both a RSA and a DSA private key you can configure
#   both in parallel (to also allow the use of DSA ciphers, etc.)
#SSLCertificateKeyFile /etc/pki/tls/private/localhost.key
SSLCertificateKeyFile /etc/pki/tls/private/www.westos.com.key         <<<<<<密码
4,浏览器获取
浏览器地址栏:https://www.westos.com
页面点击 try again > i understand the risks > add exception > get certificate > confirm security exception
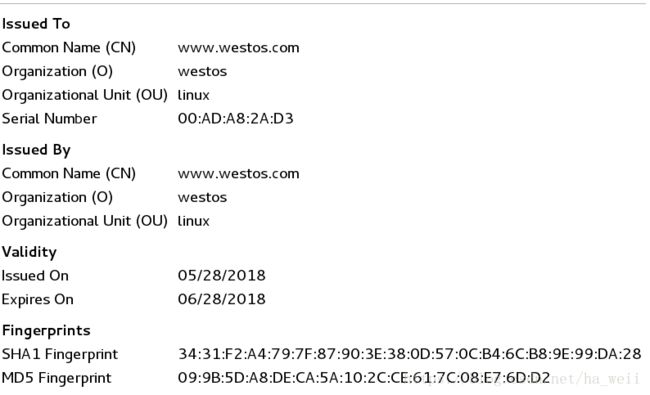
5,点击左上角的锁 > more infomation > security > view certificate 查看证书信息
七,虚拟主机开启SSL认证
[root@localhost conf.d]# mkdir /var/www/virtual/westos.com/login -p          <<<<<建立login的发布目录
[root@localhost conf.d]# vim /var/www/virtual/westos.com/login/index.html    <<<<<建立login的发布页面
[root@localhost conf.d]# cat /var/www/virtual/westos.com/login/index.html    <<<<                                                           <<<<

        Require all granted
[root@localhost conf.d]# systemctl restart httpd.service
然后就可以在在网页中输入https://login.westos.com,添加证书,查看网页了
上述方法必须要输入https://这样很麻烦,一般很多人都是直接输入login.westos.com到达界面,这样需要在login.conf文件中添加以下语句块。
直接输入login.westos.com=http://login.westos.com,所以需要修改先从80端口进入,再把地址的http修改为https
        ServerName login.westos.com
        RewriteEngine on                                             >>>>>打开重写规则
        RewriteRule ^(/.*)$ https://%{HTTP_HOST}$1 [redirect=301]    >>>>>地址栏/后面的所有部分被放在https://后面,整体地址也就变成https://login.westos.com


