SpringBoot使用Junit单元测试
摘要:本文详细的记录了SpringBoot如何结合Junit写测试用例,如何执行,打包执行,忽略执行等操作,SpringBoot内置了Junit测试组件,使用很方便,不用再单独引入其他测试组件。
演示环境:
SpringBoot + mybatis
开发工具:IntelliJ IDEA
1.pom.xml
一般使用idea新建一个SpringBoot web项目时,一般都会自动引入此依赖,如果没有,请手动引入。
         			org.springframework.boot


         			spring-boot-starter-test


         			test
2.测试类基类
新建的项目,一般会有test包和test类,结构如下:

如果没有,我们自己创建一个,由于一个项目中我们会写很多很多测试类,而测试类上面是需要以下几个注解的,每建一个类都去补注解,太麻烦,我们就在这个类中加上注解,其他测试类直接继承这个类就好了:
-
package com.alibaba;
-
-
import org.junit.After;
-
import org.junit.Before;
-
import org.junit.runner.RunWith;
-
import org.springframework.boot.test.context.SpringBootTest;
-
import org.springframework.test.context.junit4.SpringRunner;
-
import org.springframework.test.context.web.WebAppConfiguration;
-
-
@RunWith(SpringRunner.class)
-
@SpringBootTest
-
//由于是Web项目,Junit需要模拟ServletContext,因此我们需要给我们的测试类加上@WebAppConfiguration。
-
@WebAppConfiguration
-
public
class TmallApplicationTests {
-
-
@Before
-
public void init() {
-
System.out.println(
"开始测试-----------------");
-
}
-
-
@After
-
public void after() {
-
System.out.println(
"测试结束-----------------");
-
}
-
}
3.controller,service,dao等,省略,就是普通方法,普通接口
4.测试类
我这里建一个测试类,继承基类,然后测试我service中的两个方法
-
package com.alibaba;
-
-
import com.alibaba.service.EntFileService;
-
import org.junit.Assert;
-
import org.junit.Test;
-
import org.springframework.beans.factory.annotation.Autowired;
-
-
/**
-
* Created by lightClouds917
-
* Date 2018/2/2
-
* Description:测试类
-
*/
-
public
class EntFileTest extends TmallApplicationTests {
-
-
-
@Autowired
-
private EntFileService entFileService;
-
//@Ignore("not ready yet")
-
@Test
-
public void testGetEntFileById(){
-
Assert.assertSame(
"企业数量有误",
500,entFileService.getCount());
-
}
-
-
@Test
-
public void testGetEntFileList(){
-
Assert.assertSame(
"企业数量不为10",
10,entFileService.getEntFileList());
-
}
-
}
然后,第一个测试方法:我想测试一下企业数量是不是600,参数意义:
第一个参数:如果测试不通过,会抛出此消息,此参数可不要;
第二个参数:我预期的值,我这里希望他查出来的结果是600;
第三个参数:是实际的结果,就是我们调用方法返回的结果;
我们可以看一下Assert类的源码:
-
/**
-
* Asserts that two objects refer to the same object. If they are not, an
-
* {@link AssertionError} is thrown with the given message.
-
*
-
* @param message the identifying message for the {@link AssertionError} (
null
-
* okay)
-
* @param expected the expected object
-
* @param actual the object to compare to
expected
-
*/
-
static public void assertSame(String message, Object expected, Object actual) {
-
if (expected == actual) {
-
return;
-
}
-
failNotSame(message, expected, actual);
-
}
-
-
/**
-
* Asserts that two objects refer to the same object. If they are not the
-
* same, an {@link AssertionError} without a message is thrown.
-
*
-
* @param expected the expected object
-
* @param actual the object to compare to
expected
-
*/
-
static public void assertSame(Object expected, Object actual) {
-
assertSame(
null, expected, actual);
-
}
5.运行测试用例
运行有两种方法:
1.选中方法,右键,然后run 。。。;
2.点击方法前的小标;
具体操作如下截图:

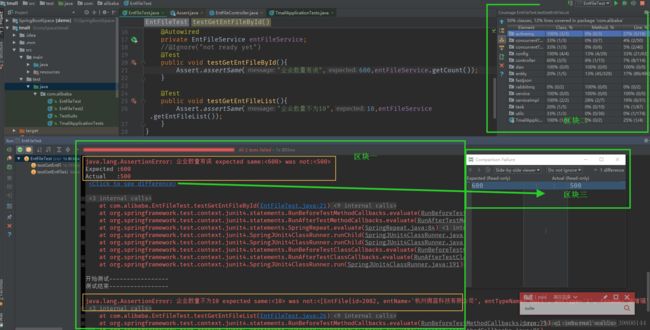
现在看运行结果,如下图:
区块一:这里是测试用例的执行结果,由于未获得预期结果,打印出了我们提前设置的错误信息。
区块二:这是测试用例的覆盖率,类的覆盖,方法的覆盖,行数的覆盖,非常详细。
区块三:此区块是预期结果和实际结果的详细对比,点击后才会显示,如图点击位置。
关于Assert中,还有很多断言方法,方法名字很规范,看名字就知道怎么用了,这里不再过多说明。
6.打包测试
项目开发完后,我们写了100个测试用例类,我不能每个类都点击进去,然后慢慢执行,SpringBoot提供了打包测试的方式:我们用一个类,把所有的测试类整理进去,然后直接运行这个类,所有的测试类都会执行。
我这里建了两个测试类,分别是EntFileTest,EntFileTest2,现在我打包进TestSuits,让他们一次运行:
@Suite.SuiteClasses({EntFileTest.class,EntFileTest2.class})

打包完整代码:
-
package com.alibaba;
-
-
import org.junit.runner.RunWith;
-
import org.junit.runners.Suite;
-
-
/**
-
* Created by lightClouds917
-
* Date 2018/2/2
-
* Description:打包测试
-
*/
-
//@Ignore("not ready yet")
-
@RunWith(Suite.class)
-
@Suite.SuiteClasses({EntFileTest.class,EntFileTest2.class})
-
public
class TestSuits {
-
-
//不用写代码,只需要注解即可
-
}
7.忽略方法
当我一个测试类写了10个测试方法时,其中有1个我暂时不想测,想跳过,但是其他9个我想一次运行,怎么办?这里有一个忽略注解,写在方法上,可以忽略这个测试方法,写在类上,可以忽略这个类。
-
package com.alibaba;
-
-
import com.alibaba.service.EntFileService;
-
import org.junit.Assert;
-
import org.junit.Ignore;
-
import org.junit.Test;
-
import org.springframework.beans.factory.annotation.Autowired;
-
-
/**
-
* Created by lightClouds917
-
* Date 2018/2/2
-
* Description:测试类
-
*/
-
public
class EntFileTest extends TmallApplicationTests {
-
-
-
@Autowired
-
private EntFileService entFileService;
-
-
@Ignore(
"not ready yet")
-
@Test
-
public void testGetEntFileById(){
-
Assert.assertSame(
"企业数量有误",
600,entFileService.getCount());
-
}
-
-
@Test
-
public void testGetEntFileList(){
-
Assert.assertSame(
"企业数量不为10",
10,entFileService.getEntFileList());
-
}
-
}