hi3536 pcie驱动学习笔记
Hi3536 PCIE学习笔记2(linux3.10.y)
一、PCI总线简单介绍
1、PCI总线配置
两类配置请求:Type00h配置请求,Type 01配置请求。Type 00h配置请求:访问与HOST主桥或者PCI桥直接相连的PCI Agent设备或这PCI桥;Type 01h配置请求:至少需要穿越一个PCI桥,访问没有与HOST主桥或PCI桥直接相连的PCI Agent设备或者PCI桥,只有PCI桥接收该类型。
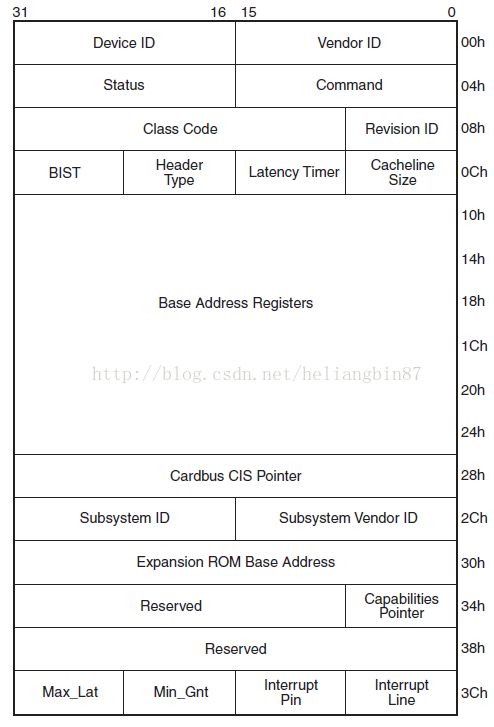
PCIAgent type 00h 配置空间
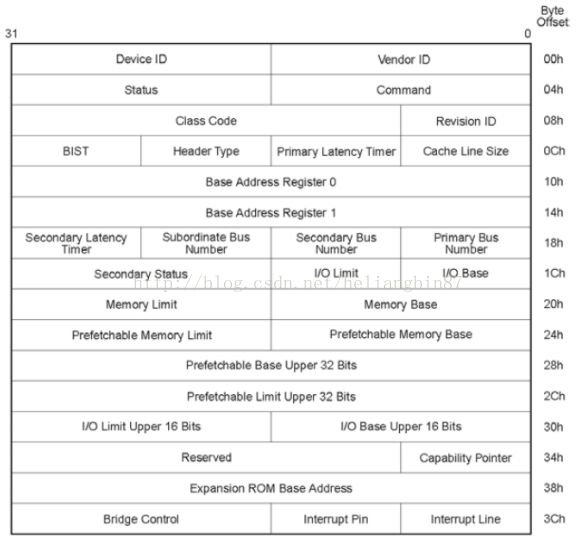
PCI桥 Type 01h 配置空间
二、内核总概述
1、内核配置
(1)kernel添加对PCI总线的支持
(2)涉及驱动
底层驱动:hi35xx_dev_host.ko pcit_dma_host.ko
PCIE消息驱动:mcc_drv_host.komcc_usrdev_host.ko
PCIV模块驱动:hi3536_pciv.kohi3536_pciv_fmw.ko
加载uboot需要的驱动:boot_device.ko
2、内核初始化过程
(1)内核启动流程
start_kernel()-> rest_init() -> kernel_init() -> kernel_init_freeable() ->do_basic_setup() -> do_initcalls()
do_initcalls():
static void __init do_initcalls(void)
{
int level;
for (level = 0; level < ARRAY_SIZE(initcall_levels) - 1;level++)
do_initcall_level(level);
}
各个级别的定义如下:
#define pure_initcall(fn) __define_initcall(fn, 0)
#define core_initcall(fn) __define_initcall(fn, 1)
#define core_initcall_sync(fn) __define_initcall(fn, 1s)
#define postcore_initcall(fn) __define_initcall(fn, 2)
#define postcore_initcall_sync(fn) __define_initcall(fn, 2s)
#define arch_initcall(fn) __define_initcall(fn, 3)
#define arch_initcall_sync(fn) __define_initcall(fn, 3s)
#define subsys_initcall(fn) __define_initcall(fn, 4)
#define subsys_initcall_sync(fn) __define_initcall(fn, 4s)
#define fs_initcall(fn) __define_initcall(fn, 5)
#define fs_initcall_sync(fn) __define_initcall(fn, 5s)
#define rootfs_initcall(fn) __define_initcall(fn, rootfs)
#define device_initcall(fn) __define_initcall(fn, 6)
#define device_initcall_sync(fn) __define_initcall(fn, 6s)
#define late_initcall(fn) __define_initcall(fn, 7)
#define late_initcall_sync(fn) __define_initcall(fn, 7s)
#define module_init(x) device_initcall(fn);
(2)PCI系统根据initcall确定调用顺序
内核目录:drivers/pci
./probe.c: postcore_initcall(pcibus_class_init);
./pci-driver.c: postcore_initcall(pci_driver_init);
./slot.c: subsys_initcall(pci_slot_init);
./hipcie/pcie.c: subsys_initcall(hisi_pcie_init);
./quirks.c: fs_initcall_sync(pci_apply_final_quirks);
./proc.c: device_initcall(pci_proc_init);
./pci.c: late_initcall(pci_resource_alignment_sysfs_init);
./pci-sysfs.c: late_initcall(pci_sysfs_init);
./hipcie/pcie.c:对PCIE总线进行扫描
(3)配置寄存器头
PCIe控制器有4K字节的配置寄存器空间,其中前256字节为PCI兼容的配置空间,有两种类型的PCI配置寄存器头PCIe Header Type0和PCIe Header Type1。当偏移0x0E地址段 head_type为0时代表HeaderType0:表示当前设备是一个EP设备即PCI设备;当head_type为1:代表HeaderType1:表示当前设备是一个RC设备即PCI桥or switch。
pci常用三种:pci i/o、pci memory、pci conf,三种都可以被CPU存储。设备驱动程序使用pci i/o pci mem,pci初始化使用pci conf。
三、PCI总线文件简述(内核)
1、probe.c
PCI detection and setup code
static struct classpcibus_class = {
.name = "pci_bus",
.dev_release = &release_pcibus_dev,
.dev_attrs = pcibus_dev_attrs,
};
static int __initpcibus_class_init(void)
{
returnclass_register(&pcibus_class);
}
postcore_initcall(pcibus_class_init);
主要作用是注册一个名为“pci_bus”的class结构,执行完之后会在/sys/class目录下产生一个“pci_bus”的目录。
2、pci-driver.c
该函数也与sysfs文件系统相关,执行完毕后,在/sys/bus目录下建立一个“pci”目录,之后当linux的pci设备使用device_register函数注册一个新的pci设备时,将在/sys/bus/pci/drivers目录下创建这个设备使用的目录。
(1)总线初始化
struct bus_type pci_bus_type = {
.name ="pci",
.match = pci_bus_match,
.uevent = pci_uevent,
.probe =pci_device_probe,
.remove =pci_device_remove,
.shutdown = pci_device_shutdown,
.dev_attrs = pci_dev_attrs,
.bus_attrs = pci_bus_attrs,
.drv_attrs = pci_drv_attrs,
.pm = PCI_PM_OPS_PTR,
};
static int __initpci_driver_init(void)
{
return bus_register(&pci_bus_type);
}
postcore_initcall(pci_driver_init);
(2)bus_register函数
注册一个总线系统(如这里的pci),总线包含两个重要的成员devices_kset和drivers_kset,代表这个总线上的两个链表:设备链表和驱动链表。两个重要链表创建后同时会添加到sysfs系统里,就是通常看到的/sys/bus/pci/drivers和/sys/bus/pci/devices。
(3)pci_bus_match
判断一个当前PCI设备是否在驱动支持的列表中。
(4)pci_uevent
将PCI的关键值存放到kobj_uevent_env的环境buffer里
(5)pci_device_probe
检查一个驱动想获取一个特定的PCI设备
3、slot.c
staticint pci_slot_init(void)
{
struct kset *pci_bus_kset;
pci_bus_kset = bus_get_kset(&pci_bus_type);
pci_slots_kset = kset_create_and_add("slots", NULL,
&pci_bus_kset->kobj);
if (!pci_slots_kset) {
printk(KERN_ERR "PCI: Slot initialization failure\n");
return -ENOMEM;
}
return 0;
}
subsys_initcall(pci_slot_init);
初始化PCI总线的卡槽位内核对象,创建后会添加到sysfs系统里,就是通常看到的/sys/bus/pci/slots
4、quirks.c
5、proc.c
static int __init pci_proc_init(void)
{
struct pci_dev *dev = NULL;
proc_bus_pci_dir = proc_mkdir("bus/pci", NULL);
proc_create("devices", 0, proc_bus_pci_dir,
&proc_bus_pci_dev_operations);
proc_initialized = 1;
for_each_pci_dev(dev)
pci_proc_attach_device(dev);
return 0;
}
device_initcall(pci_proc_init);
在proc下创建PCI相关的信息,对应的目录为proc/bus/pci
6、pci.c
BUS_ATTR(resource_alignment, 0644,pci_resource_alignment_show,
pci_resource_alignment_store);
static int __initpci_resource_alignment_sysfs_init(void)
{
return bus_create_file(&pci_bus_type,
&bus_attr_resource_alignment);
}
late_initcall(pci_resource_alignment_sysfs_init);
在sys/bus/pci/resource_alignment文件
7、pci-sysfs.c
static int __init pci_sysfs_init(void)
{
struct pci_dev *pdev = NULL;
int retval;
sysfs_initialized = 1;
for_each_pci_dev(pdev) {
retval = pci_create_sysfs_dev_files(pdev);
if (retval) {
pci_dev_put(pdev);
return retval;
}
}
return 0;
}
late_initcall(pci_sysfs_init);
将每一个设备添加到sysfs文件系统相应目录下。
8、hipcie/pcie.c(控制器驱动)
(1)注册hipcie设备和驱动
const struct dev_pm_ops hisi_pcie_pm_ops ={
.suspend = NULL,
.suspend_noirq = hisi_pcie_plat_driver_suspend,
.resume = NULL,
.resume_noirq = hisi_pcie_plat_driver_resume
};
#define HISI_PCIE_PM_OPS(&hisi_pcie_pm_ops)
#define PCIE_RC_DRV_NAME "hisi pcieroot complex"
static struct platform_driver hisi_pcie_platform_driver = {
.probe =hisi_pcie_plat_driver_probe,
.remove =hisi_pcie_plat_driver_remove,
.driver = {
.owner = THIS_MODULE,
.name = PCIE_RC_DRV_NAME,
.bus = &platform_bus_type,
.pm = HISI_PCIE_PM_OPS
},
};
//PCIE register: 0x1f000000~0x1f000fff
static struct resourcehisi_pcie_resources[] = {
[0] = {
.start = PCIE_DBI_BASE, //0x1f000000
.end = PCIE_DBI_BASE + __4KB__- 1,
.flags = IORESOURCE_REG, //register offset
}
};
static u64 hipcie_dmamask =DMA_BIT_MASK(32);
static struct platform_device hisi_pcie_platform_device = {
.name = PCIE_RC_DRV_NAME,
.id = 0,
.dev = {
.platform_data = NULL,
.dma_mask = &hipcie_dmamask,
.coherent_dma_mask = DMA_BIT_MASK(32),
.release = hisi_pcie_platform_device_release,
},
.num_resources = ARRAY_SIZE(hisi_pcie_resources),
.resource = hisi_pcie_resources,
};
static int __init hisi_pcie_init(void)
{
int ret;
ret = platform_device_register(&hisi_pcie_platform_device);
if (ret)
goto err_device;
ret = platform_driver_register(&hisi_pcie_platform_driver);
if (ret)
goto err_driver;
if (pcie_init()) {
pcie_error("pcie sys init failed!");
goto err_init;
}
}
subsys_initcall(hisi_pcie_init);
hipcie通过虚拟地址总线机制platform的方式向内核注册设备和驱动。platform_driver_register()->driver_register() -> bus_add_driver() -> driver_attach()->bus_for_each_dev(),对在每个挂在虚拟的platform bus的设备作__driver_attach() ->driver_probe_device()判断drv->bus->match()是否执行成功,此时通过指针执行platform_match->strncmp(pdev->name , drv->name , BUS_ID_SIZE),如果相符就调用really_probe(实际就是执行相应设备的platform_driver->probe(platform_device),这里probe空实现)
platform_match:是通过判断设备和驱动name的一致性。
(2)hipcie初始化pcie_init()
A.static struct hw_pcihipcie __initdata = {
.nr_controllers = 1,
.preinit = pcie_preinit, //空实现
.swizzle = pci_common_swizzle, //中断引脚转换
.setup = pcie_setup, //获取资源及配置PCIE iATU转换表
.scan = pcie_scan_bus, //扫描PCIE物理总线上的设备
.map_irq = pcie_map_irq, //映射中断引脚
};
B.static int __initpcie_init(void)
{
….
/*
* Scene: PCIe host(RC)<--->SWITCH<--->PCIe device(*)
* |
* |------->NULL SLOT
* PCIe will generate a DataAbort to ARM, when scaning NULL SLOT.
* Register hook to capture this exception and handle it.
*/
hook_fault_code(22, pcie_fault, 7, BUS_OBJERR,
"external abort on non-linefetch");
if (__arch_pcie_info_setup(pcie_info,&pcie_controllers_nr))
return -EIO;
if (__arch_pcie_sys_init(pcie_info))
goto pcie_init_err;
hipcie.nr_controllers = pcie_controllers_nr;
pr_err("Number of PCIe controllers: %d\n",
hipcie.nr_controllers);
pci_common_init(&hipcie);
return 0;
pcie_init_err:
__arch_pcie_info_release(pcie_info);
return -EIO;
}
__arch_pcie_info_setup完成控制地址转换:
/* RC configuration space */
info->conf_base_addr = (unsignedint)ioremap_nocache(PCIE_DBI_BASE,__4KB__); //0x1f000000
/* Configuration space for all EPs */
info->base_addr = (unsignedint)ioremap_nocache(PCIE_EP_CONF_BASE, cfg_size); //0x20000000,8M, 在pcie_setup中进行了地址转换设置
misc_ctrl_virt =ioremap_nocache(MISC_CTRL_BASE, __4KB__); //0x12120000
__arch_pcie_sys_init:配置PCIE控制器相关内容(开启,时钟,RC模式,配置部分PCI配置空间等)
pci_common_init(&hipcie):调用pcie_scan_bus接口实现设备扫描,资源分配,及添加到pci_bus总线上。
C.pci_common_init函数解析
pcibios_init_hw(hw,&head);配置资源,扫描设备。
hw->setup(nr,sys)(pcie_setup)
pcibios_init_resources(nr,sys);
sys->bus= hw->scan(nr, sys);(pcie_scan_bus)
pci_fixup_irqs(pcibios_swizzle,pcibios_map_irq);将pcie虚拟引脚1 2 3 4和CPU的INTA B C D的中断号映射好。
D.逐一解析函数
pcie_setup:request_pcie_res->__arch_get_pcie_resh 和 __arch_config_iatu_tbl:
request_pcie_res->__arch_get_pcie_resh: //memory/io存储域在pcie_scan_bus时给各个EP进行分配
static struct resource pcie_mem; //PCIE io/memory空间
static struct resource pcie_io; //PCIE ioport空间
static void __arch_get_pcie_res(intcontroller,
struct resource **pmem,
struct resource **pio)
{
*pmem = &pcie_mem;
(*pmem)->start = PCIE_MEM_BASE; //0x30000000
(*pmem)->end = PCIE_MEM_BASE +0x10000000 - 1; //256M
(*pmem)->flags = IORESOURCE_MEM;
(*pmem)->name = "memory";
*pio = &pcie_io;
(*pio)->start = 0x0; //没有对应空间
(*pio)->end = 0x0;
(*pio)->flags = IORESOURCE_IO;
(*pio)->name = "io";
}
pci_add_resource_offset(&sys->resources,io, sys->io_offset)
pci_add_resource_offset(&sys->resources,mem, sys->mem_offset) //mem_offset=0
__arch_config_iatu_tbl: //所有EP段配置空间转换
structpcie_iatu iatu_table[] = {
{
.viewport = 0, //atu_viewport
.region_ctrl_1 = 0x00000004,
.region_ctrl_2 = 0x90000000,
.lbar = PCIE_EP_CONF_BASE +(1<<20)//0x20100000 atu_base_low
.ubar = 0x0, //atu_base_high
.lar = PCIE_EP_CONF_BASE + (2<<20) -1, //atu_limit
.ltar = 0x01000000, //atu_target_low
.utar = 0x00000000, //atu_target_high
},配置事务0,本地总线地址0x20100000 – 0x201fffff
{
.viewport = 1,
.region_ctrl_1 = 0x00000005,
.region_ctrl_2 = 0x90000000,
.lbar = PCIE_EP_CONF_BASE +(2<<20), //0x20200000 atu_base_low
.ubar = 0x0, //atu_base_high
.lar = PCIE_EP_CONF_BASE + (__256MB__ -1), //atu_limit
.ltar = 0x02000000, //atu_target_low
.utar = 0x00000000, //atu_target_high
},配置事务1,本地总线地址0x20200000 – 0x2fffffff
};
只有执行此config后,PCIE才能实现CFG_TYPE0和CFG_TYPE1的配置事务访问(寄存器的具体配置请结合datasheet ATU地址转换,各个数值说明见PDF1886页注意事项)
pcibios_init_resources:
pci_add_resource_offset(&sys->resources,&sys->io_res, sys->io_offset);
pcie_scan_bus:
为总线提供读写操作接口:
staticstruct pci_ops pcie_ops = {
.read = pcie_read_conf,
.write = pcie_write_conf,
};
pci_scan_root_bus(NULL,sys->busnr, &pcie_ops, sys, &sys->resources)
-->pci_create_root_bus()建立相应的数据结构pci_bus,pci_host_bridge等
-->pci_scan_child_bus(b)枚举整个pci总线上的设备
-->pci_bus_size_bridges(buf)和pci_bus_assign_resources(bus)分配总线资源
Hi3536的驱动pci_config_read和pci_config_write最终就是调用上面的接口。
pci_scan_child_bus -> pci_scan_slot-> pci_scan_single_device -> pci_scan_device -> pci_setup_device 读取配置空间获取设备相应信息(配置空间信息见1.1节细节)
pci_bus_assign_resources -> pbus_assign_resources_sorted-> __assign_resources_sorted -> assign_requested_resources_sorted -> pci_assign_resource-> _pci_assign_resource 和 pci_update_resource,重新分配设备资源和更新设备的BAR起始基地址。
9、内核启动打印
Number of PCIe controllers: 1
PCI host bridge to bus 0000:00
pci_bus 0000:00: root bus resource [io 0x0000]
pci_bus 0000:00: root bus resource [mem0x30000000-0x3fffffff]
pci_bus 0000:00: No busn resource found forroot bus, will use [bus 00-ff]
********** hdr_type:0x1
********** class:0x6040001
********** cfg_size:0x1000
********** region[0x10] start:0x0,end:0x7fffff, size:0x7fffff
********** bus_region start:0x30000000,end:0x3fffffff
**********offset:0x0, res start:0x0,end0x7fffff
********** region[0x14] start:0x0,end:0xffff, size:0xffff
********** bus_region start:0x30000000,end:0x3fffffff
**********offset:0x0, res start:0x0,end0xffff
PCI: bus0: Fast back to back transfersdisabled
pci 0000:00:00.0: bridge configurationinvalid ([bus 00-00]), reconfiguring
********** hdr_type:0x0
********** class:0x4800001
********** cfg_size:0x1000
********** PCI_HEADER_TYPE_NORMAL
********** region[0x10] start:0x0,end:0xfff, size:0xfff
********** bus_region start:0x30000000,end:0x3fffffff
**********offset:0x0, res start:0x0,end0xfff
********** region[0x14] start:0x0,end:0x1ffffff, size:0x1ffffff
********** bus_region start:0x30000000,end:0x3fffffff
**********offset:0x0, res start:0x0,end0x1ffffff
********** region[0x18] start:0x0,end:0x1ffffff, size:0x1ffffff
********** bus_region start:0x30000000,end:0x3fffffff
**********offset:0x0, res start:0x0,end0x1ffffff
********** region[0x1c] start:0x0,end:0x1ffffff, size:0x1ffffff
********** bus_region start:0x30000000,end:0x3fffffff
**********offset:0x0, res start:0x0,end0x1ffffff
********** region[0x20] start:0x0,end:0x1ffffff, size:0x1ffffff
********** bus_region start:0x30000000,end:0x3fffffff
**********offset:0x0, res start:0x0,end0x1ffffff
********** region[0x24] start:0x0,end:0x1ffffff, size:0x1ffffff
********** bus_region start:0x30000000,end:0x3fffffff
**********offset:0x0, res start:0x0,end0x1ffffff
PCI: bus1: Fast back to back transfersdisabled
*****pin:1 映射到INT_B中断号
*****pin:1
pci 0000:00:00.0: ****BAR 9: assigned [mem0x02000000-0x0bffffff pref]
pci 0000:00:00.0: BAR 9: assigned [mem0x30000000-0x39ffffff pref]
pci 0000:00:00.0: ****BAR 0: assigned [mem0x00000000-0x007fffff pref]
pci 0000:00:00.0: BAR 0: assigned [mem0x3a000000-0x3a7fffff pref]
pci 0000:00:00.0: ****BAR 8: assigned [mem0x00100000-0x001fffff]
pci 0000:00:00.0: BAR 8: assigned [mem0x3a800000-0x3a8fffff]
pci 0000:00:00.0: ****BAR 1: assigned [mem0x00000000-0x0000ffff]
pci 0000:00:00.0: BAR 1: assigned [mem0x3a900000-0x3a90ffff]
pci 0000:01:00.0: ****BAR 1: assigned [mem0x00000000-0x01ffffff pref]
pci 0000:01:00.0: BAR 1: assigned [mem0x30000000-0x31ffffff pref]
pci 0000:01:00.0: ****BAR 2: assigned [mem0x00000000-0x01ffffff pref]
pci 0000:01:00.0: BAR 2: assigned [mem0x32000000-0x33ffffff pref]
pci 0000:01:00.0: ****BAR 3: assigned [mem0x00000000-0x01ffffff pref]
pci 0000:01:00.0: BAR 3: assigned [mem 0x34000000-0x35ffffffpref]
pci 0000:01:00.0: ****BAR 4: assigned [mem0x00000000-0x01ffffff pref]
pci 0000:01:00.0: BAR 4: assigned [mem0x36000000-0x37ffffff pref]
pci 0000:01:00.0: ****BAR 5: assigned [mem0x00000000-0x01ffffff pref]
pci 0000:01:00.0: BAR 5: assigned [mem0x38000000-0x39ffffff pref]
pci 0000:01:00.0: ****BAR 0: assigned [mem0x00000000-0x00000fff]
pci 0000:01:00.0: BAR 0: assigned [mem0x3a800000-0x3a800fff]
pci 0000:00:00.0: PCI bridge to [bus 01]
pci 0000:00:00.0: bridge window [mem 0x3a800000-0x3a8fffff]
pci 0000:00:00.0: bridge window [mem 0x30000000-0x39ffffffpref]
四、hi3536 PCIE驱动
1、涉及驱动
底层驱动:hi35xx_dev_host.ko pcit_dma_host.ko
PCIE消息驱动:mcc_drv_host.komcc_usrdev_host.ko
PCIV模块驱动:hi3536_pciv.kohi3536_pciv_fmw.ko(业务相关驱动,无源码不分析)
加载uboot需要的驱动:boot_device.ko
2、boot_device.ko
涉及文件:hios_boot_usrdev.c和ddr_reg_init.c。加在boot kernel fs等到所有的EP设备。
以miscdevice的设备方式注册驱动,ioctl支持获取所有设备、传输数据、启动设备、复位设备。
由booter应用程序控制加载。
3、hi35xx_dev_host.ko
涉及文件:hi35xx_dev_host.c和mcc_proc_msg.c。注册PCI设备驱动,初始化设备,使能设备,做好映射。
(1)驱动初始化
static int __inithi35xx_pcie_module_init(void)
{
….
g_local_handler = kmalloc(sizeof(structpci_operation), GFP_KERNEL);//所有pcie操作相关的结构体。
ret =hidev_host_init(g_local_handler); //初始化读写配置结构体
…
ret = pci_arch_init(g_local_handler); //初始化结构体剩余部分,大部分是由该出初始化
….
ret =pci_register_driver(&pci_hidev_driver); //注册pcie驱动
…
#ifdef MCC_PROC_ENABLE
ret = mcc_proc_init();
…
mcc_create_proc("mcc_info", NULL,NULL); //创建proc下面相关目录和文件,pci_mcc/mcc_info
ret = mcc_init_sysctl()—>register_sysctl_table()
//创建sys/dev/pci/proc_message_enable
…
#endif
return 0;
}
(2)注册pcie驱动pci_register_driver(&pci_hidev_driver)
pci_register_driver -> __pci_register_driver(drv->driver.bus = &pci_bus_type 总线为pci_bus) ->driver_register —> bus_add_driver —> driver_attach —> __driver_attach —>driver_match_device(说明如下) ->driver_probe_device -> really_probe —> dev->bus->probe(pci_bus_type.pci_device_probe)
pcie 的driver_match_device调用pci_bus_type的pci_bus_match —> pci_match_device—> pci_match_one_device(&dynid->id,dev)使用pci_device_id进行匹配这里为hi35xx_pci_tbl。
pci总线pci_device_probe调用__pci_device_probe —> pci_call_probe —> local_pci_probe —>ddi->drv->probe(pci_hidev_driver. pci_hidev_probe)
(3)pci_hidev_probe
pci_enable_device:激活PCI设备,在驱动程序可以访问PCI设备的任何设备资源之前(I/O区域或者中断),驱动程序必须调用该函数;主要就是把PCI配置空间的Command域的0位和1 位置成了1,从而达到了开启设备的目的。设置PCI设备使用的irq号。
pci_request_regions:通知内核该设备对应的IO端口和内存资源已经使用,其他的PCI设备不要再使用这个区域
hi_dev->bar0 = pci_resource_start(pdev,0); //0x3a800000在扫描设备pci_read_bases中读取pci设备bar返回的是存储器域的物理地址,更新之后PCIe设备的BARx基地址空间属于PCI总线域。
hi_dev->bar1 = pci_resource_start(pdev,1); //0x30000000
hi_dev->bar2 = pci_resource_start(pdev,2); //0x32000000
hi_dev->pci_bar0_virt = (unsignedint)ioremap_nocache(hi_dev->bar0, 0x800000); //8M
hi_dev->pci_bar1_virt = (unsignedint)ioremap_nocache(hi_dev->bar1, 0x10000); //64K
/* [pci_hidev_probe, 177]:hidev# [slot:0x1] [controller:0x0] [bar0:0x3a800000] [bar1:0x30000000][bar2:0x32000000]. */
g_local_handler->init_hidev(hi_dev):
staticint init_hidev(struct hi35xx_dev *hi_dev)
{
s_pcie_opt->move_pf_window_in(hi_dev,
s_pcie_opt->sysctl_reg_phys,
0x1000,
1);
s_pcie_opt->move_pf_window_in(hi_dev,
s_pcie_opt->misc_reg_phys,
0x1000,
3);
s_pcie_opt->pci_config_read(hi_dev,
CFG_BAR3_REG,
&hi_dev->bar3); //0x34000008
hi_dev->pci_bar3_virt = (unsignedint)ioremap(hi_dev->bar3, 0x2000); //8K
return 0;
}
move_pf_window_in和move_pf_window_out配置PCI设备(EP端)的inbound和outbound.
例子:
g_local_handler->move_pf_window_in(hi_dev,target_addr, 0xffff, 0);
copy_from_user((void *)hi_dev->pci_bar0_virt, (void *)source_addr, MAX_BAR0_SPACE_SIZE)
设置EP端的inbound将要拷贝的目的地址映射到BAR0,RC端将源数据拷贝到pci_bar0_virt地址就会拷贝到EP目的地址。
4、pcit_dma_host.ko
涉及文件:dma_trans.c
Hi3536PCIE控制器内含DMA控制器,DMA控制器包含两个DMA通道(一个读和一个写),用于大数据量存储器读写事务,实现全双工运行。
DMA写:将一块数据从本地内存空间搬运至对端设备的内存空间
DMA读:将一块数据从对端设备的内存空间搬移至本地内存空间。
(1)驱动初始化
staticint __init pci_dma_transfer_init(void)
{
…
if (dma_sys_init()) { //初始化dma.write和dma.read两个通道,每个都有消息和数据两个任务队列,支持128个
PCIT_PRINT(PCIT_ERR, "PCI DMA sysinit failed!");
return -1;
}
ret = dma_arch_init(); //初始化dma中断并开启中断,中断号为86,处理函数host_dma_irq_handler
…
ret = misc_register(&pci_dma_miscdev); //注册为miscdevice类型
…
}
(2)中断处理函数host_dma_irq_handler
irqreturn_thost_dma_irq_handler(int irq, void *dev_id)
{
__do_pcit_dma_trans(&s_pcit_dma.write,PCI_DMA_WRITE);
__do_pcit_dma_trans(&s_pcit_dma.read,PCI_DMA_READ);
return IRQ_HANDLED;
}
同时处理读写通道。
__do_pcit_dma_trans:先检查是否中止(如果中止,重试3次);正常传输完成,调用任务钩子函数finish(任务创建者自己定义),从队列中删除该任务;开启新的任务(消息任务高于数据)。
(3)misc设备pci_dma_miscdev
其他函数为空,只有dma_trans_ioctl实现读写任务创建。pcit_create_task —> __pcit_create_task -> __do_create_task: 将任务添加到队列(如果队列空则马上启动dma,如果有任务则添加到任务末尾),DMA任务完成或者中止会产生中断。
5、mcc_drv_host.ko
涉及文件:pci_proto_init_v2.c和pci_vdd_ops.c
(1)pci_proto_init_v2.c
初始化对int_x中断请求,中断处理函数message_irq_handler:
staticint __init msg_com_init(void)
{
…
handler = message_irq_handler;
if(g_local_handler->request_msg_irq(handler)) {
mcc_trace(MCC_ERR, "Request msgirq failed!");
return -1;
}
init_timer(&msg_trigger_timer);
…
}
message_irq_handler:处理recv_irq_mem和recv_thread_mem的消息,两个函数处理机制差不多,循环处理消息buf的消息,直到消息buf为空为止。
pos = head->src <
handle = hisi_handle_table[pos]
根据target_id 和port得到相应消息类型的队列,将消息放入该队列(各种消息类型队列创建在hios_mcc_usrdev通过ioctl),调用有mcc_usrdev_host.o定义的消息处理钩子函数vdd_notifier_recvfrom->hios_mcc_notifier_recv_pci。
g_local_handler->request_msg_irq-> request_message_irq:通过INT_A INT_B INIT_CINIT_D PCIE标准中断(无实际硬件端口),EP通过设置这几个中断使RC产生中断读取消息。(注:目前DSP上,RC无法通过设置这几个来使EP产生中断)。
(2)pci_vdd_ops.c
封装一层drv消息操作接口(open, sendto, setopt等),供mcc_usrdev_host.ko驱动模块使用。调用流程:hios_mcc_usrdev.c-> hios_mcc.c -> pci_vdd_ops.c。
6、mcc_usrdev_host.ko
涉及文件:hios_mcc_usrdev.c和hios_mcc.c
为用户态提供消息相关操作的驱动模块。
(1)hios_mcc_usrdev.c
注册一个miscdevice设备,该驱动与用户态程序进行消息交互。/dev/mcc_userdev该设备每个消息类型都会打开一次,根据target_id和port创建消息句柄。
主要接口说明如下:
hios_mcc_notifier_recv_pci:
消息结构钩子函数(vdd_notifier_recvfrom在中断中处理),将消息放入队列供用户读取,不同消息类型都有一个自己的队列(如通用命令消息,码流读消息,码流写消息等)
usrdev_setopt_recv_pci:
获取处理句柄、设置接收消息属性,通过ioctl控制
hi_mcc_userdev_release:
释放句柄,清空消息列表
hi_mcc_userdev_read:
读取各自队列中的消息(中断接收见pci_init_proto_v2.c)
hi_mcc_userdev_write:
发送消息,放入共享内存,调用trigger_msg_irq触发pci从设备中断(通过bar0向DSP寄存器设置产生中断)。
trigger_msg_irq:INT_A/B/C/D中断方式如果是RC端则通过设置EP端的寄存器触发中断通知EP端,如果是EP端则通过触发本地PCIE中断通知RC
hi_mcc_userdev_ioctl:
HI_MCC_IOC_ATTR_INIT:初始化消息属性
HI_MCC_IOC_CHECK:根据target_id同从设备进行握手(host有step0, step1, step2; slave有step0, step1),获取从设备的共享内存地址(主要用于消息收发),并进行初始化(hisi_shared_mem_init)。
HI_MCC_IOC_CONNECT:hios_mcc_open根据target_id和消息port创建句柄并存放在hisi_handle_table[pos] = handle这个全局表格(中断接到消息时根据target_id和port计算出pos获取到对应消息类型的句柄);file->private_data = (void *)handle将消息句柄存放在打开该文件的私有数据,方便读写等地方使用。
hisi_shared_mem_init:对共享内存进行划分
假定总范围:0x60000000 ~ 0x600C0000 (768* 1024)
send_msg:
0x60000000+4*32(first_half_base) ~0x60060000-6*32(first_half_end) (384*1024)
recv_msg:
0x60060000+4*32(second_half_base) ~ 0x600c0000-10*32(second_half_end)(384*1024)
以下以send为类(recv类似):
_init_mem send_irqmem:
0x60000000+4*32 ~ 0x60020000-4*32 (128*1024)
_init_mem send_threadmem:
0x60020000+4*32 ~ 0x6006000-6*32
以下以send_irqmem为例(其他类似):
_init_meminfo:
p->base_addr = 0x60000000+4*32
p->end_addr = 0x60020000-4*32
p->rp_addr=0x60000000+4*32 – 64
p->wp_addr=0x60000000+4*32 - 32
(2)hios_mcc.c
对pci_vdd_ops.c接口进行一次封装,供hios_mcc_usrdev.c使用。接口有:
hios_mcc_close()
hios_mcc_open()
hios_mcc_sendto()
hios_mcc_sendto_user()
hios_mcc_getopt()
hios_mcc_setopt()
hios_mcc_getlocalid()
hios_mcc_getremoteids()
hios_mcc_check_remote()


