Java NIO知识总结
什么是NIO?
Java NIO(New IO)是一个可以替代标准Java IO API的IO API(从Java 1.4开始),Java NIO提供了与标准IO不同的IO工作方式。
Java NIO: Channels and Buffers(通道和缓冲区)
标准的IO基于字节流和字符流进行操作的,而NIO是基于通道(Channel)和缓冲区(Buffer)进行操作,数据总是从通道读取到缓冲区中,或者从缓冲区写入到通道中。
Java NIO: Non-blocking IO(非阻塞IO)
Java NIO可以让你非阻塞的使用IO,例如:当线程从通道读取数据到缓冲区时,线程还是可以进行其他事情。当数据被写入到缓冲区时,线程可以继续处理它。从缓冲区写入通道也类似。
Java NIO: Selectors(选择器)
Java NIO引入了选择器的概念,选择器用于监听多个通道的事件(比如:连接打开,数据到达)。因此,单个的线程可以监听多个数据通道。
注意:传统IT是单向。
IO和NIO区别?
① IO是面向流(字节流和字符流)操作的,而NIO是面向缓冲区操作的
② IO是阻塞性IO,而NIO是非阻塞性IO
③ IO不支持选择器,而NIO支持选择器
Buffer的数据存取
一个用于特定基本数据类行的容器。存在于java.nio包中,所有缓冲区都是抽象类Buffer的子类。
Java NIO中的Buffer主要用于与NIO通道进行交互,数据是从通道读入到缓冲区,从缓冲区写入通道中的。
Buffer就像一个数组,可以保存多个相同类型的数据。根据类型不同(boolean除外)
Buffer的概述【重点理解】
Buffer是一个抽象类,其内部有几个重要的成员变量
private int mark = -1;

//下一个要读取或写入的数据的索引,position不能大于limit
private int position = 0;

//第一个不应该读取或者写入的数据的索引,即位于limit后的数据不可以读写
private int limit;

//表示Buffer最大数据容量
private int capacity;1)容量(capacity):表示Buffer最大数据容量,缓冲区容量不能为负,并且建立后不能修改。
2)限制(limit):第一个不应该读取或者写入的数据的索引,即位于limit后的数据不可以读写。缓冲区的限制不能为负,并且不能大于其容量(capacity)。
3)位置(position):下一个要读取或写入的数据的索引。缓冲区的位置不能为负,并且不能大于其限制(limit)。
4)标记(mark)与重置(reset):标记是一个索引,通过Buffer中的mark()方法指定Buffer中一个特定的position,之后可以通过调用reset()方法恢复到这个position。
看一个例子:
package cn.itcats.nio;

import java.nio.ByteBuffer;

import org.junit.Test;

public class BufferTest {
	@Test
	public void byteBufferTest(){
		//初始化ByteBuffer大小
		ByteBuffer byteBuffer = ByteBuffer.allocate(1024);
		System.out.println("position:"+byteBuffer.position());     //0
		System.out.println("limit:"+byteBuffer.limit());           //1024
		System.out.println("capacity:"+byteBuffer.capacity());     //1024
	}
}
缓冲区核心的方法:
ByteBuffer.allocate(int capacity); 获取非直接缓冲区,并设置最大容量
put() 存入数据到缓冲区
get() 获取一个缓冲区数据
get(byte) 获取所有缓冲区数据
flip() 将写模式转化为读模式,并把position置为0,limit=position,mark=-1取消标记
rewind() 读写模式都可用,并把position=0,mark=-1取消标记
clear() 作用于写模式,limit=capacity,position=0,mark=-1取消标记
这时很有必要了解一下《NIO之Buffer的clear()、rewind()、flip()方法的区别》
                //演示put方法
		byteBuffer.put("hello".getBytes());   //5个字节
		System.out.println("position:"+byteBuffer.position());		//5————表示下一个要被读取或者索引从5开始,0-4存储了hello
		System.out.println("limit:"+byteBuffer.limit());	        //1024————下一个不应该被读写的索引
		System.out.println("capacity:"+byteBuffer.capacity());		//1024
System.out.println("---------------读取值--------------------");
		byte [] b = new byte[byteBuffer.limit()];
		byteBuffer.get(b);
直接get操作会抛出java.nio.BufferUnderflowException,原因:
经过打印发现position为5,即下一个可以读写的索引为5,而hello数据存在0-4索引,则在get()并存放在数组之前因进行flip()
		System.out.println("---------------读取值--------------------");
		//开启读模式
		byteBuffer.flip();
		System.out.println("position:"+byteBuffer.position());		//0
		System.out.println("limit:"+byteBuffer.limit());	       //5
		System.out.println("capacity:"+byteBuffer.capacity());       //1024
		byte [] b = new byte[byteBuffer.limit()];
		byteBuffer.get(b);
		System.out.println(new String(b,0,b.length));
		System.out.println("position:"+byteBuffer.position());		//5
		System.out.println("limit:"+byteBuffer.limit());	     //5
		System.out.println("capacity:"+byteBuffer.capacity());	  //1024
System.out.println("---------------重复读值--------------------");
byteBuffer.flip();
System.out.println("position:"+byteBuffer.position()); //0
System.out.println("limit:"+byteBuffer.limit()); //5
System.out.println("capacity:"+byteBuffer.capacity()); //1024
byte [] b = new byte[byteBuffer.limit()];
byteBuffer.get(b); //hello
System.out.println(new String(b,0,b.length));
System.out.println("position:"+byteBuffer.position()); //5
System.out.println("limit:"+byteBuffer.limit()); //5
System.out.println("capacity:"+byteBuffer.capacity()); //1024
System.out.println("---------------清空clear值--------------------");
		byteBuffer.clear();
		System.out.println("position:"+byteBuffer.position());		//0
		System.out.println("limit:"+byteBuffer.limit());	    //1024
		System.out.println("capacity:"+byteBuffer.capacity());      //1024
		byte [] b3 = new byte[byteBuffer.limit()];
		byteBuffer.get(b3); 						//hello
		System.out.println(new String(b3,0,b3.length));
		System.out.println("position:"+byteBuffer.position());		//1024
		System.out.println("limit:"+byteBuffer.limit());	        //1024
System.out.println("capacity:"+byteBuffer.capacity()); //1024如果还没搞懂输出结果,建议再看一次:《NIO之Buffer的clear()、rewind()、flip()方法的区别》
再次声明clear()并不是真正清空值,而是postion=1,limit=capacity=1024,再次读取还是可以读出结果
make与rest用法
标记(mark)与重置(reset):标记是一个索引,通过Buffer中的mark()方法记录Buffer中一个特定的position,之后可以通过调用reset()方法恢复到这个position。
直接缓冲区与非直接缓冲区别
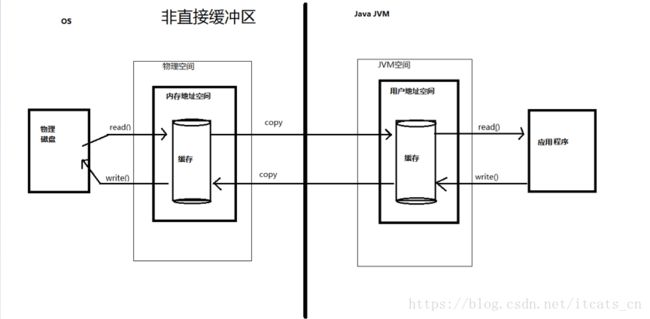
非直接缓冲区:通过 allocate() 方法分配缓冲区,将缓冲区建立在 JVM 的内存中,需要来回拷贝。
非直接缓冲区的内容驻留在JVM内,因此销毁容易且安全(使用直接缓冲区若传输过程中断,可能丢失数据),但是占用JVM内存开销,处理过程中有复制操作。我们使用的JDK原始IO中的缓冲区使用的就是非直接缓冲区。
直接缓冲区:通过 allocateDirect() 方法分配直接缓冲区,将缓冲区建立在物理内存中,不需要来回拷贝,可以提高效率。
通过创建的缓冲区,在JVM内存外开辟内存,在每次调用基础操作系统的一个本机IO之前或者之后,虚拟机都会避免将缓冲区的内容复制到中间缓冲区(或者从中间缓冲区复制内容),缓冲区的内容驻留在物理内存内,会少一次复制过程,如果需要循环使用缓冲区,用直接缓冲区可以很大地提高性能。虽然直接缓冲区使JVM可以进行高效的I/O操作,但它使用的内存是操作系统分配的,绕过了JVM堆栈,建立和销毁比堆栈上的缓冲区要更大的开销,不如非直接缓冲区安全。
通道(Channel)的原理获取
通道表示打开到 IO 设备(例如:文件、套接字)的连接。若需要使用 NIO 系统,需要获取用于连接 IO 设备的通道以及用于容纳数据的缓冲区。然后操作缓冲区,对数据进行处理。Channel 负责传输, Buffer 负责存储。通道是由 java.nio.channels 包定义的。 Channel 表示 IO 源与目标打开的连接。Channel 类似于传统的“流”。只不过 Channel本身不能直接访问数据, Channel 只能与Buffer 进行交互。
| java.nio.channels.Channel 接口: |--FileChannel |--SocketChannel |--ServerSocketChannel |--DatagramChannel
获取通道 1. Java 针对支持通道的类提供了 getChannel() 方法 本地 IO: FileInputStream/FileOutputStream RandomAccessFile
网络IO: Socket ServerSocket DatagramSocket
2. 在 JDK 1.7 中的 NIO.2 针对各个通道提供了静态方法 open() 3. 在 JDK 1.7 中的 NIO.2 的 Files 工具类的 newByteChannel() |
实际操作直接缓冲区与非直接缓冲区比较
package cn.itcats.nio;

import java.io.FileInputStream;
import java.io.FileOutputStream;
import java.io.IOException;
import java.nio.ByteBuffer;
import java.nio.MappedByteBuffer;
import java.nio.channels.FileChannel;
import java.nio.channels.FileChannel.MapMode;
import java.nio.file.Paths;
import java.nio.file.StandardOpenOption;

import org.junit.Test;

/**
 * 直接缓冲区
 *
 * @author fatah
 */
public class AllocateDirectNIO {
	@Test
	// 使用直接缓冲区完成文件的复制(內存映射文件)
	public void test2() throws IOException {
		long startTime = System.currentTimeMillis(); //321
		FileChannel inputChannel = FileChannel.open(Paths.get("1.mp4"), StandardOpenOption.READ);
		//设置读写  若2.mp4不存在的创建权限
		FileChannel outputChannel = FileChannel.open(Paths.get("2.mp4"), StandardOpenOption.READ, StandardOpenOption.WRITE,
				StandardOpenOption.CREATE);
		// 映射文件
		MappedByteBuffer inMapperBuff = inputChannel.map(MapMode.READ_ONLY, 0, inputChannel.size());
		MappedByteBuffer outMapperBuff = outputChannel.map(MapMode.READ_WRITE, 0, inputChannel.size());
		// 直接对缓冲区进行数据读写操作
		byte[] dst = new byte[inMapperBuff.limit()];
		inMapperBuff.get(dst);
		outMapperBuff.put(dst);
		outputChannel.close();
		inputChannel.close();
		long endTime = System.currentTimeMillis();
		System.out.println("内存映射文件耗时:"+(endTime-startTime));
	}

	@Test
	// 1.利用通道完成文件复制(非直接缓冲区)
	public void test1() throws IOException {  //4421
		long startTime = System.currentTimeMillis();
		FileInputStream fis = new FileInputStream("f://1.mp4");
		FileOutputStream fos = new FileOutputStream("f://2.mp4");
		// ①获取到通道
		FileChannel inputChannel = fis.getChannel();
		FileChannel outputChannel = fos.getChannel();

		// ②分配指定大小的缓冲区
		ByteBuffer buf = ByteBuffer.allocate(1024);
		while (inputChannel.read(buf) != -1) {
			buf.flip();// 切换到读取模式
			outputChannel.write(buf);
			buf.clear();// 清空缓冲区
		}
		// 关闭连接
		outputChannel.close();
		inputChannel.close();
		fos.close();
		fis.close();
		long endTime = System.currentTimeMillis();
		System.out.println("非缓冲区:"+(endTime-startTime));
	}

}
分散读取与聚集写入
分散读取(scattering Reads):将通道中的数据分散到多个缓冲区中
聚集写入(gathering Writes):将多个缓冲区的数据聚集到通道中
package cn.itcats.nio;

import java.io.FileNotFoundException;
import java.io.IOException;
import java.io.RandomAccessFile;
import java.nio.ByteBuffer;
import java.nio.channels.FileChannel;

/**
 * 分散读取,聚集写入
 * @author fatah
 */
public class FensanAndJuji {
	public static void main(String[] args) throws IOException {
		/**
		 * 分散读取
		 */
		//随机访问
		RandomAccessFile raf = new RandomAccessFile("test.txt", "rw");
		//获取通道
		FileChannel channel = raf.getChannel();
		//创建非直接缓冲区
		ByteBuffer bfPart1 = ByteBuffer.allocate(100);
		ByteBuffer bfPart2 = ByteBuffer.allocate(1024);
		//分散读取(本质上可以看成一个byte大数组对象)
		ByteBuffer[] arrays = {bfPart1,bfPart2};
		channel.read(arrays);
		for (ByteBuffer byteBuffer : arrays) {
			//切换为读模式
			byteBuffer.flip();
		}
		//取ByteBuffer bfPart1对象转为byte[]   读取100个字节
		System.out.println(new String(arrays[0].array(),0,arrays[0].limit()));
		System.out.println("-------------------------------------------------");
		//取ByteBuffer bfPart2对象转为byte[]   读取1024个字节
		System.out.println(new String(arrays[1].array(),0,arrays[1].limit()));
		/**
		 * 聚集写入
		 */
		//获取通道
		RandomAccessFile raf1 = new RandomAccessFile("test2.txt", "rw");
		FileChannel channel1 = raf1.getChannel();
		channel1.write(arrays);
		raf1.close();
		raf.close();
	}
}
字符集 Charset
编码:字符串->字节数组
解码:字节数组 -> 字符串
若编码和解码设置的不一致则会抛出异常
package cn.itcats.nio;

import java.nio.ByteBuffer;
import java.nio.CharBuffer;
import java.nio.charset.CharacterCodingException;
import java.nio.charset.Charset;
import java.nio.charset.CharsetDecoder;
import java.nio.charset.CharsetEncoder;

public class CharAndByte {
	public static void main(String[] args) throws CharacterCodingException {
		// 获取Charset对象并设置字符集
		Charset cs1 = Charset.forName("GBK");
		// 获取编码器
		CharsetEncoder ce = cs1.newEncoder();
		// 获取解码器
		CharsetDecoder cd = cs1.newDecoder();
		//创建非直接缓冲区
		CharBuffer cBuf = CharBuffer.allocate(1024);
		cBuf.put("今天天气不错");
		//开启读模式
		cBuf.flip();
		// 编码
		ByteBuffer bBuf = ce.encode(cBuf);
		for (int i = 0; i < 12; i++) {
			System.out.println(bBuf.get());
		}

		bBuf.flip();
		// 解码
		CharBuffer cBuf2 = cd.decode(bBuf);
		System.out.println(cBuf2.toString());
		System.out.println("-------------------------------------");
		Charset cs2 = Charset.forName("GBK");
		bBuf.flip();
		CharBuffer cbeef = cs2.decode(bBuf);
		System.out.println(cbeef.toString());
	}

}
BIO、NIO、AIO
该段参考 https://www.cnblogs.com/xiexj/p/6874654.html
BIO:同步阻塞式IO,服务器端与客户端三次握手建立连接后一个链路建立一个线程进行面向流的通信。这曾是jdk1.4前的唯一选择。在任何一端出现网络性能问题时都影响另一端,无法满足高并发高性能的需求。
NIO:同步非阻塞IO,以块的方式处理数据。采用多路复用Reactor模式。JDK1.4时引入。
AIO:异步非阻塞IO,基于unix事件驱动,不需要多路复用器对注册通道进行轮询,采用Proactor设计模式。JDK1.7时引入。
同步时,应用程序会直接参与IO读写操作,并且我们的应用程序会直接阻塞到某一个方法上,直到数据准备就绪:
或者采用轮训的策略实时检查数据的就绪状态,如果就绪则获取数据.
异步时,则所有的IO读写操作交给操作系统,与我们的应用程序没有直接关系,我们程序不需要关系IO读写,当操作
系统完成了IO读写操作时,会给我们应用程序发送通知,我们的应用程序直接拿走数据极即可。
Netty是实现了NIO的一个流行框架,JBoss的。Apache的同类产品叫Mina。阿里云分布式文件系统TFS里用的就是Mina。我目前的项目中使用了netty作为底层实现的有阿里云的dubbo和ElasticSearch。我之所有要研究这个东西也是因为我要实现自己的搜索引擎先要调研已存在的产品。我之前项目中用过Solr,个人比较倾向于Solr。但是大家做了很多性能比较,ElasticSearch的并发能力确实要比Solr,究其原因,就是因为Solr底层还是用的Servlet容器,而ElasticSearch底层用的是Netty。
有人问:单看实现原理,显然AIO要比NIO高级,为什么Netty底层用NIO? Netty也曾经做过一些AIO的尝试性版本,但是性能效果不理想。AIO理念很好,但是有赖于底层操作系统的支持,操作系统目前的实现并没听上去那么有吸引力,是一匹刚孕育出来的黑马。其实AIO的性能上不去,也很好感性的理解。NIO相当于餐做好了自己去取,AIO相当于送餐上门。要吃饭的人是百万,千万级的,送餐员也就几百人。所以一般要吃到饭,是自己去取快呢,还是等着送的更快?目前的外卖流程不是很完善,所以时间上没想的那么靠谱,但是有优化空间,这就是AIO。
//nio   异步非阻塞
class Client {

	public static void main(String[] args) throws IOException {
		System.out.println("客户端已经启动....");
		// 1.创建通道
		SocketChannel sChannel = SocketChannel.open(new InetSocketAddress("127.0.0.1", 8080));
		// 2.切换异步非阻塞
		sChannel.configureBlocking(false);
		// 3.指定缓冲区大小
		ByteBuffer byteBuffer = ByteBuffer.allocate(1024);
		Scanner scanner=  new Scanner(System.in);
		while (scanner.hasNext()) {
			String str=scanner.next();
			byteBuffer.put((new Date().toString()+"\n"+str).getBytes());
			// 4.切换读取模式
			byteBuffer.flip();
			sChannel.write(byteBuffer);
			byteBuffer.clear();
		}
		sChannel.close();
	}

}

// nio
class Server {
	public static void main(String[] args) throws IOException {
		System.out.println("服务器端已经启动....");
		// 1.创建通道
		ServerSocketChannel sChannel = ServerSocketChannel.open();
		// 2.切换读取模式
		sChannel.configureBlocking(false);
		// 3.绑定连接
		sChannel.bind(new InetSocketAddress(8080));
		// 4.获取选择器
		Selector selector = Selector.open();
		// 5.将通道注册到选择器 "并且指定监听接受事件"
		sChannel.register(selector, SelectionKey.OP_ACCEPT);
		// 6. 轮训式 获取选择 "已经准备就绪"的事件
		while (selector.select() > 0) {
			// 7.获取当前选择器所有注册的"选择键(已经就绪的监听事件)"
			Iterator it = selector.selectedKeys().iterator();
			while (it.hasNext()) {
				// 8.获取准备就绪的事件
				SelectionKey sk = it.next();
				// 9.判断具体是什么事件准备就绪
				if (sk.isAcceptable()) {
					// 10.若"接受就绪",获取客户端连接
					SocketChannel socketChannel = sChannel.accept();
					// 11.设置阻塞模式
					socketChannel.configureBlocking(false);
					// 12.将该通道注册到服务器上
					socketChannel.register(selector, SelectionKey.OP_READ);
				} else if (sk.isReadable()) {
					// 13.获取当前选择器"就绪" 状态的通道
					SocketChannel socketChannel = (SocketChannel) sk.channel();
					// 14.读取数据
					ByteBuffer buf = ByteBuffer.allocate(1024);
					int len = 0;
					while ((len = socketChannel.read(buf)) > 0) {
						buf.flip();
						System.out.println(new String(buf.array(), 0, len));
						buf.clear();
					}
				}
				it.remove();
			}
		}

	}
}
JDK NIO的BUG,例如臭名昭著的epoll bug,它会导致Selector空轮询,最终导致CPU 100%。官方声称在JDK1.6版本的update18修复了该问题,但是直到JDK1.7版本该问题仍旧存在,只不过该bug发生概率降低了一些而已,它并没有被根本解决。
选择KEY
1、SelectionKey.OP_CONNECT 可连接
2、SelectionKey.OP_ACCEPT 可接受连接
3、SelectionKey.OP_READ 可读
4、SelectionKey.OP_WRITE 可写
如果你对不止一种事件感兴趣,那么可以用“位或”操作符将常量连接起来,如下:
int interestSet = SelectionKey.OP_READ | SelectionKey.OP_WRITE;
在SelectionKey类的源码中我们可以看到如下的4中属性,四个变量用来表示四种不同类型的事件:可读、可写、可连接、可接受连接


