Spring+SpringMVC+Hibernate小案例(实现Spring对Hibernate的事务管理)
一、工作环境
编辑器用的是MyEclipse,用Mysql数据库,maven管理jar包。
二、搭建环境
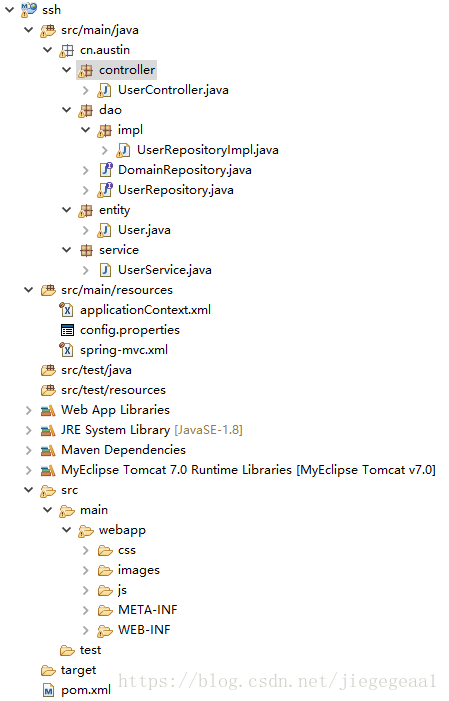
(1)完整工程图:
(2)pom.xml:
  4.0.0
  ssh
  ssh
  0.0.1-SNAPSHOT
  war
  ssh


    3.0
    4.3.7.RELEASE
    4.3.5.Final
    1.9.13
    2.5.0
    5.1.38
    0.9.1.2
    1.2.17
    1.3.1
    1.16.10
    UTF-8


      org.glassfish
      bean-validator
      3.0-JBoss-4.0.2
      provided


      org.glassfish
      javax.enterprise.deploy
      3.0.1
      provided


      org.glassfish
      javax.jms
      3.0.1
      provided


      org.glassfish
      javax.management.j2ee
      3.0.1
      provided


      org.eclipse.persistence
      javax.persistence
      2.0.0
      provided


      org.glassfish
      javax.resource
      3.0.1
      provided


      org.glassfish
      javax.security.auth.message
      3.0.1
      provided


      org.glassfish
      javax.security.jacc
      3.0.1
      provided


      org.glassfish
      javax.servlet
      3.0.1
      provided


      org.glassfish
      javax.servlet.jsp
      3.0.1
      provided


      org.glassfish
      javax.servlet.jsp.jstl
      3.0.1
      provided


      javax.xml.bind
      jaxb-api-osgi
      2.2.1
      provided


      javax.ws.rs
      jsr311-api
      1.1.1
      provided


      org.glassfish.web
      jstl-impl
      1.2
      provided


      javax.mail
      mail
      1.4.3
      provided


      javax.xml
      webservices-api-osgi
      2.0.1
      provided


      org.jboss.weld
      weld-osgi-bundle
      1.0.1-SP3
      provided


      org.glassfish.web
      javax.servlet.jsp.jstl
      1.2.1


      org.springframework
      spring-beans
      ${springVersion}


      org.springframework
      spring-core
      ${springVersion}


      org.springframework
      spring-context
      ${springVersion}


      org.springframework
      spring-orm
      ${springVersion}


		org.springframework
		spring-tx
		${springVersion}


      org.springframework
      spring-web
      ${springVersion}


      org.springframework
      spring-webmvc
      ${springVersion}


      org.hibernate
      hibernate-core
      ${hibernateVersion}


      org.hibernate
      hibernate-ehcache
      ${hibernateVersion}


      mysql
      mysql-connector-java
      ${mysqlVersion}


      c3p0
      c3p0
      ${c3p0Version}


      org.codehaus.jackson
      jackson-mapper-asl
      ${jsonVersion}


      com.fasterxml.jackson.core
      jackson-core
      ${jacksonVersion}


      com.fasterxml.jackson.core
      jackson-annotations
      ${jacksonVersion}


      com.fasterxml.jackson.core
      jackson-databind
      ${jacksonVersion}


      log4j
      log4j
      ${log4jVersion}


      commons-fileupload
      commons-fileupload
      ${fileuploadVersion}


        org.projectlombok
        lombok
        ${lombokVersion}
        provided


        maven-compiler-plugin
        2.3.2

          1.8
          1.8


        maven-war-plugin
        2.6

          false
(3)先配置Springmvc:spring-mvc.xml
然后在web.xml中加载springmvc配置:
	  	spring-mvc
	  	org.springframework.web.servlet.DispatcherServlet

	  		contextConfigLocation
	  		classpath:spring-mvc.xml

	  	1


	  	spring-mvc
	  	/
然后写Controller:UserController.java
package cn.austin.controller;

import java.util.List;

import org.springframework.beans.factory.annotation.Autowired;
import org.springframework.stereotype.Controller;
import org.springframework.web.bind.annotation.RequestMapping;
import org.springframework.web.bind.annotation.SessionAttributes;

import com.fasterxml.jackson.annotation.JsonIgnoreProperties;

import cn.austin.entity.User;
import cn.austin.service.UserService;

@Controller
public class UserController {

	@RequestMapping("/index")
	public String index() {
		return "index";
	}
}
这里返回了index,再结合spring-mvc.xml中的视图解析器,加上前缀后缀之后就变成了/WEB-INF/index.jsp
到这里,Springmvc配置完毕,来验证一下:
Springmvc配置成功!
(4)将Spring和Springmvc整合起来:
下面是Spring的配置文件applicationContext.xml:
细心的可以发现Spring和Springmvc的配置文件都会有
在web.xml中加载Spring配置和相关过滤器:
		encodingFilter
		org.springframework.web.filter.CharacterEncodingFilter

			encoding
			UTF-8


			forceEncoding
			true


		encodingFilter
		/*


		contextConfigLocation
		classpath:applicationContext.xml


		org.springframework.web.context.ContextLoaderListener
到这里,Spring和Springmvc整合完毕,现在新建Service层来测试:
UserService.java:
import java.util.List;

import org.springframework.beans.factory.annotation.Autowired;
import org.springframework.stereotype.Service;
import org.springframework.transaction.annotation.Transactional;

import cn.austin.dao.impl.UserRepositoryImpl;
import cn.austin.entity.User;


@Service
public class UserService {
	public void show() {
		System.out.println("show service");
	}

}
UserController.java:
import java.util.List;

import org.springframework.beans.factory.annotation.Autowired;
import org.springframework.stereotype.Controller;
import org.springframework.web.bind.annotation.RequestMapping;
import org.springframework.web.bind.annotation.SessionAttributes;

import com.fasterxml.jackson.annotation.JsonIgnoreProperties;

import cn.austin.entity.User;

@Controller
public class UserController {

	@Autowired
	private UserService userService;

	@RequestMapping("/index")
	public String index() {
		this.userService.show();
		return "index";
	}
}
再次访问http://127.0.0.1:8080/ssh/index,不仅可以成功访问主页,还可以在控制台上看到输出:show service。这说明了Spring和Springmvc整合成功!
(5)下面是最后,也是最困难的一步,将Hibernate也整合进去(困难是因为还会涉及到事务,将Hibernate事务交给Spring来管理):
先配置好数据库设置:config.properties
#database connection config
jdbc.driver = com.mysql.jdbc.Driver
jdbc.url = jdbc:mysql://127.0.0.1:3306/struts?useUnicode=true&characterEncoding=utf-8
jdbc.username = root
jdbc.password = 123

#hibernate config
hibernate.dialect = org.hibernate.dialect.MySQLDialect
hibernate.show_sql = true
hibernate.format_sql = true
hibernate.hbm2ddl.auto =update
使用时改成自己的数据库就可以。
来看Hibernate的相关配置。因为Hibernate的工厂以及事务都是交给Spring来管理的,因此将它们配置在一块,都配置在applicationContext.xml中,下面是完整的配置:
				${hibernate.hbm2ddl.auto}
				${hibernate.dialect}
				${hibernate.show_sql}
				${hibernate.format_sql}
下面来看数据库访问层(Dao)的写法:
这里先定义了一个最通用的接口DomainRepository,可供任意的实体Dao使用:
DomainRepository.java:
package cn.austin.dao;

import java.io.Serializable;
import java.util.List;

/*
 * 通用数据访问接口
 */
public interface DomainRepository {

	T load(PK id);

	T get(PK id);

	List findAll();

	void persist(T entity);

	void add(T entity);

	void update(T entity);

	void delete(PK id);

	void flush();
}
UserRepository.java继承于这个接口,它是专门操作User数据库的:
package cn.austin.dao;

import org.springframework.stereotype.Repository;

import cn.austin.entity.User;

public interface UserRepository extends DomainRepository {

}
该接口的具体实现类如下:UserRepositoryImpl.java
package cn.austin.dao.impl;

import java.util.List;

import org.hibernate.Session;
import org.hibernate.SessionFactory;
import org.hibernate.Transaction;
import org.springframework.beans.factory.annotation.Autowired;
import org.springframework.stereotype.Repository;

import cn.austin.dao.UserRepository;
import cn.austin.entity.User;

@Repository
public class UserRepositoryImpl implements UserRepository {

	@Autowired
	private SessionFactory sessionFactory;

	private Session getSession() {
		return this.sessionFactory.getCurrentSession();
	}

	@Override
	public User load(Integer id) {
		return (User) this.getSession().load(User.class, id);
	}

	@Override
	public User get(Integer id) { // get by Id
		return (User) this.getSession().get(User.class, id);
	}

	@Override
	public List findAll() {
		return this.getSession().createQuery("from User").list();
	}

	@Override
	public void persist(User entity) {
		this.getSession().persist(entity);
	}

	@Override
	public void add(User entity) {
		this.getSession().save(entity);
	}

	@Override
	public void update(User entity) {
		this.getSession().update(entity);
	}

	@Override
	public void delete(Integer id)  {
		User user = this.get(id);
		try{
			this.getSession().delete(user);
		}catch(Exception e){
			e.printStackTrace();
		}
	}

	@Override
	public void flush() {
		this.getSession().flush();
	}

}
注意:这里十分重要的一点是,获取Session一定是要通过getCurrentSession()方法来获得!如果你用的是openSession()来获得,那么会造成的问题是事务的连接和操作数据库的连接(session)是不相干的,从而导致事务无法提交等等,导致update和save操作无法完成!
下面来看看Entity:
User.java:
package cn.austin.entity;

import javax.persistence.Column;
import javax.persistence.Entity;
import javax.persistence.GeneratedValue;
import javax.persistence.GenerationType;
import javax.persistence.Id;
import javax.persistence.Table;

import com.fasterxml.jackson.annotation.JsonIgnoreProperties;


@Entity
@Table(name="ssh_user")
public class User {
	@Id
	@Column(name="id")
	@GeneratedValue(strategy=GenerationType.IDENTITY)
	private Integer id;

	@Column(name="username")
	private String username;

	@Column(name="password")
	private String password;

	@Column(name="description")
	private String description;

	public Integer getId() {
		return id;
	}

	public void setId(Integer id) {
		this.id = id;
	}

	public String getUsername() {
		return username;
	}

	public void setUsername(String username) {
		this.username = username;
	}

	public String getPassword() {
		return password;
	}

	public void setPassword(String password) {
		this.password = password;
	}

	public String getDesc() {
		return description;
	}

	public void setDesc(String description) {
		this.description = description;
	}

	@Override
	public String toString() {
		return "User [id=" + id + ", username=" + username + ", password=" + password + ", description=" + description + "]";
	}

}
记得一定要建好数据表!
我也在实体这里被坑了一把。。。刚开始我的description写的是desc,结果执行增加操作的时候莫名地报错了:
com.mysql.jdbc.exceptions.jdbc4.MySQLSyntaxErrorException: You have an error in your SQL syntax; check the manual that corresponds to your MySQL server version for the right syntax to use near 'desc, password, username) values ('c', 'b', 'a')' at line 1
后来排错的时候才发现,原来desc是Mysql的关键字,不能这么用,改成description就成功了。
下面来看完整的UserService.java:
package cn.austin.service;

import java.util.List;

import org.springframework.beans.factory.annotation.Autowired;
import org.springframework.stereotype.Service;
import org.springframework.transaction.annotation.Transactional;

import cn.austin.dao.impl.UserRepositoryImpl;
import cn.austin.entity.User;

@Transactional
@Service
public class UserService {
	@Autowired
	private UserRepositoryImpl userRepositoryImpl;

	public User getById(Integer id) {
		return this.userRepositoryImpl.get(id);
	}

	public List findAll() {
		return this.userRepositoryImpl.findAll();
	}

	public void add(User user) {
		this.userRepositoryImpl.add(user);
	}

	public void update(User user) {
		this.userRepositoryImpl.update(user);
	}
	public void delete(Integer id) {
		this.userRepositoryImpl.delete(id);
	}

}
UserService.java类上面一定要加一个@Transactional注解,否则会报错。
那么问题来了,什么是事务管理呢?
事务管理是为了避免程序在执行过程中出现了异常,从而导致数据库的数据与实际的不一样。因此,如果某段程序中出现了异常,整个事务就会回滚,而不会提交,这样一来安全上得到了保证。
下面会对事务进行简单地验证。
(6)配置好数据访问层后,现在先来测试基本的增删查改功能:
我的数据库是这样的:
UserController.java:
package cn.austin.controller;

import java.util.List;

import org.springframework.beans.factory.annotation.Autowired;
import org.springframework.stereotype.Controller;
import org.springframework.web.bind.annotation.RequestMapping;
import org.springframework.web.bind.annotation.SessionAttributes;

import com.fasterxml.jackson.annotation.JsonIgnoreProperties;

import cn.austin.entity.User;
import cn.austin.service.UserService;

@SessionAttributes(value="username")
@Controller
public class UserController {

	@Autowired
	private UserService userService;

	@RequestMapping("/index")
	public String index() {
		/*
		 * 新增
		 */
		User user = new User();
		user.setUsername("abc");
		user.setPassword("abc");
		user.setDesc("abc");
		this.userService.add(user);

		/*
		 * 删除
		 */
		this.userService.delete(8);

		/*
		 *修改
		 */
		User user1 = new User();
		user1.setId(9);
		user1.setUsername("999");
		user1.setPassword("999");
		user1.setDesc("999");
		this.userService.update(user1);

		/*
		 * 查询
		 */
		List users = this.userService.findAll();
		for(User us : users)
			System.out.println(us);

		return "index";
	}
}
再来访问http://127.0.0.1:8080/ssh/index:
数据库变成了这样:
看看MyEclipse的控制台:
这是查询出来的结果。都是我想要的结果,说明了Sping + Springmvc +Hibernate整合成功,事务配置成功!
(7)最后来简单地测试一下事务:
这里用修改功能来测试:
UserController.java:
package cn.austin.controller;

import java.util.List;

import org.springframework.beans.factory.annotation.Autowired;
import org.springframework.stereotype.Controller;
import org.springframework.web.bind.annotation.RequestMapping;
import org.springframework.web.bind.annotation.SessionAttributes;

import com.fasterxml.jackson.annotation.JsonIgnoreProperties;

import cn.austin.entity.User;
import cn.austin.service.UserService;

@SessionAttributes(value="username")
@Controller
public class UserController {

	@Autowired
	private UserService userService;

	@RequestMapping("/index")
	public String index() {
		/*
		 *修改
		 */
		User user1 = new User();
		user1.setId(9);
		user1.setUsername("9988");
		user1.setPassword("9988");
		user1.setDesc("9988");
		this.userService.update(user1);

		return "index";
	}
}
UserRepositoryImpl.java中的update方法:
@Override
	public void update(User entity) {
			this.getSession().update(entity);
			int a = 1/0;
	}
这里写了一个异常,再次运行http://127.0.0.1:8080/ssh/index:
马上就报错了:java.lang.ArithmeticException: / by zero
而且这时候,数据库是没有数据更新的。这就简单地验证了事务的回滚功能:只有程序全部能正常执行,事务才会提交;否则,只要有一个错误的地方,事务就会回滚。
最后,祝大家整合成功,没有任何BUG!!


