android xml布局总结篇
【android-tips】android xml布局总结篇
一.背景
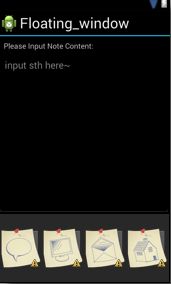
可能很多人跟我一样,做了好久的android程序,却一直没有认真地坐下来好好学习下xml文件的布局。其实有的时候我们用view绘制或是利用ADT的图形界面功能就可以轻松搞定布局,但是最好还是静下来学习下xml的布局文件具体写法。这一节我们要绘制如下图所示的界面。
二基础知识
首先我们要了解android到底有那些布局,和每个布局类型的区别。
1.线性布局 LinearLayout
线性布局分两种。一种是水平布局,一种是垂直布局。下面我们根据上图举例子。
先把上图的代码贴出来吧!
-
-
-
android:layout_width="fill_parent" android:layout_height="fill_parent" -
xmlns:android="http://schemas.android.com/apk/res/android"> -
-
android:layout_width="wrap_content" android:padding="10dp"> -
-
android:layout_width="fill_parent" android:layout_weight="1"> -
-
android:layout_height="fill_parent" android:gravity="left" -
android:hint="@string/edithint"> -
-
-
android:layout_width="fill_parent" android:layout_weight="2" -
android:gravity="center"
android:orientation="horizontal"
>
可以看到,上图是由三部分组成。在大的LinearLayout从上而下垂直分布着三个内容:TextView,LinearLayout,LinearLayout。所以总体的LinearLayout是垂直布局
android:orientation="vertical"
下面我们来看水平布局
其实就是上图中的最下面那个LinearLayout。四个图标平行排列。
android:orientation="horizontal"
2.相对布局 RelativeLayout
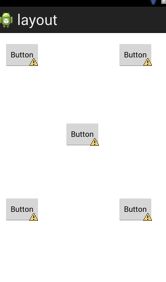
这个布局相对简单一点。一般来讲利用ADT自己拖放按钮就可以。基本上可以随意布局。如下图所示
代码是
-
-
xmlns:tools="http://schemas.android.com/tools" -
android:layout_width="match_parent" -
android:layout_height="match_parent" -
android:paddingBottom="@dimen/activity_vertical_margin" -
android:paddingLeft="@dimen/activity_horizontal_margin" -
android:paddingRight="@dimen/activity_horizontal_margin" -
android:paddingTop="@dimen/activity_vertical_margin" -
tools:context=".MainActivity" > -
-
android:id="@+id/button1" -
style="?android:attr/buttonStyleSmall" -
android:layout_width="wrap_content" -
android:layout_height="wrap_content" -
android:layout_alignParentLeft="true" -
android:layout_alignParentTop="true" -
android:text="Button" /> -
-
android:id="@+id/button2" -
style="?android:attr/buttonStyleSmall" -
android:layout_width="wrap_content" -
android:layout_height="wrap_content" -
android:layout_alignBaseline="@+id/button1" -
android:layout_alignBottom="@+id/button1" -
android:layout_alignParentRight="true" -
android:layout_marginRight="14dp" -
android:text="Button" /> -
-
android:id="@+id/button3" -
style="?android:attr/buttonStyleSmall" -
android:layout_width="wrap_content" -
android:layout_height="wrap_content" -
android:layout_below="@+id/button1" -
android:layout_centerHorizontal="true" -
android:layout_marginTop="97dp" -
android:text="Button" /> -
-
android:id="@+id/button4" -
style="?android:attr/buttonStyleSmall" -
android:layout_width="wrap_content" -
android:layout_height="wrap_content" -
android:layout_alignLeft="@+id/button1" -
android:layout_below="@+id/button3" -
android:layout_marginTop="89dp" -
android:text="Button" /> -
-
android:id="@+id/button5" -
style="?android:attr/buttonStyleSmall" -
android:layout_width="wrap_content" -
android:layout_height="wrap_content" -
android:layout_alignLeft="@+id/button2" -
android:layout_alignTop="@+id/button4" -
android:text="Button" /> -
layout_marginBottom是指控件边以外空下的距离,比如Button1和Button2垂直显示,将Button1中layout_marginBottom = 10dp,那么Button1与Button2之间将有10dp距离。
下面这两句是居左显示和居右显示
android:layout_alignParentLeft="true"
android:layout_alignParentTop="true"
常用语句总结:
android:layout_toLeftOf —— 该组件位于引用组件的左方
android:layout_toRightOf —— 该组件位于引用组件的右方
android:layout_above —— 该组件位于引用组件的上方
android:layout_below —— 该组件位于引用组件的下方
android:layout_alignParentLeft —— 该组件是否对齐父组件的左端
android:layout_alignParentRight —— 该组件是否齐其父组件的右端
android:layout_alignParentTop —— 该组件是否对齐父组件的顶部
android:layout_alignParentBottom —— 该组件是否对齐父组件的底部
android:layout_centerInParent —— 该组件是否相对于父组件居中
android:layout_centerHorizontal —— 该组件是否横向居中
android:layout_centerVertical —— 该组件是否垂直居中
总之,相对视图应该是最有用的,具体的操作比较复杂,更多的是通过图形界面拖拉,再用代码微调!
3.FrameLayout
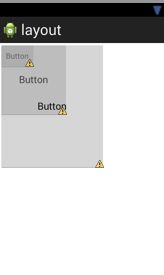
这个布局很简单,而且感觉有点二二的,哈哈!就是控件一个挨一个在左上角罗列。
代码
-
-
-
android:layout_width="match_parent" -
android:layout_height="match_parent" > -
-
android:id="@+id/button1" -
style="?android:attr/buttonStyleSmall" -
android:layout_width="wrap_content" -
android:layout_height="wrap_content" -
android:text="Button" /> -
-
android:id="@+id/button2" -
android:layout_width="126dp" -
android:layout_height="135dp" -
android:text="Button" /> -
-
android:id="@+id/button3" -
android:layout_width="194dp" -
android:layout_height="232dp" -
android:text="Button" /> -
4.绝对布局 AbsoluteLayout
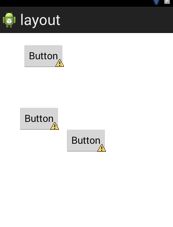
绝对布局比较容易使用,就是以左上方为原点建立坐标系。每个控件用layout_x和layout_y表示位置。但是据说这种布局比较刚性,不容易适配各种终端,所以要慎用!
代码
-
-
-
android:layout_width="match_parent" -
android:layout_height="match_parent" > -
-
android:id="@+id/button1" -
android:layout_width="wrap_content" -
android:layout_height="wrap_content" -
android:layout_x="44dp" -
android:layout_y="18dp" -
android:text="Button" /> -
-
android:id="@+id/button2" -
android:layout_width="wrap_content" -
android:layout_height="wrap_content" -
android:layout_x="122dp" -
android:layout_y="173dp" -
android:text="Button" /> -
-
android:id="@+id/button3" -
android:layout_width="wrap_content" -
android:layout_height="wrap_content" -
android:layout_x="36dp" -
android:layout_y="133dp" -
android:text="Button" /> -
5.表格布局 TableLayout
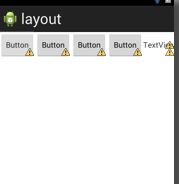
TableLayout有点像一个表格或是矩阵。在布局中加入TableRow,它的属性是horizontal所以每个TableRow只能横放。它里面的每个控件的高都是一样的。下图所示,是加入了一个TableRow和里面的控件。
代码
-
-
-
android:layout_width="match_parent" -
android:layout_height="match_parent" > -
-
android:id="@+id/tableRow1" -
android:layout_width="wrap_content" -
android:layout_height="wrap_content" > -
-
android:id="@+id/button1" -
style="?android:attr/buttonStyleSmall" -
android:layout_width="wrap_content" -
android:layout_height="wrap_content" -
android:text="Button" /> -
-
android:id="@+id/button2" -
style="?android:attr/buttonStyleSmall" -
android:layout_width="wrap_content" -
android:layout_height="wrap_content" -
android:text="Button" /> -
-
android:id="@+id/button3" -
style="?android:attr/buttonStyleSmall" -
android:layout_width="wrap_content" -
android:layout_height="wrap_content" -
android:text="Button" /> -
-
android:id="@+id/button4" -
style="?android:attr/buttonStyleSmall" -
android:layout_width="wrap_content" -
android:layout_height="wrap_content" -
android:text="Button" /> -
-
android:id="@+id/textView1" -
android:layout_width="wrap_content" -
android:layout_height="wrap_content" -
android:text="TextView" /> -
-
ok!你学会了么,have fun!
