两小时学会springboot-入门
之前我的博客写过从头搭建ssm框架. 里面一大堆的xml配置文件,比较麻烦.有了springboot,化繁为简,较大的方便了.下面咱们就开始从头搭建一个springboot项目,争取我带着写博客,带着做,两个小时搞定它
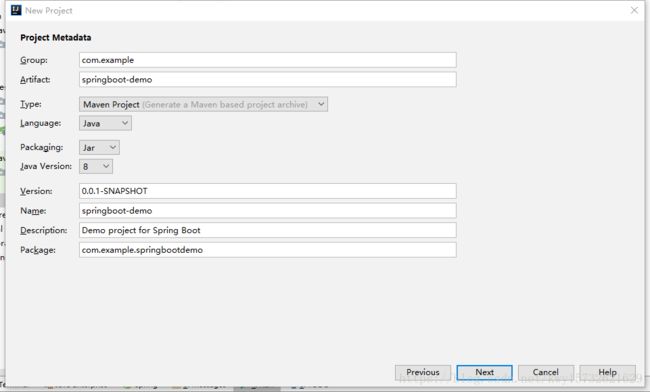
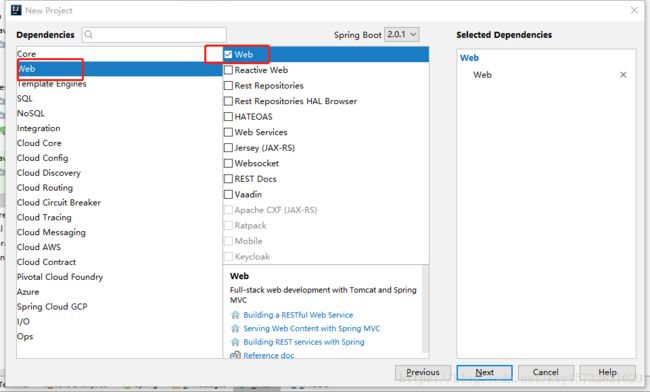
1.新建一个springboot项目
2.启动项目
有三种方式:
1.进入SpringbootDemoApplication中

右键,选择run
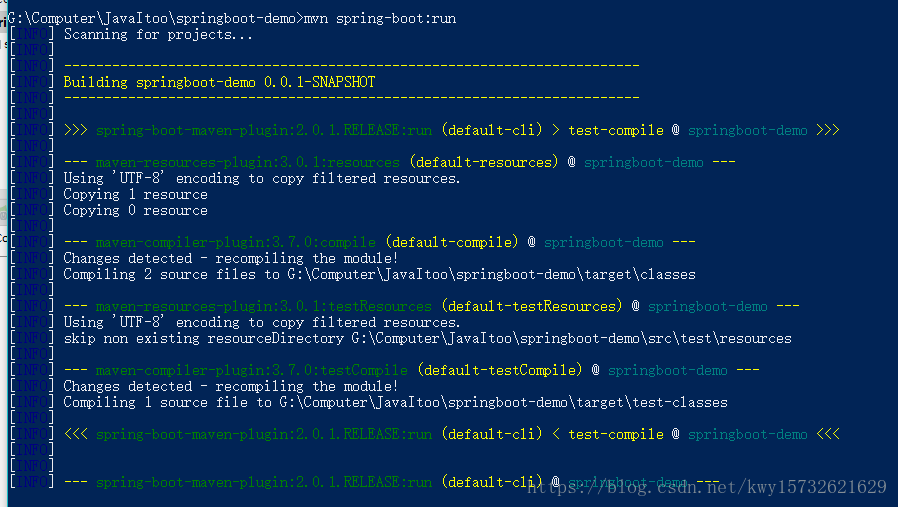
2.在项目跟路径下执行maven命令: mvn spring-boot:run
3.在项目跟路径下执行maven命令,先执行mvn install 再执行:cd target
到target目录下后, 再执行:java -jar springboot-demo-0.0.1-SNAPSHOT.jar
![]()
大家说启动之后也看不出效果来啊
那么我们添加一个类试试,在SpringbootDemoApplication同级目录下添加一个类:HelloController:
package com.example.springbootdemo;

import org.springframework.web.bind.annotation.RequestMapping;
import org.springframework.web.bind.annotation.RequestMethod;
import org.springframework.web.bind.annotation.RestController;

@RestController
public class HelloController {
    @RequestMapping(value = "/hello",method = RequestMethod.GET)
    public String say(){
        return "Hello Spring Boot";
    }
}配置文件
默认启动的是8080,现在我不想让它用8080端口,或者说,现在我看不出来是哪个项目的,我想在url中多加一层项目名字, 如何来改配置文件呢
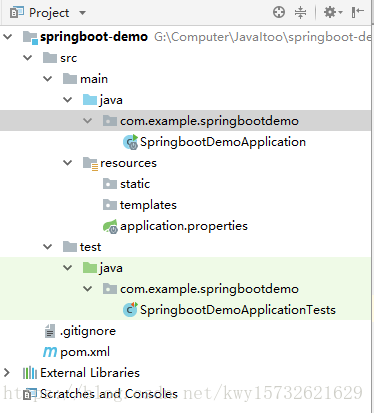
上面的项目文件目录结构我们看到了, 找到resources 的application.properties文件:
server.port=8081
server.servlet.context-path=/demo当然这个配置可以,但是大家可以看到我配置文件前面的server是相同的,能不能省略,可以的,有一种更简单的方式
在application.properties同级目录下创建一个文件application.yml文件
server:
  port: 8082
启动后,可以看到和application.properties效果是一样的.所以可以直接使用application.yml
替换了之前默认的properties文件
注意啊 port: 后面是需要有空格的,再输入8081
如果我们在配置文件中添加了内容, 怎么在类文件中读到它呢,举个例子:
server:
  port: 8082
name: 孔唯妍
现在我们要在项目中读到SECOND_LOGIN_PASSWORD
@RestController
public class HelloController {
    @Value("${name}")
    private String name;
    @RequestMapping(value = "/hello",method = RequestMethod.GET)
    public String say(){
        return name;
    }
}
运行大家可以看到效果:
如果我想要配置文件中某些的组合,那么下面这种配置
server:
  port: 8082
name: 孔唯妍
age: 22
content: "name: ${name},age: ${age}"
看我们的java类:
@RestController
public class HelloController {
//    @Value("${name}")
//    private String name;
    @Value("${content}")
    private String context;
    @RequestMapping(value = "/hello",method = RequestMethod.GET)
    public String say(){
        return context;
    }
}
效果如图:

可能有人会说: 这才两个,还好,要是很多呢,比如各种信息,怎么办简单,那么我们继续修改配置文件,相当于建立一个分组,就需要用到这两个注解:@Component @ConfiguartionProperties
server:
  port: 8082
my:
  name: 孔唯妍
  age: 22
新建一个实体类:MyProperties
package com.example.springbootdemo;

import org.springframework.boot.context.properties.ConfigurationProperties;
import org.springframework.stereotype.Component;
@Component
@ConfigurationProperties(prefix = "my")
public class MyProperties {
    public String getName() {
        return name;
    }

    public void setName(String name) {
        this.name = name;
    }

    private String name;

    public Integer getAge() {
        return age;
    }

    public void setAge(Integer age) {
        this.age = age;
    }

    private Integer age;

}
看看我们的hellocontroller类
package com.example.springbootdemo;

import org.springframework.beans.factory.annotation.Autowired;
import org.springframework.beans.factory.annotation.Value;
import org.springframework.web.bind.annotation.RequestMapping;
import org.springframework.web.bind.annotation.RequestMethod;
import org.springframework.web.bind.annotation.RestController;

@RestController
public class HelloController {
    @Autowired
    private MyProperties myProperties;
    @RequestMapping(value = "/hello",method = RequestMethod.GET)
    public String say(){
        return myProperties.getName();
    }
}
多环境配置
下面我们来谈谈,开发和生产的环境, 它的环境肯定是不一样的,那我要每次部署的时候,修改配置文件吗?当然不是
我们在resources目录下建立两个文件,直接复制application.yml即可
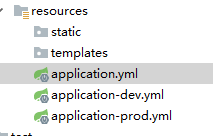
修改application.yml
spring:
  profiles:
    active: dev
修改active,即是走哪个配置文件
可能会说,这不是还是用的一个配置,这里就得提一下上面我们讲的启动方式
第三种方式的:
进入到target目录, 输入maven命令:
java -jar springboot-demo-0.0.1-SNAPSHOT.jar –spring.profiles.active=prod
Controller使用
@Controller 这个和在spingmvc没啥区别;@RestController 用了这个之后,就可以省掉两个注解@Controller和@RequestBody
关于@RequestMapping
在方法上
我们拿helloController做实验
@RequestMapping(value = {"/hello","/hi"},method = RequestMethod.GET)
    public String say(){
        return myProperties.getName();
    }
这就意味着,我访问hello是这个方法,访问hi也是这个方法
@PathVariable 获取参数注解
@GetMapping 组合注解,是@RequestMapping(method = RequestMethod.GET)的缩写
关于使用上,我觉得和springmvc没啥区别,就不多做解释了
数据库操作
Spring-Data-Jpa
定义了一系列对象持久化的标准,目前实现这一规范的产品有Hibernate.TopLink等
Pom文件添加依赖:
<dependency>
      <groupId>org.springframework.bootgroupId>
      <artifactId>spring-boot-starter-data-jpaartifactId>
dependency>
<dependency>
      <groupId>mysqlgroupId>
      <artifactId>mysql-connector-javaartifactId>
dependency>
新建一个实体类
package com.example.springbootdemo;

import javax.persistence.Entity;
import javax.persistence.GeneratedValue;
import javax.persistence.Id;

@Entity
public class My {
    @Id
    @GeneratedValue
    private Integer id;
    private String name;
    private Integer age;

    public My() {
    }

    public Integer getId() {
        return id;
    }

    public void setId(Integer id) {
        this.id = id;
    }

    public String getName() {
        return name;
    }

    public void setName(String name) {
        this.name = name;
    }

    public Integer getAge() {
        return age;
    }

    public void setAge(Integer age) {
        this.age = age;
    }
}
新建一个接口类MyProperties
package com.example.springbootdemo;

import org.springframework.boot.context.properties.ConfigurationProperties;
import org.springframework.stereotype.Component;
@Component
@ConfigurationProperties(prefix = "my")
public class MyProperties {
    public String getName() {
        return name;
    }

    public void setName(String name) {
        this.name = name;
    }

    private String name;

    public Integer getAge() {
        return age;
    }

    public void setAge(Integer age) {
        this.age = age;
    }

    private Integer age;

}
新建一个MyController
package com.example.springbootdemo;

import org.springframework.beans.factory.annotation.Autowired;
import org.springframework.web.bind.annotation.GetMapping;
import org.springframework.web.bind.annotation.RestController;

import java.util.List;

@RestController
public class MyController {
    @Autowired
    private MyRepository myRepository;
    @GetMapping(value = "/my")
    public List myList(){
        return myRepository.findAll();
    }
}
启动项目
1.数据库中会新增一个表:my表.
2.自己手动往里面插入两条数据,方便我们的select查询

3.启动项目
4.路径输入地址:localhost:8082/my

可以看到查询成功. 一条线已经ok了
这个用的是封装的内容,如果说自己写根据什么条件来查询,那么就在MyRepository中写一个接口,比如:
public interface MyRepository extends JpaRepository<My,Integer> {
    /**
     * 通过年龄来查询
     */
    public List findByAge(Integer Age);
}
Controll调用:
@GetMapping(value = "/my/age/{age}")
    public List myListByAge(@PathVariable("age") Integer age){
        return myRepository.findByAge(age);
    }
就可以了
事务管理
数据库的事务,比如同时插入两条数据,但是其中一条失败了,另一条我就不希望它插入了.希望的结果是两个同时成功,或者都不成功
service方法上面加上:@Transactional即可

