使用 SpringBoot 写增删改查接口
一、前言

1、之前使用 SSM(Spring+SpringMVC+MyBatis)+Maven 写后端的接口,创建了不少 Maven 工程。一开始还觉得 SSM+Maven 是十分简便的,但是后来审美疲劳,渐渐感觉这种固定化地创建 New Maven Project 是一件体力操作。
2、比如那些 web.xml(全局配置)、dispatch-Servlet.xml(SpringMVC配置)、applicationContext.xml(Spring配置)、mybatis-config.xml(MyBatis配置)等大同小异,一开始还会老老实实从0开始写,后来烦了直接复制粘贴之前的代码。
3、SpringBoot 就解决这个硬伤,很快建立工程,使用 SpringData 封装数据库访问层基本 CURD 接口(SSM还得使用逆向工程),一个简单的 application.yml 配置就搞定前面的所有配置,一手轻巧的注解取代了之前大量的代码。
这次根据 SpringBoot 官方API文档等,测试一下基于 SpringBoot 的 CURD,同时启用 Restful 风格,编写起代码来,十分具有美感~
RESTful API:
RESTful API 目前是前后端分离最佳实践
① 轻量,直接通过 http,不需要额外的协议
② 面向资源,一目了然,具有自解释性
③ 数据描述简单,一般通过 json 或 xml 做数据通信
二、依旧是简单的 CRUD,后台的基本
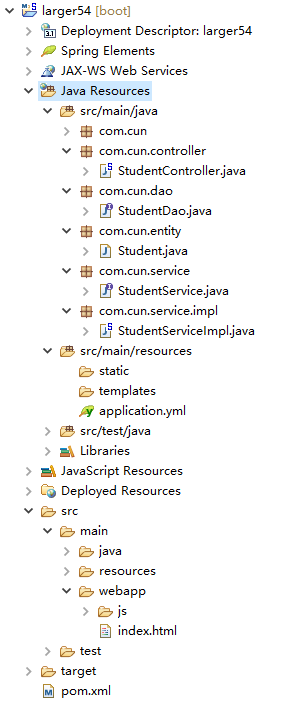
1、代码结构
总体来说,还是采用了标准的编程模式,建立 entity、dao、service、controller 包进行分类包装,部分接口采用 interface+implements。命名方面也有注意。
代码应该是很规范的。
2、Student.java
实体
package com.cun.entity;

import javax.persistence.Column;
import javax.persistence.Entity;
import javax.persistence.GeneratedValue;
import javax.persistence.Id;
import javax.persistence.Table;

import org.hibernate.validator.constraints.NotEmpty;

@Entity // 实体
@Table(name = "t_student") // 数据库表名
public class Student {

	@Id // 主键
	@GeneratedValue // 自增
	private Integer id;

	@NotEmpty(message = "学生姓名不能为空") // 表单验证
	@Column(length = 20) // 字段长度
	private String t_name;

	@Column(length = 20) // 字段长度
	private String major;

	public Integer getId() {
		return id;
	}

	public void setId(Integer id) {
		this.id = id;
	}

	public String getT_name() {
		return t_name;
	}

	public void setT_name(String t_name) {
		this.t_name = t_name;
	}

	public String getMajor() {
		return major;
	}

	public void setMajor(String major) {
		this.major = major;
	}

}
3、StudentDao.java
dao 接口
实现类都不用写了,SpringData-JPA 自动帮你实现,里边虽然空空,但是单表基本CRUD接口都写好了
package com.cun.dao;

import org.springframework.data.jpa.repository.JpaRepository;

import com.cun.entity.Student;

/**
 * 简单的dao层只需要继承JpaRepository接口,即可,
 * 两个参数,分别表示 —— 实体类型、主键类型
 * 复杂sql语句再自己增加接口
 * @author linhongcun
 *
 */
public interface StudentDao extends JpaRepository<Student, Integer>{


}
4、StudentService.java
事务处接口
package com.cun.service;

import java.util.List;

import com.cun.entity.Student;

public interface StudentService {

	public void addStudent(Student student);
	public void deleteStudent(Integer id);
	public void updateStudent(Student student);
	public Student findStudent(Integer id);
	public List<Student> findAllStudent();

}
5、StudentServiceImpl.java
事务处接口实现类
package com.cun.service.impl;

import java.util.List;

import org.springframework.beans.factory.annotation.Autowired;
import org.springframework.stereotype.Service;

import com.cun.dao.StudentDao;
import com.cun.entity.Student;
import com.cun.service.StudentService;

@Service
public class StudentServiceImpl implements StudentService {

	@Autowired
	private StudentDao studentDao;

	@Override
	public void addStudent(Student student) {
		// TODO Auto-generated method stub
		studentDao.save(student);
	}

	@Override
	public void deleteStudent(Integer id) {
		// TODO Auto-generated method stub
		studentDao.delete(id);

	}

	@Override
	public void updateStudent(Student student) {
		// TODO Auto-generated method stub
		studentDao.save(student);
	}

	@Override
	public Student findStudent(Integer id) {
		// TODO Auto-generated method stub
		return studentDao.findOne(id);
	}

	@Override
	public List<Student> findAllStudent() {
		// TODO Auto-generated method stub
		return studentDao.findAll();

	}

}
6、StudentController.java
控制层
package com.cun.controller;
import java.util.List;
import org.springframework.beans.factory.annotation.Autowired;
import org.springframework.web.bind.annotation.DeleteMapping;
import org.springframework.web.bind.annotation.GetMapping;
import org.springframework.web.bind.annotation.PathVariable;
import org.springframework.web.bind.annotation.PostMapping;
import org.springframework.web.bind.annotation.PutMapping;
import org.springframework.web.bind.annotation.RequestMapping;
import org.springframework.web.bind.annotation.RestController;
import com.cun.entity.Student;
import com.cun.service.StudentService;
//@RestController 代替 @Controller,省略以后的 @ResponseBody
@RestController
@RequestMapping("/student")
public class StudentController {
@Autowired
private StudentService studentservice;
/**
* 显示所有
* url:"http://localhost/student/findall"
*
* @return
*/
@RequestMapping(value = "/findall")
public List<Student> findAllStudent() {
return studentservice.findAllStudent();
}
/**
* 查找 restful 风格
* url:"http://localhost/student/findone/1"
*
* @param id
* @return
*/
// == @RequestMapping(value = "/findone/{id}", method = RequestMethod.GET)
@GetMapping("/findone/{id}")
public Student findStudentRestful(@PathVariable("id") Integer id) {
return studentservice.findStudent(id);
}
/**
* 删除 restful 风格
* url:"http://localhost/student/deleteone/4"
* 注意无法通过浏览器的链接来模拟检验,可以通过 jquery的 $.ajax方法,并type="delete"
*
* @param id
*/
// == @RequestMapping(value = "/deleteone/{id}", method = RequestMethod.DELETE)
@DeleteMapping("/deleteone/{id}")
public void deleteStudentRestful(@PathVariable("id") Integer id) {
studentservice.deleteStudent(id);
}
/**
* 增加 restful 风格
* url:"http://localhost/student/addone"
* 通过
// == @RequestMapping(value="/addone",method=RequestMethod.POST)
@PostMapping("/addone")
public void addStudentRestful(Student student) {
studentservice.addStudent(student);
}
/**
* 修改 restful 风格
* url:"http://localhost/student/updateone"
* 验证:可以通过 jquery的 $.ajax方法,并type="put",同时注意data形式——A=a&B=b&C=c
*
* @param student
*/
// == @RequestMapping(value="/addone",method=RequestMethod.PUT)
@PutMapping("/updateone")
public void updateStudentRestful(Student student) {
studentservice.updateStudent(student);
}
}
7、index.html
接口测试,这里写得有点简陋,不过还是可以正确测试接口写得是否有问题
<html>
<head>
<meta charset="UTF-8">
<title>title>
<script src="js/jquery-1.7.2.js">script>
<script type="text/javascript">


	/**
	* 实际应用时,里边的参数应根据实际而改变,而不是写死的,
	* 这里仅仅①简单地模拟前后端,②简单测试接口
	*
	*/


	function del() {
		$.ajax({
			type : "delete",
			url : "http://localhost/student/deleteone/4",
			async : true
		});
	}

	function upd() {
		$.ajax({
			type : "put",
			data:"id=6&t_name=cun&major=计科",
			url : "http://localhost/student/updateone",
			async : true
		});
	}
script>
head>
<body>

	<button id="btn" onclick="del()">delete requestbutton>


	<button id="btn2" onclick="upd()">update requestbutton>


	<form action="http://localhost/student/addone" method="post">
		major<input type="text" name="major" />
		t_name<input type="text" name="t_name" />
		<input type="submit" value="submit" />
	form>


	<a href="http://localhost/student/findone/6">select requesta>
body>
html>
8、application.yml
配置,算是很简单了,下面几个配置是最常用的
server:
  port: 80 #为了以后访问项目不用写端口号
  context-path: / #为了以后访问项目不用写项目名
spring:
  datasource:
    driver-class-name: com.mysql.jdbc.Driver
    url: jdbc:mysql://localhost:3306/testspring
    username: root
    password: 123
  jpa:
    hibernate:
      ddl-auto: update  #数据库同步代码
    show-sql: true      #dao操作时,显示sql语句
9、pom.xml
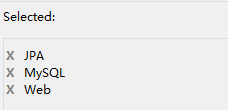
在 eclipse 创建 SpringBoot 工程时加入
以后再加入 mysql、jpa、web 就好了,并且可以通过 Alt+/ => Edit Starter 加入
三、小结
SpringBoot官方中文参考文档
【思考:SpringBoot 自动配置】
首先,这是基于 Spring4+ 版本的
①采用注解 bean 的方式进行配置
②习惯优于配置,自动加载了大量的常用的配置方式,如 SpringMVC+Spring,视图解析器、控制器等
③又可更改,如修改 SpringMVC,@Configuration+@Bean,修改上述自动配置。
2018/8/4 更新:RESTful 风格理解
本文的接口不是真正意义上的 rest 风格,具体可以看如下
理解RESTful架构——阮一峰
RESTful API 设计指南——阮一峰
2018/9/5 更新:汤小洋 SpringBoot 2.0 小结
在网上发现了一篇 SpringBoot 总结得很好的文章,且是最新版本的,而本文是 1.5.x 的,有必要分享
【2018版】最新最全的SpringBoot 2.0入门笔记

