Spring Cloud 实践:项目初始化【含采坑】
搞 Java 的无论是新手还是老鸟肯定都知道什么是 Spring,它有很多优秀的框架而且都是非常成熟稳定的,在许多大型项目中使用广泛,开源生态环境良好。俺是个纯纯的 S 粉,当要使用框架解决某个功能时优先考虑使用 Spring 系列的东西。下面就分享下我在使用 Spring Cloud 时的一些经历,供大家茶余饭后消遣 :)
微服务架构确实也不是什么新的玩意了,如果想在你的产品或是项目中使用微服务的话,可以试试 Spring Cloud 这套东西,好像是15年发布的第一版,到现在已经有几年的时间了,社区的维护和迭代都跟得上潮流,反馈处理的也还是蛮及时的。当然,在使用微服务前,你应该对微服务有了充分的了解,以及对优势和弊端都有数。切记滥用。
这一篇,不说太多的东西,只是把项目构建并运行起来。
- 本机已经安装并配置好 Gradle;
- 具备基本的 Gradle 使用经验;
- 会用 IntelliJ IDEA 打开 Gradle 项目;
首先,来到 Spring Cloud 项目的主页:https://projects.spring.io/spring-cloud/,点击【QUICK START】按钮,跳到当前页面中部的位置,选择 版本及 构建方式,这里我选择的是 Finchley ,构建方式为 Gradle ,点击复制按钮将下面的构建脚本复制到剪贴板中。如下图:

得到的脚本应该是下面这段(这里面有几个坑):
buildscript {
    ext {
        springBootVersion = '2.0.1.RELEASE'
    }
    repositories {
        mavenCentral()
    }
    dependencies {
        classpath("org.springframework.boot:spring-boot-gradle-plugin:${springBootVersion}")
    }
}

apply plugin: 'java'
apply plugin: 'spring-boot'

dependencyManagement {
  imports {
    mavenBom ':spring-cloud-dependencies:Finchley.RELEASE'
  }
}

dependencies {
    compile ':spring-cloud-starter-config'
    compile ':spring-cloud-starter-eureka'
}
在本机建立个目录,开个命令行窗口并把路径切换到此目录下,执行下面命令:
D:\test> gradle init使用文本编辑器打开此目录中的 build.gradle 文件,将上面的构建脚本复制到此文件中后保存。
我这里使用的是 IntelliJ IDEA 开发工具。使用 IDEA open project 选择创建的那个目录。这时IDEA 应该会自动的去根据构建脚本进行项目构建了。
坑1
如果正常的话,这时你应该遇到了第一个坑(汗),构建窗口会出现 Plugin with id 'spring-boot' not found. 提示,点击提示下的 Open File 链接直接跳到出问题的脚本处,如下图:

找不到这个插件啊!我靠,到 Gradle 官网查了一遍,没找到为啥。百度、必应,有一顿找。
这时我已经意识到,应该是又踩坑了。找不到 spring boot 插件,这个不是很奇怪嘛。
那么纯的 Spring Boot 构建脚本里也应该有用到 spring boot 插件,看看那个里面是怎么写的吧,来到 https://start.spring.io/ 选择 Generate a Gradle Project with Java,点击 Generate Project 下载项目文件 ,打开下载后的压缩包,查看这个的 build.gradle 文件里是怎么写的,如下:
apply plugin: 'java'
apply plugin: 'eclipse'
apply plugin: 'org.springframework.boot'
apply plugin: 'io.spring.dependency-management'
很明显的这里面用的是 apply plugin: 'org.springframework.boot' 而不是 apply plugin: 'spring-boot' 那替换下试试吧。
OK,之前的哪个错误已经没有,可又有了新的。。。
坑2
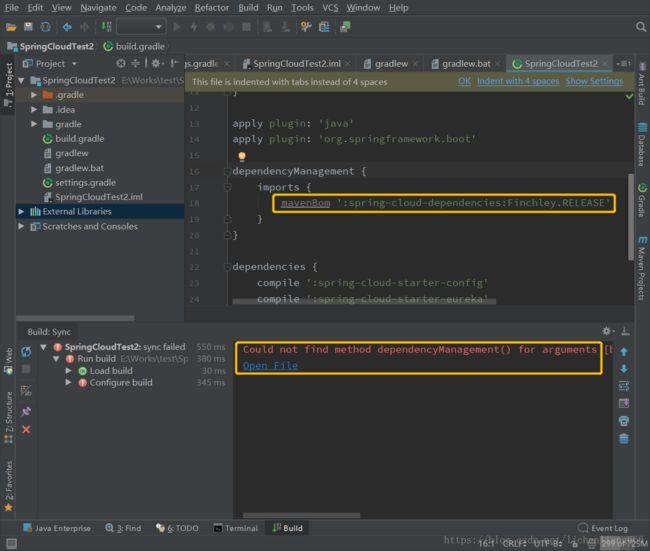
如果还是正常的话,第二个坑来了,构建窗口会出现下面提示:
Could not find method dependencyManagement() for arguments
[build_5odpun0k5r9l87j7l7cbitax8$_run_closure1@25297b84] on root project ‘SpringCloudTest2’ of type org.gradle.api.Project.
还是点击提示下的 Open File 链接直接跳到出问题的脚本处,如下图:

还是根据上面纯的 Spring Boot 构建脚本加入下面的这个插件:
apply plugin: 'io.spring.dependency-management'坑3
这回的错误是:
Cannot resolve external dependency
org.springframework.boot:spring-boot-dependencies:2.0.1.RELEASE because no repositories are defined.
Required by:
project :
这是一个比较常见的问题,因为构建脚本中没有配置 repositories ,加入下面的脚本:
repositories {
    mavenCentral()
}
坑4
依然还有,这次的错误是:
Could not find :spring-cloud-dependencies:Finchley.RELEASE.
Required by:
project :
Search in build.gradle files
其实,明眼人应该能看出怪异的地方了 mavenBom ':spring-cloud-dependencies:Finchley.RELEASE',正常情况下值应该是分为三段,每段间用 : 分割。
groupId:artifactId:version 组成,只知道可以省略版本那段,可看上的明显是没有groupId这段,可正确的 groupId 应该是什么呢。必应下 mavenBom ':spring-cloud-dependencies:Finchley.RELEASE',在搜索结果页上找到了这个 Spring Cloud Brixton.RELEASE is available ,页面里有也有个比较老的 Gradle 构建脚本,如下:
buildscript {
  dependencies {
    classpath("org.springframework.boot:spring-boot-gradle-plugin:1.3.5.RELEASE")
  }
}
repositories {
  maven {
    mavenCentral()
  }
}
apply plugin: 'spring-boot'

dependencyManagement {
  imports {
    mavenBom 'org.springframework.cloud:spring-cloud-dependencies:Brixton.RELEASE'
  }
}

dependencies {
    compile 'org.springframework.cloud:spring-cloud-starter-config'
    compile 'org.springframework.cloud:spring-cloud-starter-eureka'
    //...
}
看上面的脚本文件, mavenBom 值正确的 groupId 应该是 org.springframework.cloud ,好,那就来修复另一个问题吧。
完整的正确脚本
buildscript {
    ext {
        springBootVersion = '2.0.1.RELEASE'
    }
    repositories {
        mavenCentral()
    }
    dependencies {
        classpath("org.springframework.boot:spring-boot-gradle-plugin:${springBootVersion}")
    }
}

apply plugin: 'java'
// 坑1:由原始的 apply plugin: 'spring-boot' 改为下面这行
apply plugin: 'org.springframework.boot'
// 坑2:加入下面这行
apply plugin: 'io.spring.dependency-management'

dependencyManagement {
    imports {
        // 坑4:配置值增加 groupId(org.springframework.cloud)这段
        mavenBom 'org.springframework.cloud:spring-cloud-dependencies:Finchley.RELEASE'
    }
}

// 坑3:加入下面这段资源库配置
repositories {
    mavenCentral()
}

dependencies {
    compile ':spring-cloud-starter-config'
    compile ':spring-cloud-starter-eureka'
}
此文后续:
- 修改错别字;
- 润色词句;
- 为什么会有这么多问题;
- 补充关于 groupId:artifactId:version 的简写规则。

