Restful形式接口文档生成之Swagger与SpringMVC整合手记
既然是整合Swagger,那么前提是你已经使用SpringMVC搭建了一套接口服务,无论繁简,只要可用就行。关于接口文档生成工具,大家在网上搜索的时候,可能会发现另外一个工具:springfox。网上关于springfox和spring整合的文章也非常多的呀。那springfox和swagger是什么关系呢?引用springfox官方的语录:
Springfox has evolved from a project originally created by Marty Pitt and was named swagger-springmvc.
这段英文很简单,不懂的读者对照在线词典也可以翻译出来,加油!言归正传,先简单介绍下项目环境:
- JDK1.7
- Spring 3.2.2
- swagger-springmvc 1.0.2 (最新版本)
一、依赖管理
在整合之前,需要把所有使用到的依赖包全部引入。网上很多文章只是简单告诉读者引入swagger-springmvc-1.0.2.jar包,但是随后你发现这远远不够,还需要很多包,如下所示:
        com.mangofactory
        swagger-springmvc
        1.0.2


        com.mangofactory
        swagger-models
        1.0.2


        com.wordnik
        swagger-annotations
        1.3.11


        com.google.guava
        guava
        15.0


        com.fasterxml.jackson.core
        jackson-annotations
        2.4.4


        com.fasterxml.jackson.core
        jackson-databind
        2.4.4


        com.fasterxml.jackson.core
        jackson-core
        2.4.4


        com.fasterxml
        classmate
        1.1.0
以上是比较完整的依赖列表,本文搭建的项目可以正常运行。读者可能会有疑问,maven管理的依赖包不是具有传递性吗?是的,是有传递性,但是传递性是根据
二、Swagger配置
Swagger的配置实际上就是自定义一个Config类,通过java编码的方式实现配置。代码如下:
import com.mangofactory.swagger.configuration.SpringSwaggerConfig;
import com.mangofactory.swagger.models.dto.ApiInfo;
import com.mangofactory.swagger.plugin.EnableSwagger;
import com.mangofactory.swagger.plugin.SwaggerSpringMvcPlugin;
import org.springframework.beans.factory.annotation.Autowired;
import org.springframework.context.annotation.Bean;
import org.springframework.context.annotation.Configuration;

/**
 * Created by xiaohui on 2016/1/14.
 */
@Configuration
@EnableSwagger
public class SwaggerConfig {

    private SpringSwaggerConfig springSwaggerConfig;

    /**
     * Required to autowire SpringSwaggerConfig
     */
    @Autowired
    public void setSpringSwaggerConfig(SpringSwaggerConfig springSwaggerConfig)
    {
        this.springSwaggerConfig = springSwaggerConfig;
    }

    /**
     * Every SwaggerSpringMvcPlugin bean is picked up by the swagger-mvc
     * framework - allowing for multiple swagger groups i.e. same code base
     * multiple swagger resource listings.
     */
    @Bean
    public SwaggerSpringMvcPlugin customImplementation()
    {
        return new SwaggerSpringMvcPlugin(this.springSwaggerConfig)
                .apiInfo(apiInfo())
                .includePatterns(".*?");
    }

    private ApiInfo apiInfo()
    {
        ApiInfo apiInfo = new ApiInfo(
                "My Apps API Title",
                "My Apps API Description",
                "My Apps API terms of service",
                "My Apps API Contact Email",
                "My Apps API Licence Type",
                "My Apps API License URL");
        return apiInfo;
    }
}
上面这段代码是从网络上找到的,你也肯定找到了,对吧!但是,你会发现一个问题:SpringSwaggerConfig无法注入。这是为什么呢?其实很简单,因为spring容器里没有SpringSwaggerConfig类型的对象。解决办法:在springmvc的配置文件中加入以下配置即可。
到目前为止,我们已经完成了对所有接口方法的扫描解析功能,那解析得到什么内容呢?这需要我们自定义,自定义操作的对象就是接口方法。先看段代码:
/**
 * 根据用户名获取用户对象
 * @param name
 * @return
 */
@RequestMapping(value="/name/{name}", method = RequestMethod.GET)
@ResponseBody
@ApiOperation(value = "根据用户名获取用户对象", httpMethod = "GET", response = ApiResult.class, notes = "根据用户名获取用户对象")
public ApiResult getUserByName(@ApiParam(required = true, name = "name", value = "用户名") @PathVariable String name) throws Exception{
    UcUser ucUser = ucUserManager.getUserByName(name);

    if(ucUser != null) {
        ApiResult result = new ApiResult();
        result.setCode(ResultCode.SUCCESS.getCode());
        result.setData(ucUser);
        return result;
    } else {
        throw new BusinessException("根据{name=" + name + "}获取不到UcUser对象");
    }
}
上述代码是Controller中的一个方法,@ApiOperation注解对这个方法进行了说明,@ApiParam注解对方法参数进行了说明。关于这两个注解的使用,可以参看源码。这样子,Swagger就可以扫描接口方法,得到我们自定义的接口说明内容。
三、Swagger-UI配置
Swagger扫描解析得到的是一个json文档,对于用户不太友好。下面介绍swagger-ui,它能够友好的展示解析得到的接口说明内容。
从https://github.com/swagger-api/swagger-ui 获取其所有的 dist 目录下东西放到需要集成的项目里,本文放入 src/main/webapp/WEB-INF/swagger/ 目录下。
修改swagger/index.html文件,默认是从连接http://petstore.swagger.io/v2/swagger.json获取 API 的 JSON,这里需要将url值修改为http://{ip}:{port}/{projectName}/api-docs的形式,{}中的值根据自身情况填写。比如我的url值为:http://localhost:8083/arrow-api/api-docs
因为swagger-ui项目都是静态资源,restful形式的拦截方法会将静态资源进行拦截处理,所以在springmvc配置文件中需要配置对静态文件的处理方式。
//所有swagger目录的访问,直接访问location指定的目录
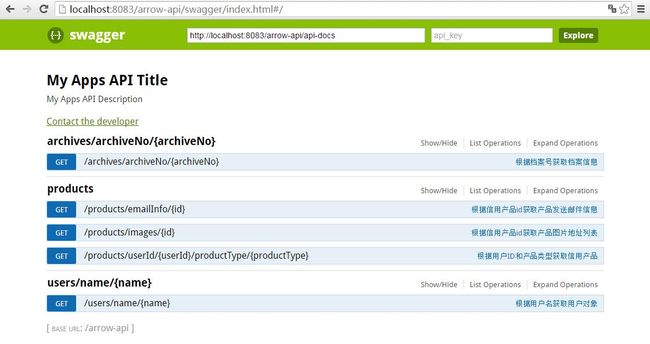
OK!大功告成,打开浏览器直接访问swagger目录下的index.html文件,即可看到接口文档说明了。注意访问地址哦!看下图:
原文地址:http://javatech.wang/index.php/archives/74/