SSM环境搭建(五) - 使用Spring Initializr搭建Spring Boot Web工程
一.搭建Web工程
万事开头难,自己搭建Web项目结构费时费力,Spring提供了Spring Initializr,它可以为你生成一个基本的Spring Boot项目结构
Spring Initializr官网:https://start.spring.io/
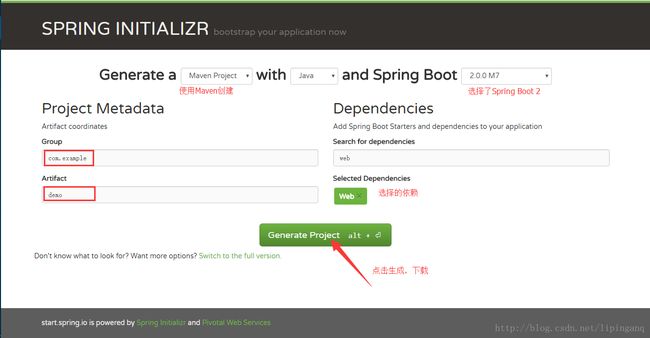
1.生成项目结构
用浏览器打开https://start.spring.io/
2.解压到工作空间
我自己空间为:D:\eclipse\workspace\boot\demo

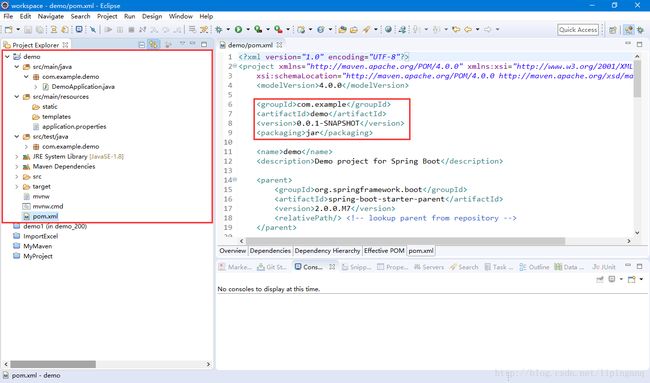
3.Eclipse导入项目
File -> Import -> Existing Maven Projects

导入成功后:
4.集成MVC框架
Spring Boot中集成并配置MVC框架,只需要在pom.xml文件中添加:
<dependency>
    <groupId>org.springframework.bootgroupId>
    <artifactId>spring-boot-starter-webartifactId>
dependency>
完整POM文件:
<project xmlns="http://maven.apache.org/POM/4.0.0" xmlns:xsi="http://www.w3.org/2001/XMLSchema-instance"
    xsi:schemaLocation="http://maven.apache.org/POM/4.0.0 http://maven.apache.org/xsd/maven-4.0.0.xsd">
    <modelVersion>4.0.0modelVersion>

    <groupId>com.examplegroupId>
    <artifactId>demoartifactId>
    <version>0.0.1-SNAPSHOTversion>
    <packaging>jarpackaging>

    <name>demoname>
    <description>Demo project for Spring Bootdescription>

    <parent>
        <groupId>org.springframework.bootgroupId>
        <artifactId>spring-boot-starter-parentartifactId>
        <version>2.0.0.M7version>
        <relativePath/>
    parent>

    <properties>
        <project.build.sourceEncoding>UTF-8project.build.sourceEncoding>
        <project.reporting.outputEncoding>UTF-8project.reporting.outputEncoding>
        <java.version>1.8java.version>
    properties>

    <dependencies>
        <dependency>
            <groupId>org.springframework.bootgroupId>
            <artifactId>spring-boot-starter-webartifactId>
        dependency>

        <dependency>
            <groupId>org.springframework.bootgroupId>
            <artifactId>spring-boot-starter-testartifactId>
            <scope>testscope>
        dependency>
    dependencies>

    <build>
        <plugins>
            <plugin>
                <groupId>org.springframework.bootgroupId>
                <artifactId>spring-boot-maven-pluginartifactId>
            plugin>
        plugins>
    build>

    <repositories>
        <repository>
            <id>spring-snapshotsid>
            <name>Spring Snapshotsname>
            <url>https://repo.spring.io/snapshoturl>
            <snapshots>
                <enabled>trueenabled>
            snapshots>
        repository>
        <repository>
            <id>spring-milestonesid>
            <name>Spring Milestonesname>
            <url>https://repo.spring.io/milestoneurl>
            <snapshots>
                <enabled>falseenabled>
            snapshots>
        repository>
    repositories>

    <pluginRepositories>
        <pluginRepository>
            <id>spring-snapshotsid>
            <name>Spring Snapshotsname>
            <url>https://repo.spring.io/snapshoturl>
            <snapshots>
                <enabled>trueenabled>
            snapshots>
        pluginRepository>
        <pluginRepository>
            <id>spring-milestonesid>
            <name>Spring Milestonesname>
            <url>https://repo.spring.io/milestoneurl>
            <snapshots>
                <enabled>falseenabled>
            snapshots>
        pluginRepository>
    pluginRepositories>


project>
5.一个简单实例
实例代码:
package com.example.demo;

import org.springframework.boot.SpringApplication;
import org.springframework.boot.autoconfigure.SpringBootApplication;
import org.springframework.web.bind.annotation.RequestMapping;
import org.springframework.web.bind.annotation.RestController;

@SpringBootApplication
@RestController
public class DemoApplication {

    @RequestMapping("/test")
    public String test() {
        return "Hello Spring Boot";
    }

    public static void main(String[] args) {
        SpringApplication.run(DemoApplication.class, args);
    }
}
- @SpringBootApplication标注DemoApplication 是Spring Boot应用的入口
- main方法在应用启动的时候执行
- @RestController标注DemoApplication是一个控制器,返回格式为JSON
- @RequestMapping来映射URL
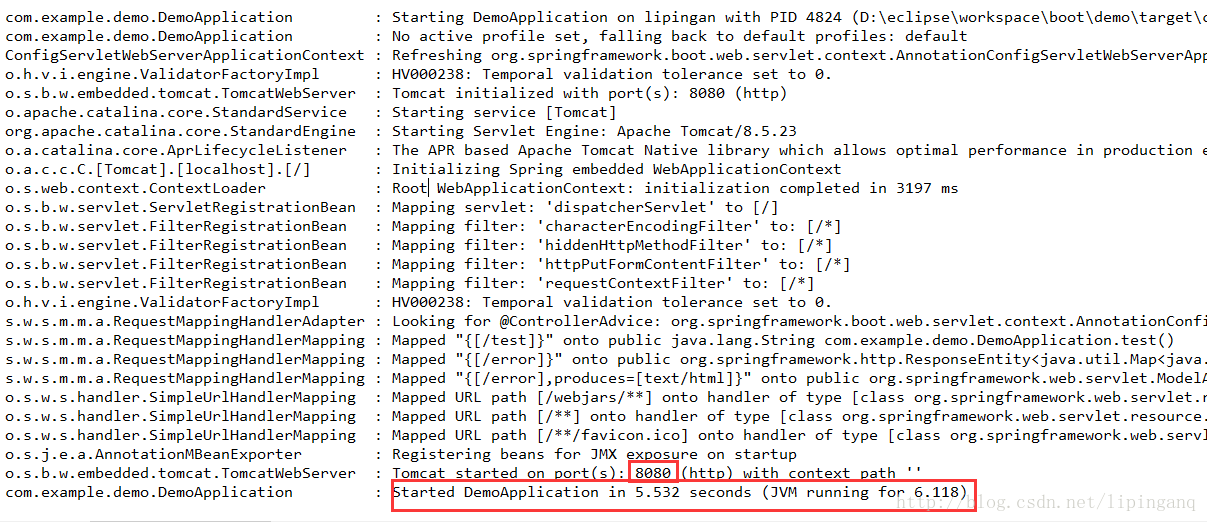
6.启动服务
在DemoApplication上Run As -> Java application
Spring Boot内置Tomcat,默认端口号为8080
7.访问
浏览器输入:http://localhost:8080/test

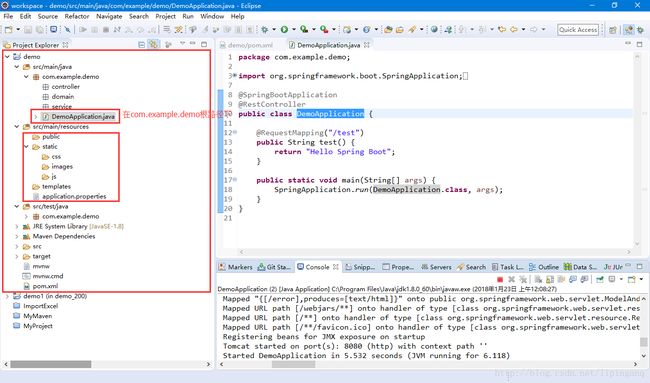
二.Web应用目录结构
Spring Boot应用中资源存放在一些默认路径下:
- Web模板文件存放在resources/templates目录下
- 模板文件使用的静态资源存放在resources/static目录下
- 在resources目录下application.properties或application.yml,这个文件会被发布到classpath中,Spring Boot会自动读取
- 程序入口类DemoApplication应该放在根路径下,这样才会扫描自动加载DemoApplication所处包下及其子包中符合条件的bean
三.增加Web支持
以前根据Spring创建一个Web应用,需要配置web.xml、applicationContext.xml,使用Spring Boot,仅仅需要在pom.xml中配置Spring Boot,并添加spring-boot-starter-web的依赖即可:
    <parent>
        <groupId>org.springframework.bootgroupId>
        <artifactId>spring-boot-starter-parentartifactId>
        <version>2.0.0.M7version>
        <relativePath/>
    parent>

    <dependencies>
        <dependency>
            <groupId>org.springframework.bootgroupId>
            <artifactId>spring-boot-starter-webartifactId>
        dependency>
    dependencies>
四.使用热部署
参考:Spring Boot干货系列:(十)开发常用的热部署方式汇总
上面的例子,修改类时必须重新启动应用,对于开发者非常不方便,Spring Boot提供了spring-boot-devtools,它能在修改类或配置文件时自动重新加载Spring Boot应用
需要在pom.xml中添加以下依赖:
<dependency>
    <groupId>org.springframework.bootgroupId>
    <artifactId>spring-boot-devtoolsartifactId>
    <optional>trueoptional>
dependency>
1.第一次启动
Registering beans for JMX exposure on startup
o.s.b.w.embedded.tomcat.TomcatWebServer  : Tomcat started on port(s): 8090 (http) with context path ''
com.example.demo.DemoApplication         : Started DemoApplication in 6.663 seconds (JVM running for 7.502)
2.修改类
LiveReload server is running on port 35729
Registering beans for JMX exposure on startup
Tomcat started on port(s): 8090 (http) with context path ''
Condition evaluation unchanged
Started DemoApplication in 2.664 seconds (JVM running for 29.787)
主要多了2个变化:
- LiveReload server用于监控Spring Boot应用文件的变化
- 启动速度快。Spring Boot再次重启避免重启了Tomcat,也避免重启已经加载的Spring相关类,只重新加载变化的类,所以速度很快
五.查看已启用的自动配置
可以通过下面三种方式查看当前项目中已启用和未启用的自动配置的报告:
- 运行jar时增加–debug参数:
java -jar xx.jar --debug- 在application.properties中设置属性
debug=true- 在STS中设置

此时启动,可在控制台输出,已启用的自动配置:
Positive matches:
-----------------

   CodecsAutoConfiguration matched:
      - @ConditionalOnClass found required class 'org.springframework.http.codec.CodecConfigurer'; @ConditionalOnMissingClass did not find unwanted class (OnClassCondition)

   CodecsAutoConfiguration.JacksonCodecConfiguration matched:
      - @ConditionalOnClass found required class 'com.fasterxml.jackson.databind.ObjectMapper'; @ConditionalOnMissingClass did not find unwanted class (OnClassCondition)

   CodecsAutoConfiguration.JacksonCodecConfiguration#jacksonCodecCustomizer matched:
      - @ConditionalOnBean (types: com.fasterxml.jackson.databind.ObjectMapper; SearchStrategy: all) found bean 'jacksonObjectMapper' (OnBeanCondition)

   DispatcherServletAutoConfiguration matched:
      - @ConditionalOnClass found required class 'org.springframework.web.servlet.DispatcherServlet'; @ConditionalOnMissingClass did not find unwanted class (OnClassCondition)
      - found ConfigurableWebEnvironment (OnWebApplicationCondition)
...
未启动的自动配置:
Negative matches:
-----------------

   ActiveMQAutoConfiguration:
      Did not match:
         - @ConditionalOnClass did not find required classes 'javax.jms.ConnectionFactory', 'org.apache.activemq.ActiveMQConnectionFactory' (OnClassCondition)

   AopAutoConfiguration:
      Did not match:
         - @ConditionalOnClass did not find required classes 'org.aspectj.lang.annotation.Aspect', 'org.aspectj.lang.reflect.Advice', 'org.aspectj.weaver.AnnotatedElement' (OnClassCondition)

   ArtemisAutoConfiguration:
      Did not match:
         - @ConditionalOnClass did not find required classes 'javax.jms.ConnectionFactory', 'org.apache.activemq.artemis.jms.client.ActiveMQConnectionFactory' (OnClassCondition)

   BatchAutoConfiguration:
      Did not match:
         - @ConditionalOnClass did not find required classes 'org.springframework.batch.core.launch.JobLauncher', 'org.springframework.jdbc.core.JdbcOperations' (OnClassCondition)