spring boot 2.1学习笔记【八】SpringBoot 2 集成 mysql多数据源, MySQL多数据源事务
springboot系列学习笔记全部文章请移步值博主专栏**: spring boot 2.X/spring cloud Greenwich。
由于是一系列文章,所以后面的文章可能会使用到前面文章的项目。springboot系列代码全部上传至GitHub:https://github.com/liubenlong/springboot2_demo
本系列环境:Java11;springboot 2.1.1.RELEASE;springcloud Greenwich.RELEASE;MySQL 8.0.5;
文章目录
- 环境说明
- 多数据源属性配置
- 配置数据源及事务
有时候需要在一个项目中集成多个数据源,并且可能会对多个数据源进行修改,固本篇介绍一下如何使用springboot2配置多数据源并且配置多数据源事务
环境说明
springboot2.1.1
mybatis1.3.2
druid连接池
mysql8
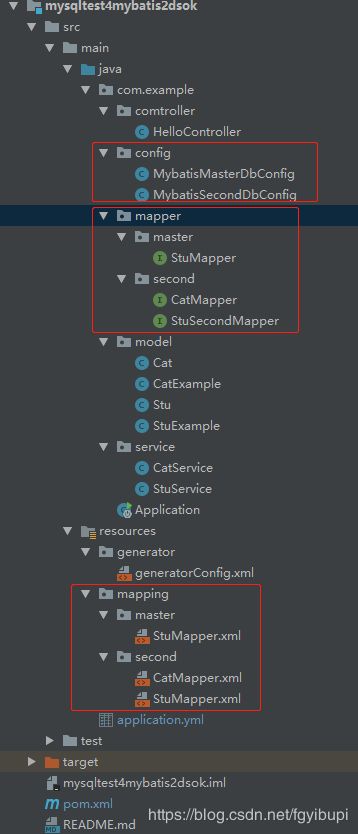
由于配置了多数据源,就不能使用springboot默认的配置了,我们需要手动配置多个数据源,并且配置相关的事务管理器。为了便于管理,这里我们将不同的数据源进行了包的拆分。
多数据源属性配置
pom依赖与 spring boot 2.1学习笔记【七】SpringBoot 2集成MySQL,Mybatis 中的相同。主库中有stu表,第二个数据源中有cat和stu两张表。
application.yml需要增加第二个数据源ds2的配置(配置结构可以调整,不是一定这样写,只需要在@ConfigurationProperties指定前缀即可):
spring:
  datasource:
    multiplenames: ds2
    type: com.alibaba.druid.pool.DruidDataSource
    druid:
      # 特别注意:java 9以后需要将com.mysql.jdbc.Driver  改为  com.mysql.cj.jdbc.Driver即可
      # 否则报错:Loading class `com.mysql.jdbc.Driver'. This is deprecated.
      driver-class-name: com.mysql.cj.jdbc.Driver
      #基本属性
      url: jdbc:mysql://127.0.0.1:3306/test?charset=utf8mb4&useSSL=false
      username: root
      password: ****
      #配置初始化大小/最小/最大[仅用于测试,生成环境需要修改哦]
      initial-size: 5
      min-idle: 5
      max-active: 20
      #获取连接等待超时时间
      max-wait: 60000
      #间隔多久进行一次检测,检测需要关闭的空闲连接
      time-between-eviction-runs-millis: 60000
      #一个连接在池中最小生存的时间
      min-evictable-idle-time-millis: 300000
      #指定获取连接时连接校验的sql查询语句
      validation-query: SELECT 'x'
      #验证连接的有效性
      test-while-idle: true
      #获取连接时候验证,会影响性能(不建议true)
      test-on-borrow: false
      #打开PSCache,并指定每个连接上PSCache的大小。oracle设为true,mysql设为false。分库分表较多推荐设置为false
      pool-prepared-statements: false
      max-pool-prepared-statement-per-connection-size: 20
    ds2:
      type: com.alibaba.druid.pool.DruidDataSource
      druid:
        # 特别注意:java 9以后需要将com.mysql.jdbc.Driver  改为  com.mysql.cj.jdbc.Driver即可
        # 否则报错:Loading class `com.mysql.jdbc.Driver'. This is deprecated.
        driver-class-name: com.mysql.cj.jdbc.Driver
        #基本属性
        url: jdbc:mysql://127.0.0.1:3306/test2?charset=utf8mb4&useSSL=false
        username: root
        password: ****
        #配置初始化大小/最小/最大[仅用于测试,生成环境需要修改哦]
        initial-size: 5
        min-idle: 5
        max-active: 20
        #获取连接等待超时时间
        max-wait: 60000
        #间隔多久进行一次检测,检测需要关闭的空闲连接
        time-between-eviction-runs-millis: 60000
        #一个连接在池中最小生存的时间
        min-evictable-idle-time-millis: 300000
        #指定获取连接时连接校验的sql查询语句
        validation-query: SELECT 'x'
        #验证连接的有效性
        test-while-idle: true
        #获取连接时候验证,会影响性能(不建议true)
        test-on-borrow: false
        #打开PSCache,并指定每个连接上PSCache的大小。oracle设为true,mysql设为false。分库分表较多推荐设置为false
        pool-prepared-statements: false
        max-pool-prepared-statement-per-connection-size: 20

#pagehelper
pagehelper:
  helperDialect: mysql
  #  分页参数合理化,默认false禁用 .启用合理化时,如果pageNum<1会查询第一页,如果pageNum>pages会查询最后一页
  #  用合理化时,如果pageNum<1或pageNum>pages会返回空数据
  reasonable: true
  supportMethodsArguments: true
  # 设置为true时,使用RowBounds分页会进行count查询 .默认=false
  rowBoundsWithCount: true
接下来将多个数据源的mapper等文件组织好,主要是区分了包,注意这里可能需要你对自动生成的mapper进行文件夹的移动,完整的目录结构:

配置数据源及事务
主数据源配置,这里通过属性安全的配置方式来配置DataSource。然后创建相关的事务管理器
@Configuration
@MapperScan(basePackages = {"com.example.mapper.master"}, sqlSessionTemplateRef = "masterSqlSessionTemplate")
public class MybatisMasterDbConfig {
    @Bean
    //默认数据源
    @Primary
    //类型安全的属性配置
    @ConfigurationProperties(prefix = "spring.datasource.druid")
    public DataSource mysqDataSource() {
        //通过DataSourceBuilder构建数据源
        return DataSourceBuilder.create().type(DruidDataSource.class).build();
    }

    @Bean(name = "masterSqlSessionFactory")
    @Primary
    public SqlSessionFactory masterSqlSessionFactory(DataSource dataSource) throws Exception {
        SqlSessionFactoryBean bean = new SqlSessionFactoryBean();
        bean.setDataSource(dataSource);
        //由于拆分了包结构,这里指定mapper
        bean.setMapperLocations(new PathMatchingResourcePatternResolver().getResources("classpath:mapping/master/*.xml"));
        return bean.getObject();
    }
    //事务管理器
    @Bean(name = "masterTransactionManager")
    @Primary
    public DataSourceTransactionManager masterTransactionManager(DataSource dataSource) {
        return new DataSourceTransactionManager(dataSource);
    }

    @Bean(name = "masterSqlSessionTemplate")
    @Primary
    public SqlSessionTemplate masterSqlSessionTemplate(@Qualifier("masterSqlSessionFactory") SqlSessionFactory sqlSessionFactory) {
        return new SqlSessionTemplate(sqlSessionFactory);
    }
}
第二个数据源配置:
@Configuration
@MapperScan(basePackages = {"com.example.mapper.second"}, sqlSessionTemplateRef = "secondSqlSessionTemplate")
public class MybatisSecondDbConfig {

    @Bean
    @Qualifier("ds2")//指定bean的名称
    @ConfigurationProperties(prefix = "spring.datasource.ds2.druid")
    public DataSource oracleDataSource() {
        return DataSourceBuilder.create().type(DruidDataSource.class).build();
    }


    @Bean(name = "secondSqlSessionFactory")
    public SqlSessionFactory secondSqlSessionFactory(@Qualifier("ds2") DataSource dataSource) throws Exception {
        SqlSessionFactoryBean bean = new SqlSessionFactoryBean();
        bean.setDataSource(dataSource);
        //由于拆分了包结构,这里指定mapper
        bean.setMapperLocations(new PathMatchingResourcePatternResolver().getResources("classpath:mapping/second/*.xml"));
        return bean.getObject();
    }

    @Bean(name = "secondTransactionManager")
    public DataSourceTransactionManager secondTransactionManager(@Qualifier("ds2") DataSource dataSource) {
        return new DataSourceTransactionManager(dataSource);
    }

    @Bean(name = "secondSqlSessionTemplate")
    public SqlSessionTemplate secondSqlSessionTemplate(@Qualifier("secondSqlSessionFactory") SqlSessionFactory sqlSessionFactory) {
        return new SqlSessionTemplate(sqlSessionFactory);
    }
}
通过上面的配置,每个数据源扫描对应目录下的mapper进行绑定。如此一来,使用不同的mapper既可以使用其指定的数据源了。
编写catservice测试:
@Component
@Slf4j
public class CatService {
    @Autowired
    private CatMapper catMapper;

    public List<Cat> findAll() {
        return catMapper.selectByExample(null);
    }

    public Cat findByPK(int id) {
        return catMapper.selectByPrimaryKey(id);
    }

    public int updateByPrimaryKey(Cat cat) {
        return catMapper.updateByPrimaryKey(cat);
    }
}
StuService:
@Component
@Slf4j
public class StuService {
    @Autowired
    private StuMapper stuMapper;
    @Autowired
    private StuSecondMapper stuSecondMapper;
    @Autowired
    private CatMapper catMapper;

    public List<Stu> findAll() {
        return stuMapper.selectByExample(null);
    }

    public List<Stu> selectByExample() {
        StuExample stuExample = new StuExample();
        stuExample.createCriteria().andAgeEqualTo(12);//条件查询
        stuExample.setOrderByClause("name");//排序
        return stuMapper.selectByExample(stuExample);
    }

    public int modify(int id, String address) {
        Stu stu = stuMapper.selectByPrimaryKey(id);
        stu.setAddress(address);
        return stuMapper.updateByPrimaryKeySelective(stu);
    }

    /**
     * 测试多数据源事务
     * transactionManager指定哪个数据源使用事务,不指定默认则默认数据源使用事务
     * @param str
     */
    @Transactional(rollbackFor = Exception.class, transactionManager = "secondTransactionManager")
    public void modify4multipleds(String str) {
        Stu stu = stuMapper.selectByPrimaryKey(2);
        stu.setAddress(str);
        int i = stuMapper.updateByPrimaryKey(stu);

        Cat cat = catMapper.selectByPrimaryKey(2);
        cat.setColor(str);
        int i1 = catMapper.updateByPrimaryKey(cat);

        int a = 1/0;//模拟异常

        stu = stuMapper.selectByPrimaryKey(2);
        stu.setAddress(str + "__2");
        i = stuMapper.updateByPrimaryKey(stu);
        log.info(i + "");

        cat = catMapper.selectByPrimaryKey(2);
        cat.setColor(str + "__2");
        i1 = catMapper.updateByPrimaryKey(cat);
    }
}
读者可以自行测试不同数据源的切换,调用不同的mapper会请求不同的数据源。
这里着重介绍一下多数据源事务的测试。上面modify4multipleds方法用于测试事务,1/0模拟异常。使用@Transactional(rollbackFor = Exception.class, transactionManager = "secondTransactionManager")声明式事务。这里rollbackFor = Exception.class表示所有的异常均回滚,因为运行时异常可能不会回滚。transactionManager = "secondTransactionManager")是事务切换的关键。这里事务只能支持单个数据源事务,如果想要多数据源都支持事务就归属于分布式事务的问题了。transactionManager不写则是默认数据源的事务,指定是secondTransactionManager则是第二个数据源的事务生效。
读者可以尝试transactionManager填写不同的值, 观察数据库中的数据改变效果,看看是否回滚。
本文代码已上传GitHub:https://github.com/liubenlong/springboot2_demo/tree/master/mysqltest4mybatis2dsok
springboot系列学习笔记全部文章请移步值博主专栏**: spring boot 2.X/spring cloud Greenwich。
由于是一系列文章,所以后面的文章可能会使用到前面文章的项目。springboot系列代码全部上传至GitHub:https://github.com/liubenlong/springboot2_demo
本系列环境:Java11;springboot 2.1.1.RELEASE;springcloud Greenwich.RELEASE;MySQL 8.0.5;