android P 锁屏初探 ——3 power键锁屏流程
之前已经分析过 锁屏的结构 ,今天具体分析一下power键上锁流程。

1、锁屏相关的主要几个类:
SystemUI\src\com\android\systemui\keyguard\KeyguardViewMediator.java 等等,也就是流程图顶部一行显示的类。
其中:
KeyguardViewMediator是大脑,控制着整个锁屏;
KeyguardService 负责Keyguard模块与PWM和PMS的沟通;
KeyguardUpdateMonitor 负责将锁屏等的状态变化传递下去;
StatusBarKeyguardViewManager 负责View管理;
KeyguardBouncer 专门负责Bouncer界面的管理。
这里重点说一下KeyguardViewMediator 和 KeyguardUpdateMonitor的作用:
KeyguardViewMediator是整个待机解/锁屏业务的调度器,负责调度锁屏界面的相关动作及查询解锁屏状态,
可以进行的调度操作包括:
1) 响应PowerManagerService对KeyguardService的调度(通过PhoneWindowManager);
2) 实施真正的锁屏doKeyguardLocked()与解锁keyguardDone(boolean);
3) 响应SIM卡状态变化并对锁屏界面做相应的调整onSimStateChanged();
4) 调度待机锁屏UI界面的管理,包括显示handleShow ()、隐藏handleHide ()、重置handleReset ()、等,提供状态查询接口,比如:isSecure(),isHiding(),KeyguardViewMediator实现这部分调度是通过持有mStatusBarKeyguardViewManager来实现的。
另外,Keyguard相关的api可能会被其他的线程调用,比如InputManagerService和windowManagerService。因此在keyguardViewMediator的方法是同步的,并且任何一个和Keyguard画面相关的事件都投掷到Handler中以确保在UI线程中处理。
KeyguardUpdateMonitor是所有会影响整个待机解/锁屏业务的事件的监控器。(除了作为监控器,它还发挥着类似上下文的作用,也许我们应该把这个类命名为(KeyguardContext)。它监控诸如时间改变、电池状态改变、时区改变、SIM卡状态变化、电话状态变化、电话信号变化等事件。它是一个观察者模式的被观察对象。观察者通过调用KeyguardUpdateMonitor的registerInfoCallback(InfoCallback)和registerSimStateCallback(SimStateCallback)方法进行注册,观察自己感兴趣的变化。KeyguardUpdateMonitor的观察者包括KeyguardViewMediator、LockScreen、PatternUnlockScreen、AccountUnlockScreen、PasswordUnlockScreen、SimUnlockScreen等。观察者通过调用KeyguardUpdateMonitor的removeCallback(Object)取消观察。
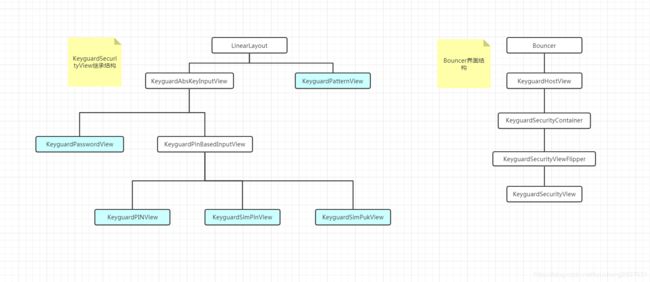
2、锁屏界面布局结构:
锁屏界面跟解锁后的状态栏是共用的布局。尤其是通知栏和QS部分,是完全共用的。都包含在StatusBarWindowView中。
Bouncer的界面比较特殊,是动态创建并添加到StatusBarWindowView中的。
布局结构如下图:

Bouncer根据SecurityMode会呈现不同的界面,一般有5种。Pattern、PIN、Password、SimPIN、SimPUK(都实现了KeyguardSecurityView)。
Bouncer界面结构如下:
3、锁屏流程
为了方便分析,现将锁屏界面分为:非安全锁屏界面(亮屏后看到的界面,有时钟、通知消息等) 、 安全锁屏界面(即Bouncer界面,比如图案锁界面、密码锁界面、SIM卡的PIN码验证界面PUK码验证界面等)。
1)、锁屏流程牵扯到灭屏流程。相关内容可以看这篇文章:灭屏流程分析
锁屏流程其实就是从PMS发起的,重点在goToSleep()之后的Notifier中。
亮屏和锁屏都是这里发起的:
private void handleEarlyInteractiveChange() {
    synchronized (mLock) {
        //此时为false
        if (mInteractive) {
            // Waking up...
            mHandler.post(new Runnable() {
                @Override
                public void run() {
                    // Note a SCREEN tron event is logged in PowerManagerService.
                    mPolicy.startedWakingUp();
                }
            });
            // Send interactive broadcast.
            mPendingInteractiveState = INTERACTIVE_STATE_AWAKE;
            mPendingWakeUpBroadcast = true;
            updatePendingBroadcastLocked();
        } else {  // doze 和 sleep这两种状态属于 not interactive
            final int why = translateOffReason(mInteractiveChangeReason);//锁屏的原因
            mHandler.post(new Runnable() {
                @Override
                public void run() {
                    //通过PhoneWindowManager设置锁屏
                    mPolicy.startedGoingToSleep(why);//这里的mPolicy就是PhoneWindowManager。
                }
            });
        }
    }
}
2)、锁屏内部startedGoingToSleep()这一部分主要是下面这个方法:
    /**
     * Called to let us know the screen was turned off.
     * @param why either {@link WindowManagerPolicyConstants#OFF_BECAUSE_OF_USER} or
     *   {@link WindowManagerPolicyConstants#OFF_BECAUSE_OF_TIMEOUT}.
     */
    public void onStartedGoingToSleep(int why) {
    //这里的why就是PMS中gotosleep的Notifier传递过来的why。而power键灭屏这个why是PWM传递给PMS的,是PowerManager.GO_TO_SLEEP_REASON_SLEEP_BUTTON
        if (DEBUG) Log.d(TAG, "onStartedGoingToSleep(" + why + ")");
        synchronized (this) {
            mDeviceInteractive = false;
            mGoingToSleep = true;

            // Lock immediately based on setting if secure (user has a pin/pattern/password).
            // This also "locks" the device when not secure to provide easy access to the
            // camera while preventing unwanted input.
            int currentUser = KeyguardUpdateMonitor.getCurrentUser();
            final boolean lockImmediately =
                    mLockPatternUtils.getPowerButtonInstantlyLocks(currentUser)
                            || !mLockPatternUtils.isSecure(currentUser);
            long timeout = getLockTimeout(KeyguardUpdateMonitor.getCurrentUser());
            mLockLater = false;
            if (mExitSecureCallback != null) {//实在没找到哪里赋值了这个变量。那它就是null喽? 估计应该是从verifyUnlock()传递过来的,但本地并没有备份,如果备份了就会走这里了。
                if (DEBUG) Log.d(TAG, "pending exit secure callback cancelled");
                try {
                    mExitSecureCallback.onKeyguardExitResult(false);
                } catch (RemoteException e) {
                    Slog.w(TAG, "Failed to call onKeyguardExitResult(false)", e);
                }
                mExitSecureCallback = null;
                if (!mExternallyEnabled) {
                    hideLocked();
                }
            } else if (mShowing) {//如果本身就是在锁屏界面,并没有解锁,按power键会走这里。
                mPendingReset = true;
            } else if ((why == WindowManagerPolicyConstants.OFF_BECAUSE_OF_TIMEOUT && timeout > 0)
                    || (why == WindowManagerPolicyConstants.OFF_BECAUSE_OF_USER && !lockImmediately)) {
                doKeyguardLaterLocked(timeout);
                mLockLater = true;
            } else if (!mLockPatternUtils.isLockScreenDisabled(currentUser)) {//所以,power键锁屏一般会走这里。
                mPendingLock = true;
            }

            if (mPendingLock) {
                playSounds(true);
            }
        }
        KeyguardUpdateMonitor.getInstance(mContext).dispatchStartedGoingToSleep(why);//这里会去调用  updateFingerprintListeningState();
        notifyStartedGoingToSleep();
    }
上面代码里最后注释处的updateFingerprintListeningState(); 就是指纹解锁开始的地方。就是因为这里,在锁屏状态下指纹sensor也是活跃的,能解锁屏幕。
3)、进入锁屏主流程:onFinishedGoingToSleep()
这里的notifyFinishedGoingToSleep(); 只有在安全锁屏界面按power键时才会运行,重新显示对应的KeyguardSecurityView并调用其onPause()方法。每种KeyguardSecurityView都有各自的onPause()实现,主要做一些锁屏前的清理和状态保持工作。
当然这也是在锁屏界面按power键,mPendingReset = true,锁屏会运行
            if (mPendingReset) {
                resetStateLocked();
                mPendingReset = false;
            }
更新锁屏界面。
如果不是在锁屏界面按power键,就会调用:
            if (mPendingLock) {
                doKeyguardLocked(null);
                mPendingLock = false;
            }
最终都是调用了StatusBarKeyguardViewManager的reset方法。
二者的区别是,前者因为已经在锁屏界面,故不需要AMS进行activity栈调度、修改锁屏界面laygoutparam等工作。
doKeyguardLocked(Bundle options) 中主要对一些条件进行验证,都验证通过才会真正去show。
看看StatusBarKeyguardViewManager的reset方法:
    public void reset(boolean hideBouncerWhenShowing) {
        if (mShowing) {
            if (mOccluded && !mDozing) {//// occlude 是 特殊情况,例如来电,音乐锁屏等显示在锁屏界面上的activity
                mStatusBar.hideKeyguard();
                if (hideBouncerWhenShowing || mBouncer.needsFullscreenBouncer()) {
                    hideBouncer(false /* destroyView */);
                }
            } else {
                showBouncerOrKeyguard(hideBouncerWhenShowing);
            }
            KeyguardUpdateMonitor.getInstance(mContext).sendKeyguardReset();
            updateStates();
        }
    }
一般会调用showBouncerOrKeyguard():
    /**
     * Shows the notification keyguard or the bouncer depending on
     * {@link KeyguardBouncer#needsFullscreenBouncer()}.
     */
    protected void showBouncerOrKeyguard(boolean hideBouncerWhenShowing) {
        if (mBouncer.needsFullscreenBouncer() && !mDozing) {//存在锁定的sim卡会走到这里
            // The keyguard might be showing (already). So we need to hide it.
            mStatusBar.hideKeyguard();
            mBouncer.show(true /* resetSecuritySelection */);
        } else {//一般会走这里
            mStatusBar.showKeyguard();
            if (hideBouncerWhenShowing) {
                hideBouncer(shouldDestroyViewOnReset() /* destroyView */);//destroyView表示要从container中remove掉当前的bouncer。
                mBouncer.prepare();// 加载bouncer的布局;在灭屏情况下,因为用户可能已经修改了锁屏方式,之前的bouncer可能已经不适用了,所以要重新准备
            }
        }
        updateStates();
    }
之后就兵分两路:
通过mStatusBar.showKeyguard()去显示非安全锁屏界面,主要是修改相关View的状态,比如:
setBarState(StatusBarState.KEYGUARD);
mNotificationPanel.expand(false /* animate */);
通过mBouncer.prepare()去更新安全锁屏界面。
如果之前没有创建过Bouncer界面(比如开机),则会先创建Bouncer界面:
    protected void inflateView() {
        removeView();
        mHandler.removeCallbacks(mRemoveViewRunnable);
        mRoot = (ViewGroup) LayoutInflater.from(mContext).inflate(R.layout.keyguard_bouncer, null);
        mKeyguardView = mRoot.findViewById(R.id.keyguard_host_view);
        mKeyguardView.setLockPatternUtils(mLockPatternUtils);
        mKeyguardView.setViewMediatorCallback(mCallback);
        mContainer.addView(mRoot, mContainer.getChildCount());//这里的container来自StatusBar.java的startkeyguard()中的registerStatusbar,其实就是StatusbarWindowview
        mStatusBarHeight = mRoot.getResources().getDimensionPixelOffset(
                com.android.systemui.R.dimen.status_bar_height);
        mRoot.setVisibility(View.INVISIBLE);//当前还不能显示bouncer
        mRoot.setAccessibilityPaneTitle(mKeyguardView.getAccessibilityTitleForCurrentMode());

        final WindowInsets rootInsets = mRoot.getRootWindowInsets();
        if (rootInsets != null) {
            mRoot.dispatchApplyWindowInsets(rootInsets);
        }
    }
然后会根据具体的SecurityMode去填充对应的KeyguardSecurityView(如果是开机过程,则是在上述的 inflateView() 后接着在 KeyguardHostView的onFinishInflate()中会调用 mSecurityContainer.showPrimarySecurityScreen()来填充securieMode对应的界面):
    /**
     * Switches to the given security view unless it's already being shown, in which case
     * this is a no-op.
     *
     * @param securityMode
     */
    private void showSecurityScreen(SecurityMode securityMode) {
        if (DEBUG) Log.d(TAG, "showSecurityScreen(" + securityMode + ")");
        if (securityMode == mCurrentSecuritySelection) return;

        //这里的KeyguardSecurityView应该都是 KeyguardSecurityViewFlipper(KeyguardSecurityViewFlipper实现了KeyguardSecurityView接口)
        KeyguardSecurityView oldView = getSecurityView(mCurrentSecuritySelection);
        KeyguardSecurityView newView = getSecurityView(securityMode);

        // Emulate Activity life cycle
        if (oldView != null) {
            oldView.onPause();
            oldView.setKeyguardCallback(mNullCallback); // ignore requests from old view
        }
        if (securityMode != SecurityMode.None) {
            newView.onResume(KeyguardSecurityView.VIEW_REVEALED);
            newView.setKeyguardCallback(mCallback);
        }

        // Find and show this child.
        final int childCount = mSecurityViewFlipper.getChildCount();

        final int securityViewIdForMode = getSecurityViewIdForMode(securityMode);
        for (int i = 0; i < childCount; i++) {
            if (mSecurityViewFlipper.getChildAt(i).getId() == securityViewIdForMode) {
                mSecurityViewFlipper.setDisplayedChild(i);
                break;
            }
        }
        mCurrentSecuritySelection = securityMode;
        mSecurityCallback.onSecurityModeChanged(securityMode,
                securityMode != SecurityMode.None && newView.needsInput());
    }
这样锁屏界面就构建完成了。只是因为当前已经灭屏,看不到,需要再次亮屏才能看到,而上滑后显示的就是安全锁屏界面。
相信,结合顶部的流程图,还是比较好理解的。_