记一次 Centos7.4 手动搭建 Elasticsearch 7.4.0 集群
QQ交流群:64655993 希望能对您有所帮助!!!
官方网站:
https://www.elastic.co/cn/products/elasticsearch
一、基础环境说明
1、系统说明
系统:CentOS-7-x86_64-Minimal-1708
下载地址:
http://archive.kernel.org/centos-vault/7.4.1708/isos/x86_64/
2、安装虚拟机
安装3个虚拟机(生产环境节点数量,视具体业务需求而定)
每个虚拟机配置: 3G内存 2核CPU
安装过程可参考:
https://blog.csdn.net/llwy1428/article/details/89328381
3、Elasticsearch 下载地址
https://www.elastic.co/cn/
https://www.elastic.co/cn/start
二、基础环境配置
1、修改主机名
编辑集群中的各个节点主机名(本集群三个节点的主机名分别为 node3.cn node4.cn node5.cn)
以 node3.cn 为例:
[root@localhost~]# hostnamectl set-hostname node3.cnnode4.cn、node5.cn 略。
2、配置虚拟机网络,每台虚拟机均接入互联网(并设置静态IP)
网卡配置可参考:
https://blog.csdn.net/llwy1428/article/details/85058028
设置静态IP
此处以node3.cn节点为例(集群中其他节点配置参照本节点,注意 ip 唯一):
[[email protected] ~]# vi /etc/sysconfig/network-scripts/ifcfg-ens33node3.cn的IP是: IPADDR=192.168.11.133
node4.cn的IP是: IPADDR=192.168.11.134
node5.cn的IP是: IPADDR=192.168.11.135说明:红框内为修改、增加的部分
修改完毕后保存并退出
:wq重启network服务
[root@node3 ~]# service network restart![]()
可参考:
https://blog.csdn.net/llwy1428/article/details/85058028
集群中其他节点配置参照本节点。
3、安装基本工具(各节点均要安装)
[root@node3 ~]# yum install -y vim wget lrzsz tree zip unzip net-tools ntp
[root@node3 ~]# yum update -y (可选)
4、(选装)集群各节点安装、配置JDK(es7.x 需要jdk11以上,安装包中自带了openjdk)
集群中各个节点均要安装JDK
具体步骤参考:
https://blog.csdn.net/llwy1428/article/details/85232267
5、配置防火墙
关闭防火墙,并设置开机禁止启动
关闭防火墙  : systemctl stop firewalld
查看状态    : systemctl status firewalld
开机禁用    : systemctl disable firewalld
6、配置host文件
此处以 node3.cn 节点为例,集群中其他节点和 node3.cn 相同:
[root@node3 ~]# vim /etc/hosts7、配置节点间时间同步
本文以阿里时间服务器为准,阿里云时间服务器地址:ntp6.aliyun.com
说明:如有专用时间服务器,请更改时间服务器的主机名或者IP地址,主机名需要在etc/hosts文件中做好映射。
以 node3.cn 为例:
设置系统时区为东八区(上海时区)
[root@node3 ~]# timedatectl set-timezone Asia/Shanghai关闭ntpd服务(一定要做这一步,否则自动同步时间会失效)
[root@node3 ~]# systemctl stop ntpd.service设置ntpd服务禁止开机启动
[root@node3 ~]# systemctl disable ntpd设置定时任务
[root@node3 ~]# crontab -e写入以下内容(每10分钟同步一下阿里云时间服务器):
0-59/10 * * * * /usr/sbin/ntpdate ntp6.aliyun.com重启定时任务服务
[root@node3 ~]# /bin/systemctl restart crond.service设置定时任务开机启动
[root@node3 ~]# vim /etc/rc.local加入以下内容后,保存并退出
:wq/bin/systemctl start crond.service集群中其他各个节点同 node3.cn 节点。
8、配置系统环境为UTF8
以 node3.cn 为例:
[root@node3 ~]# echo "export LANG=zh_CN.UTF-8 " >> ~/.bashrc
[root@node3 ~]# source ~/.bashrc
集群中其他各个节点同 node3.cn 节点。
9、修改文件最大打开数(非生产环境,可不配置)
此处以 node3.cn 节点为例:
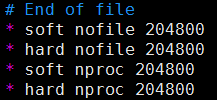
[root@node3 ~]# vim /etc/security/limits.conf* soft nofile 204800
* hard nofile 204800
* soft nproc 204800
* hard nproc 204800
[root@node3 ~]# vim /etc/security/limits.d/20-nproc.conf* soft nproc 204800
* hard nproc 204800
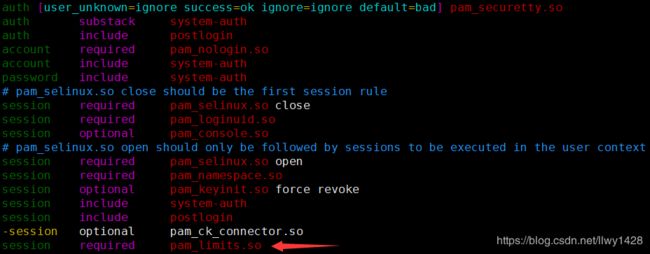
[root@node3 ~]# vim /etc/pam.d/loginsession required pam_limits.so
集群中其他节点配置和 node3.cn 相同
10、禁用SELinux(可选)
以 node3.cn 为例:
[root@node3 ~]# vim /etc/selinux/config修改如下内容后,保存并退出
:wq集群中其他节点配置和 node3.cn 相同。
11、禁用Transparent HugePages(可选)
以 node3.cn 为例:
查看
[root@node3 ~]# cat /sys/kernel/mm/transparent_hugepage/enabled
效果:
[always] madvise never
[root@node3 ~]# vim /etc/rc.d/rc.localif test -f /sys/kernel/mm/transparent_hugepage/enabled; then
echo never > /sys/kernel/mm/transparent_hugepage/enabled
fi
if test -f /sys/kernel/mm/transparent_hugepage/defrag; then
echo never > /sys/kernel/mm/transparent_hugepage/defrag
fi
[root@node3 ~]# chmod +x /etc/rc.d/rc.local重启系统后,永久生效。
重启系统后查看:
[root@node3 ~]# cat /sys/kernel/mm/transparent_hugepage/enabled
效果:
always madvise [never]
集群中其他节点配置和 node3.cn 相同。
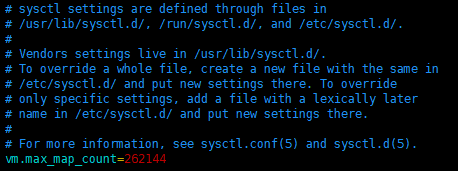
12、配置内存 /etc/sysctl.conf
[root@node3 ~]# vim /etc/sysctl.conf
写入(根据自身硬件条件而定,其它节点于此相同)
vm.max_map_count=262144
三、Elasticsearch 集群部署、配置
1、每个节点创建文件夹 /opt/elasticsearch/
[root@node3 ~]# mkdir /opt/elasticsearch/2、上传文件 rz
把官网上的压缩包(elasticsearch-7.4.0-linux-x86_64.tar.gz)下载到本地,再用 rz 或者其他第三方ftp工具把安装包上传至节点 node3 的指定目录下(网络允许的条件下,也可直接使用 wget 直接下载)
[root@node3 elasticsearch]# rz上传完毕后,解压缩压缩包
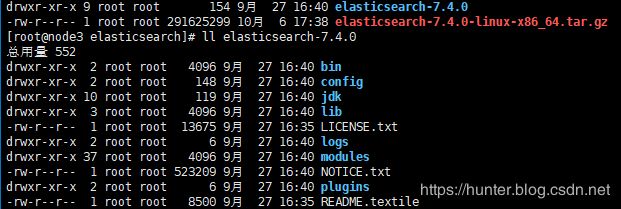
[root@node3 elasticsearch]# tar zxvf elasticsearch-7.4.0-linux-x86_64.tar.gz查看解压后的文件夹
3、修改配置文件 elasticsearch.yml
[root@node3 ~]# vim /opt/elasticsearch/elasticsearch-7.0.0/config/elasticsearch.yml文件内容如下(具体参数说明,见文章结尾):
# ---------------------------------- Cluster ---
cluster.name: es-cluster
# ------------------------------------ Node ---
# 注意:每个节点的名字(node.name)不要相同
node.name: node3.cn
node.master: true
node.data: true
# ----------------------------------- Paths ---
path.data: /opt/elasticsearch/elasticsearch-7.4.0/data
path.logs: /opt/elasticsearch/elasticsearch-7.4.0/logs
# ---------------------------------- Network ---
network.host: 0.0.0.0
http.port: 9200
# --------------------------------- Discovery ---
cluster.initial_master_nodes: ["node3.cn", "node4.cn","node5.cn"]
discovery.zen.ping.unicast.hosts: ["192.168.11.133", "192.168.11.134","192.168.11.135"]
discovery.zen.minimum_master_nodes: 2
修改配置文件 elasticsearch-env
[root@node3 ~]# vi /opt/elasticsearch/elasticsearch-7.4.0/bin/elasticsearch-envJAVA_HOME="/opt/elasticsearch/elasticsearch-7.4.0/jdk"4、分发文件
把节点 node3 上已经配置好的es所有文件发送给集群的所有节点的相同目录 (会提示输入各自节点的 root 用户的密码)
[root@node3 ~]# scp -r /opt/elasticsearch/elasticsearch-7.4.0 node4.cn:/opt/elasticsearch/
[root@node3 ~]# scp -r /opt/elasticsearch/elasticsearch-7.4.0 node5.cn:/opt/elasticsearch/
分别在 node4、node5 上编辑文件 elasticsearch.yml
修改各自的 node.name (注意区分 node.name 保证集群中node.name唯一)
[root@node4 ~]# vim /opt/elasticsearch/elasticsearch-7.4.0/config/elasticsearch.yml
[root@node5 ~]# vim /opt/elasticsearch/elasticsearch-7.4.0/config/elasticsearch.yml
保存后退出 :wq
5、创建用户组及用户信息
[root@node3 ~]# groupadd es
[root@node3 ~]# useradd es -g es
[root@node3 ~]# chown -R es:es /opt/elasticsearch/*
集群中其他各节点操作同 node3 节点。
6、启动服务
切换用户
[root@node3 ~]# su es
[es@node3 ~]$ /opt/elasticsearch/elasticsearch-7.4.0/bin/elasticsearch -d
启动成功效果:
其他各节点操作同 node3 节点。
7、查看启动情况
[root@node3 ~]$ jps亦可在其他节点查看服务启动情况。
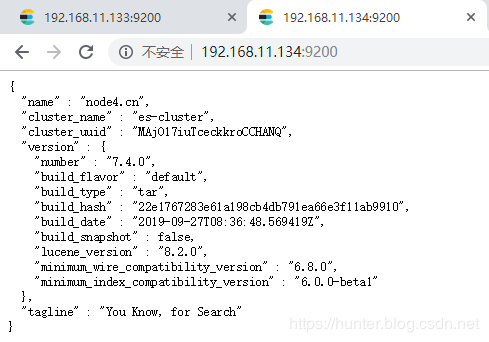
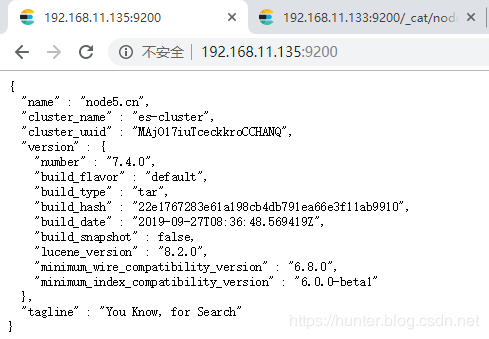
8、在浏览器查看启动结果
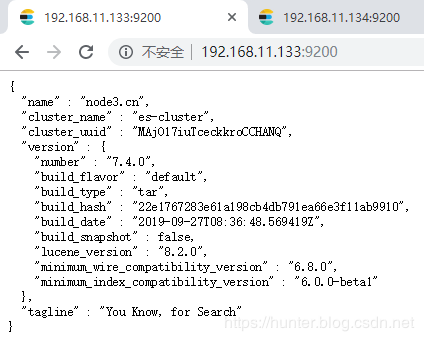
在浏览器输入
http://192.168.11.133:9200/
http://192.168.11.134:9200/
http://192.168.11.135:9200/
效果如下:
至此,Centos7.4 手动搭建 Elasticsearch 7 集群 操作完毕。
有一些可视化工具可直观的观察 Elasticsearch 中的更多详细信息。
如:elasticsearch-head、Kibana、ElasticHD 等
ElasticHD:搭建步骤:
参考:https://hunter.blog.csdn.net/article/details/89326527
elasticsearch-head搭建步骤:
参考:https://hunter.blog.csdn.net/article/details/102336223
Kibana搭建步骤:
参考:https://blog.csdn.net/llwy1428/article/details/89326461
四、可能遇到的问题及解决方案(持续更新)
1、启动后,过一段时间服务自动挂掉,查看日志,并报以下错误:
[1]: max virtual memory areas vm.max_map_count [65530] is too low, increase to at least [262144]问题翻译过来就是:elasticsearch用户拥有的内存权限太小,至少需要262144;
查看当下的内存
[root@node3 ~]# sysctl -a|grep vm.max_map_count
解决方案:
编辑文件 sysctl.conf
[root@node3 ~]# vim /etc/sysctl.conf最后添加一行
vm.max_map_count=262144保存后,重启系统,永久生效。
(集群中其他节点操作和node3节点相同)
2、服务启动失败
[2019-04-29T22:13:53,403][ERROR][o.e.b.Bootstrap          ] [node3.cn] Exception
java.lang.RuntimeException: can not run elasticsearch as root
问题产生原因:elasticsearch不允许在root权限下启动,需要切换到es用户。
解决方案:参见第三部分的第4、5两步
3、切换es用户后启动报错
2019-04-29 22:40:55,736 main ERROR Unable to locate appender "rolling_old" for logger config "root"问题产生原因:在默认的log目录下,存在非es用户权限的文件
解决方案:在root用户下,给elasticsearch的log目录下所有文件赋权给es用户
[root@node3 ~]# chmod -R es:es /opt/elasticsearch/elasticsearch-7.4.0/logs/*4、启动时报错 jdk 版本太低,需要 jdk11 以上
修改文件 elasticsearch-env
[root@node3 ~]# vi /opt/elasticsearch/elasticsearch-7.4.0/bin/elasticsearch-env
开头写入(各节点都要操作)
JAVA_HOME="/opt/elasticsearch/elasticsearch-7.4.0/jdk"
五、参数说明
cluster.name: elasticsearch
配置es的集群名称,默认是elasticsearch,es会自动发现在同一网段下的es,如果在同一网段下有多个集群,就可以用这个属性来区分不同的集群。
node.name: “node1.cn”
节点名,默认随机指定一个name列表中名字,该列表在es的jar包中config文件夹里name.txt文件中,其中有很多作者添加的有趣名字。
node.master: true
指定该节点是否有资格被选举成为node,默认是true,es是默认集群中的第一台机器为master,如果这台机挂了就会重新选举master。
node.data: true
指定该节点是否存储索引数据,默认为true。
index.number_of_shards: 5
设置默认索引分片个数,默认为5片。
index.number_of_replicas: 1
设置默认索引副本个数,默认为1个副本。
path.conf: /path/to/conf
设置配置文件的存储路径,默认是es根目录下的config文件夹。
path.data: /path/to/data
设置索引数据的存储路径,默认是es根目录下的data文件夹,可以设置多个存储路径,用逗号隔开,例:
path.data: /path/to/data1,/path/to/data2
path.work: /path/to/work
设置临时文件的存储路径,默认是es根目录下的work文件夹。
path.logs: /path/to/logs
设置日志文件的存储路径,默认是es根目录下的logs文件夹
path.plugins: /path/to/plugins
设置插件的存放路径,默认是es根目录下的plugins文件夹
bootstrap.mlockall: true
设置为true来锁住内存。因为当jvm开始swapping时es的效率 会降低,所以要保证它不swap,可以把ES_MIN_MEM和ES_MAX_MEM两个环境变量设置成同一个值,并且保证机器有足够的内存分配给es。 同时也要允许elasticsearch的进程可以锁住内存,linux下可以通过ulimit -l unlimited命令。
network.bind_host: 192.168.0.1
设置绑定的ip地址,可以是ipv4或ipv6的,默认为0.0.0.0。
network.publish_host: 192.168.0.1
设置其它节点和该节点交互的ip地址,如果不设置它会自动判断,值必须是个真实的ip地址。
network.host: 192.168.0.1
这个参数是用来同时设置bind_host和publish_host上面两个参数。
transport.tcp.port: 9300
设置节点间交互的tcp端口,默认是9300。
transport.tcp.compress: true
设置是否压缩tcp传输时的数据,默认为false,不压缩。
http.port: 9200
设置对外服务的http端口,默认为9200。
http.max_content_length: 100mb
设置内容的最大容量,默认100mb
http.enabled: false
是否使用http协议对外提供服务,默认为true,开启。
gateway.type: local
gateway的类型,默认为local即为本地文件系统,可以设置为本地文件系统,分布式文件系统,hadoop的HDFS,和amazon的s3服务器,其它文件系统的设置方法下次再详细说。
gateway.recover_after_nodes: 1
设置集群中N个节点启动时进行数据恢复,默认为1。
gateway.recover_after_time: 5m
设置初始化数据恢复进程的超时时间,默认是5分钟。
gateway.expected_nodes: 2
设置这个集群中节点的数量,默认为2,一旦这N个节点启动,就会立即进行数据恢复。
cluster.routing.allocation.node_initial_primaries_recoveries: 4
初始化数据恢复时,并发恢复线程的个数,默认为4。
cluster.routing.allocation.node_concurrent_recoveries: 2
添加删除节点或负载均衡时并发恢复线程的个数,默认为4。
indices.recovery.max_size_per_sec: 0
设置数据恢复时限制的带宽,如入100mb,默认为0,即无限制。
indices.recovery.concurrent_streams: 5
设置这个参数来限制从其它分片恢复数据时最大同时打开并发流的个数,默认为5。
discovery.zen.minimum_master_nodes: 1
设置这个参数来保证集群中的节点可以知道其它N个有master资格的节点。默认为1,对于大的集群来说,可以设置大一点的值(2-4)
discovery.zen.ping.timeout: 3s
设置集群中自动发现其它节点时ping连接超时时间,默认为3秒,对于比较差的网络环境可以高点的值来防止自动发现时出错。
discovery.zen.ping.multicast.enabled: false
设置是否打开多播发现节点,默认是true。
discovery.zen.ping.unicast.hosts: [“host1”, “host2:port”, “host3[portX-portY]”]
设置集群中master节点的初始列表,可以通过这些节点来自动发现新加入集群的节点。
下面是一些查询时的慢日志参数设置
index.search.slowlog.level: TRACE
index.search.slowlog.threshold.query.warn: 10s
index.search.slowlog.threshold.query.info: 5s
index.search.slowlog.threshold.query.debug: 2s
index.search.slowlog.threshold.query.trace: 500ms
index.search.slowlog.threshold.fetch.warn: 1s
index.search.slowlog.threshold.fetch.info: 800ms
index.search.slowlog.threshold.fetch.debug:500ms
index.search.slowlog.threshold.fetch.trace: 200ms
六、扩展---插件安装
1、国际化分词插件 analysis-icu
[es@node3 ~]$ /opt/elasticsearch/elasticsearch-7.4.0/bin/elasticsearch-plugin install analysis-icu2、浏览器查看已安装插件
http://192.168.11.133:9200/_cat/plugins
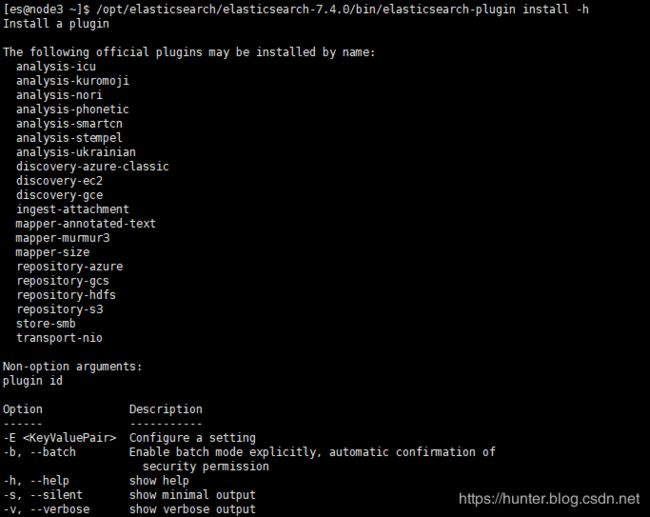
3、查看其它可直接安装的插件
[es@node3 ~]$ /opt/elasticsearch/elasticsearch-7.4.0/bin/elasticsearch-plugin install -h
借鉴地址:
https://blog.csdn.net/u012637358/article/details/80994945
ES 基本操作
https://www.cnblogs.com/zeenzhou/p/11588629.html


