Mysql8.0主从复制搭建,shardingsphere+springboot+mybatis读写分离
1、安装mysql8.0
首先需要在192.167.3.171上安装JDK。
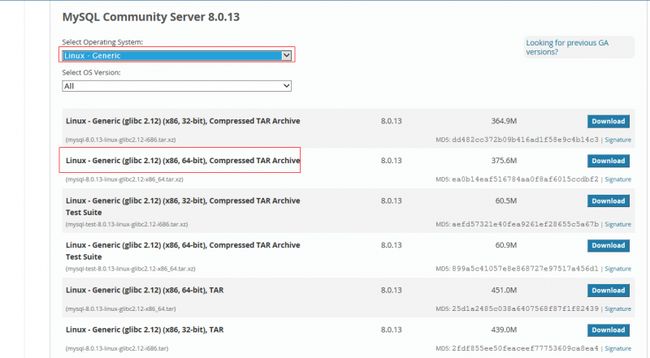
下载mysql安装包,https://dev.mysql.com/downloads/,找到以下页面下载。
下载后放到linux系统中
官网说需要先查看本机是否已安装mysql,删除mysql这里不介绍。
1 |
yum install libaio yum install openssl |
安装mysql所需的软件包:libaiohe openssl。
1 |
tar -xvf mysql-8.0.13-linux-glibc2.12-x86_64.tar.xz |
解压。
1 |
mv mysql-8.0.13-linux-glibc2.12-x86_64 /usr/local/mysql |
将解压文件移动到local下。
1 2 3 4 5 6 7 8 9 10 11 12 13 |
groupadd mysql useradd -r -g mysql -s /bin/false mysql cd /usr/local/mysql mkdir mysql-files chown mysql:mysql mysql-files chmod 750 mysql-files bin/mysqld --initialize --user=mysql |
初始化数据库,注意此处随机生成的密码,第一次登陆mysql的时候要使用。
1 |
bin/mysql_ssl_rsa_setup |
安装ssl。
1 |
cp support-files/mysql.server /etc/init.d/mysql.server |
将服务文件复制到开机启动目录,实现服务开机自启动。
1 |
bin/mysqld_safe --user=mysql & |
开启服务,&是后台运行的意思,执行命令之后,终端会卡在一个位置,再按一下Enter即可。
如果上面命令报错,什么log,pid文件未找到之类的,就需要执行下面方法。由于mysql服务启动时,会去读取/etc/my.cnf文件中的配置内容,我们打开文件来看,文件内容如下(我已修改):![]()
原来的内容地址就是启动mysql服务时报错的路径,我们可以知道,文件不存在问题导致启动失败。这时,就需要新建文件,并设置文件权限了。我这里修改了红框内的路径,具体命令如下:
1 2 3 4 5 6 7 8 9 10 11 |
cd /usr/local/mysql/mysql-files mkdir log ; mkdir pid touch log/mysql.log ; touch pid/mysql.pid cd /usr/local/mysql chown -R mysql:mysql mysql-files chmod -R 750 mysql-files |
然后再次执行:
1 |
bin/mysqld_safe --user=mysql & |
1 |
bin/mysql -uroot -p |
登陆mysql,回车后粘贴之前初始密码。
如果登陆时报错,错误如下图,然后,去查看/tmp下面的文件,发现确实没有mysql.sock文件,本地用户登录时使用socket登陆,所以需要这样一个文件,那好,就找一个呗,执行 find / -name mysql.sock,找到在/var/lib/mysql下面有一个文件,然后,我尝试cp到tmp下,发现失败,那行,我ln一个呗,ln -s /var/lib/mysql/mysql.sock /tmp/mysql.sock,然后再尝试登陆,有一台机器就可以了,另一台始终不行。那行,我指定行了吧,用以下命令登陆:mysql -uroot -p -S /var/lib/mysql/mysql.sock,试了下可以,那就这样吧!
1 2 3 |
ALTER USER 'root'@'localhost' IDENTIFIED BY 'ibethfy; flush privileges |
执行完成后,我又想使用navicat登陆,那好,试试呗,navicat连接直接报找不到服务,2003 cannot。。。。。,行嘛,排除原因,总结如下:
1、建立供外部连接的mysql用户。
1 2 3 4 5 6 7 |
mysql -uroot -pibethfy -s /var/lib/mysql/mysql.sock create user 'ibethfy'@'%' identified by 'ibethfy'; grant all on *.* to 'ibethfy'@'%'; --注意,mysql8的grant语句和之前版本有差别。 flush privileges; |
2、防火墙关了,我用的centos。
1 2 3 4 5 |
firewall-cmd --state -- 查看防火墙状态,发现时running; systemctl stop firewalld.service -- 关闭防火墙 firewall-cmd --state -- 再次查看,发现not running; |
然后再用navicat连接,好嘛,又报错,caching-sha2-password,看来一下,应该是mysql的加密策略变了,navicat版本没跟上呗,那行,执行下面命令,然后再连接,没问题了!
1 2 3 4 5 6 7 |
mysql -uroot -pibethfy -s /var/lib/mysql/mysql.sock alter user 'ibethfy'@'%' identified by 'ibethfy' password expire never; alter user 'ibethfy'@'%' identified with mysql_native_password by 'ibethfy'; flush privileges; |
ps -ef |grep mysql,可以看到mysql服务有两个,mysqld_safe和mysqld。说明启动成功了。
大家在linux装mysql8.0的时候,如果按照步骤来,还出现问题,就分析一下,主要导致的一些原因就是权限问题和文件问题,依次解决一下再试试。
2、mysql主从安装
分别按以上方发安装两个mysql服务,分别为192.167.3.171(主),192.167.3.172(从)。
配置主服务
my.conf 文件修改。添加log-bin与server-id,具体配置如下:
重启mysql,service restart mysql;如果没有找到服务,直接用ps -ef|grep mysql,找到对应进程,kill -9强行终止后,使用mysqld_safe --user=mysql & 重启。
登陆mysql,赋予外部连接的ibethfy用户权限并刷新。grant replication slave on *.* to 'ibethfy'@'%'; flush privileges;
查看主服务信息,从服务配置时需要用到,show master status;
修改从mysql服务配置
修改my.cnf,vi /etc/my.cnf
配置从服务,先登陆后,执行 CHANGE MASTER TO MASTER_HOST='192.167.3.171', MASTER_USER='ibethfy', MASTER_PASSWORD=ibethfy',MASTER_LOG_FILE='binlog.000010', MASTER_LOG_POS=1179;
start slave;
show slave status\G;查看从服务状态,如果内容中有Last_IO_Error: Fatal error: The slave I/O thread stops because master and slave have equal MySQL server ids; these ids must be different for replication to work (or the –replicate-same-server-id option must be used on slave but this does not always make sense; please check the manual before using it);错误,需要执行下面语句:
show variables like 'server_id';可以看见server_id=1,这里与主服务id相同,则执行,set global server_id=2;与my.cnf内容相同即可。
重新启动start slave;
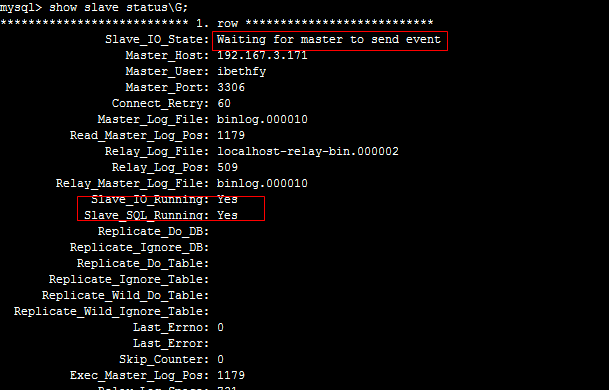
如果得到以下信息,则提示主从复制配置成功。
现在可以测试了,在主服务建一个database,从服务可以看见,代表配置成功。
3、springboot+mybatis+shardingsphere搭建主从分离
使用idea创建springboot工程
pom.xml依赖jar配置,具体配置如下
1 2 3 4 5 6 7 8 9 10 11 12 13 14 15 16 17 18 19 20 21 22 23 24 25 26 27 28 29 30 31 32 33 34 35 36 37 38 39 40 41 42 43 44 45 46 47 48 49 50 51 52 53 54 55 56 57 58 59 60 61 62 63 64 65 66 67 68 69 70 71 72 73 74 75 76 77 78 |
|
application.yml配置,具体如下
1 2 3 4 5 6 7 8 9 10 11 12 13 14 15 16 17 18 19 20 21 22 23 24 25 26 27 28 29 30 31 32 33 34 35 36 |
server:
  port: 8888
spring:
  application:
    name: SharingJdbc
mybatis:
  type-aliases-package: com.example.demo.entity
  mapper-locations: classpath:mapper/*.xml
sharding:
  jdbc:
    datasource:
      names: master1,slave1
      master1:
        type: com.zaxxer.hikari.HikariDataSource
        driver-class-name: com.mysql.cj.jdbc.Driver
        jdbc-url: jdbc:mysql://192.167.3.171:3306/ibethfy?useSSL=false&useUnicode=true&characterEncoding=utf8&autoReconnect=true
        username: ibethfy
        password: ibethfy
        maxPoolSize: 20
      slave1:
        type: com.zaxxer.hikari.HikariDataSource
        driver-class-name: com.mysql.cj.jdbc.Driver
        jdbc-url: jdbc:mysql://192.167.3.172:3306/ibethfy?useSSL=false&useUnicode=true&characterEncoding=utf8&autoReconnect=true
        username: ibethfy
        password: ibethfy
        maxPoolSize: 20
    config:
      masterslave:
        load-balance-algorithm-type: round_robin
        name: db_m1_s1
        master-data-source-name: master1
        slave-data-source-names: slave1
      sharding:
        props:
          sql:
show: true |
mybatis自动生成器配置
1 2 3 4 5 6 7 8 9 10 11 12 13 14 15 16 17 18 19 20 21 22 23 24 25 26 27 28 29 30 31 32 33 34 35 36 37 38 39 40 41 42 43 44 45 46 47 48 49 50 |
|
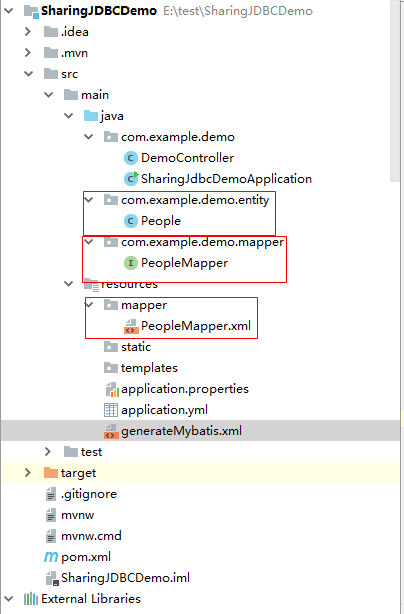
项目demo结构图,比较简单,只实现功能
自动生成器执行方法,打开maven project,点击运行,具体参考下图
SharingJdbcDemoApplication,配置mapper扫描路径,也可直接在mapper类上增加@Mapper.
1 2 3 4 5 6 7 8 9 10 11 12 13 14 15 |
package com.example.demo;

import org.mybatis.spring.annotation.MapperScan;
import org.springframework.boot.SpringApplication;
import org.springframework.boot.autoconfigure.SpringBootApplication;

@SpringBootApplication
@MapperScan("com.example.demo.mapper")
public class SharingJdbcDemoApplication {

    public static void main(String[] args) {
        SpringApplication.run(SharingJdbcDemoApplication.class, args);
    }

} |
DemoController类
1 2 3 4 5 6 7 8 9 10 11 12 13 14 15 16 17 18 19 20 21 22 23 24 25 26 27 28 29 30 31 |
package com.example.demo;

        import com.example.demo.entity.People;
        import com.example.demo.mapper.PeopleMapper;
        import org.springframework.beans.factory.annotation.Autowired;
        import org.springframework.web.bind.annotation.PathVariable;
        import org.springframework.web.bind.annotation.RequestMapping;
        import org.springframework.web.bind.annotation.RestController;

        import java.util.List;

@RestController
public class DemoController {

    @Autowired
    PeopleMapper peopleMapper;

    @RequestMapping("/{id}")
    public People getPeople(@PathVariable(value = "id") int id)
    {
        return peopleMapper.selectByPrimaryKey(id);
    }

    @RequestMapping("/insert/{name}")
    public void insert(@PathVariable(value = "name") String name)
    {
        People p  = new People();
        p.setName(name);
        peopleMapper.insert(p);
    }
} |
启动工程后,即可测试读写分离。关于如何查看读写分离效果,可以开启mysql的查询日志,开启方法如下
登陆mysql,执行语句查询日志记录开启情况:show variables like "%general%";
+------------------+------------------------------+
| Variable_name | Value |
+------------------+------------------------------+
| general_log | OFF |
| general_log_file | /var/lib/mysql/localhost.log |
+------------------+------------------------------+
set global general_log = "ON";开启日志记录,可以在/var/lib/mysql中查看日志。
测试:访问http://localhost:8888/1,查询数据,在日志中,可以看到,172从服务日志记录查询语句,171没有日志。
测试:访问http://localhost:8888/insert/ibethfy,插入语句,可以看到171主服务有日志,172从服务没有日志。
注意:io.shardingsphere用3.0.0版本即可,3.1.0引入maven会报关联错误。
之前想使用mycat实现读写分离等,结果发现mycat只支持mysql5版本,其余版本未在其支持列表,并且mycat很久没更新啦!我自己试了很久都没搭建好mycat的环境,哎!
好啦,基本的都搞完了,之后实施shardingsphere的分库分表!


