Centos7.2部署LAMP
Centos7.2部署LAMP
- 转自:https://help.aliyun.com/document_detail/50774.html
- 项目配置
- 步骤一: 准备编译环境
- 1. 关闭防火墙
- 2.关闭SELinux
- 步骤二:安装Apache
- 1.安装依赖包
- 2.下载解压Apache,Apr和Apr-util的源码包
- 3.把Apr和Apr-util的文件夹移到Apache的srclib文件夹下
- 4.编译
- 5.设置PATH环境变量
- 6.输入命令httpd -v可查看Apache的版本号
- 7.添加Apache的启动配置文件
- 8.启动Apache服务并设置开机自动启动
- 步骤三:安装MySQL
- 1.准备编译环境。
- 2.准备MySQL数据存放目录
- 3.更改数据目录属主和属组
- 4.下载稳定版源码包解压编译
- 5.修改安装目录的属组为mysql
- 6.初始化数据库并复制配置文件
- 7.修改配置文件中的安装路径及数据目录存放路径
- 8.输入命令vi /usr/lib/systemd/system/mysql.service打开MySQL的启动配置文件,按下i键,然后写下如下内容:
- 9.设置PATH环境变量
- 10.启动MySQL服务并设置开机启动
- 11.修改MySQL的root用户密码。运行以下命令,并按界面提示设置密码
- 12.测试登录MySQL数据库
- 步骤四:安装PHP
- 1.安装依赖包
- 2.下载稳定版源码包解压编译
- 3.复制PHP的配置文件
- 4.输入命令vi /usr/local/apache2/conf/httpd.conf打开Apache配置文件,按下i键开始编辑
- 5.添加Apache对解析PHP的支持
- 步骤五:安装phpMyAdmin
- 1.准备phpMyAdmin数据存放目录
- 2.下载phpMyAdmin压缩包并解压
- 3.复制phpMyAdmin文件到准备好的数据存放目录。
转自:https://help.aliyun.com/document_detail/50774.html
项目配置
本篇教程在示例步骤中使用了以下版本的软件。操作时,请您以实际软件版本为准。
操作系统:CentOS 7.2 64位
Apache:2.4.37
MySQL:5.6.24
PHP:7.0.32
phpMyAdmin:4.0.10.20
步骤一: 准备编译环境
输入命令cat /etc/redhat-release查看系统版本
![]()
1. 关闭防火墙
输入systemctl status firewalld命令查看当前防火墙的状态。
如果防火墙的状态参数是active,则防火墙为开启状态。如果防火墙的状态参数是inactive,则防火墙为关闭状态。
如上图所示,此处防火墙为开启状态,需要运行如下命令关闭防火墙:
如果您想临时关闭防火墙,输入命令systemctl stop firewalld。
如果您想永久关闭防火墙,输入命令systemctl disable firewalld。
2.关闭SELinux
输入getenforce命令查看当前SELinux的状态。
![]()
如果SELinux状态参数是Enforcing,则SELinux为开启状态。如果SELinux状态参数是Disabled, 则SELinux为关闭状态。
如上图所示,此处SELinux为开启状态,需要运行如下命令关闭SELinux:
如果您想临时关闭SELinux,输入命令setenforce 0
如果您想永久关闭SELinux,输入命令vi /etc/selinux/config编辑SELinux配置文件。回车后,把光标移动到SELINUX=enforcing这一行,按下i键进入编辑模式,修改为SELINUX=disabled, 按下Esc键,然后输入:wq并回车以保存并关闭SELinux配置文件。
步骤二:安装Apache
1.安装依赖包
yum groupinstall " Development Tools" -y
yum install libtool
yum install expat-devel pcre pcre-devel openssl-devel -y
2.下载解压Apache,Apr和Apr-util的源码包
wget https://mirrors.aliyun.com/apache/httpd/httpd-2.4.37.tar.gz
wget https://mirrors.aliyun.com/apache/apr/apr-1.6.5.tar.gz
wget https://mirrors.aliyun.com/apache/apr/apr-util-1.6.1.tar.gz
tar xvf httpd-2.4.37.tar.gz -C /usr/local/src
tar xvf apr-1.6.5.tar.gz -C /usr/local/src
tar xvf apr-util-1.6.1.tar.gz -C /usr/local/src
说明:源代码版本会不断升级。您可以在
https://mirrors.aliyun.com/apache/httpd/
https://mirrors.aliyun.com/apache/apr/
获取合适的安装包地址。
3.把Apr和Apr-util的文件夹移到Apache的srclib文件夹下
cd /usr/local/src
mv apr-1.6.5 httpd-2.4.37/srclib/apr
mv apr-util-1.6.1 httpd-2.4.37/srclib/apr-util
4.编译
cd /usr/local/src/httpd-2.4.37
./buildconf
./configure --prefix=/usr/local/apache2 \
--enable-ssl \
--enable-so \
--with-mpm=event \
--with-included-apr \
--enable-cgi \
--enable-rewrite \
--enable-mods-shared=most \
--enable-mpms-shared=all
make && make install
5.设置PATH环境变量
echo "export PATH=$PATH:/usr/local/apache2/bin" > /etc/profile.d/httpd.sh
source /etc/profile.d/httpd.sh
6.输入命令httpd -v可查看Apache的版本号
7.添加Apache的启动配置文件
输入命令vi /usr/lib/systemd/system/httpd.service打开Apache的启动配置文件,按下i键,然后在配置文件中写下如下内容:
[Unit]
Description=The Apache HTTP Server
After=network.target

[Service]
Type=forking
ExecStart=/usr/local/apache2/bin/apachectl -k start
ExecReload=/usr/local/apache2/bin/apachectl -k graceful
ExecStop=/usr/local/apache2/bin/apachectl -k graceful-stop
PIDFile=/usr/local/apache2/logs/httpd.pid
PrivateTmp=true

[Install]
WantedBy=multi-user.target
按下Esc键,然后输入:wq并回车以保存并关闭Apache启动配置文件。
8.启动Apache服务并设置开机自动启动
systemctl start httpd
systemctl enable httpd
步骤三:安装MySQL
1.准备编译环境。
yum install ncurses-devel bison gnutls-devel -y
yum install cmake -y
2.准备MySQL数据存放目录
cd
mkdir /mnt/data
groupadd -r mysql
useradd -r -g mysql -s /sbin/nologin mysql
id mysq
3.更改数据目录属主和属组
chown -R mysql:mysql /mnt/data
4.下载稳定版源码包解压编译
wget https://downloads.mysql.com/archives/get/file/mysql-5.6.24.tar.gz
tar xvf mysql-5.6.24.tar.gz -C  /usr/local/src
cd /usr/local/src/mysql-5.6.24
cmake . -DCMAKE_INSTALL_PREFIX=/usr/local/mysql \
> -DMYSQL_DATADIR=/mnt/data \
> -DSYSCONFDIR=/etc \
> -DWITH_INNOBASE_STORAGE_ENGINE=1 \
> -DWITH_ARCHIVE_STORAGE_ENGINE=1 \
> -DWITH_BLACKHOLE_STORAGE_ENGINE=1 \
> -DWITH_READLINE=1 \
> -DWITH_SSL=system \
> -DWITH_ZLIB=system \
> -DWITH_LIBWRAP=0 \
> -DMYSQL_TCP_PORT=3306 \
> -DDEFAULT_CHARSET=utf8 \
> -DMYSQL_UNIX_ADDR=/usr/local/mysql/mysql.sock \
> -DDEFAULT_COLLATION=utf8_general_ci \
> -DWITH_SYSTEMD=1 \
> -DINSTALL_SYSTEMD_UNITDIR=/usr/lib/systemd/system
make && make install
5.修改安装目录的属组为mysql
chown -R mysql:mysql /usr/local/mysql/
6.初始化数据库并复制配置文件
cd /usr/local/mysql
/usr/local/mysql/scripts/mysql_install_db --user=mysql --datadir=/mnt/data/
mv /etc/my.cnf /etc/my.cnf.bak
cp /usr/local/mysql/support-files/my-default.cnf /etc/my.cnf
7.修改配置文件中的安装路径及数据目录存放路径
echo -e "basedir = /usr/local/mysql\ndatadir = /mnt/data\n" >> /etc/my.cnf
8.输入命令vi /usr/lib/systemd/system/mysql.service打开MySQL的启动配置文件,按下i键,然后写下如下内容:
[Unit]
Description=MySQL Community Server
After=network.target
After=syslog.target

[Install]
WantedBy=multi-user.target
Alias=mysql.service

[Service]
User=mysql
Group=mysql
PermissionsStartOnly=true
ExecStart=/usr/local/mysql/bin/mysqld
TimeoutSec=600
Restart=always
PrivateTmp=false
按下Esc键,然后输入:wq并回车以保存并关闭MySQL启动配置文件。
9.设置PATH环境变量
echo "export PATH=$PATH:/usr/local/mysql/bin" > /etc/profile.d/mysql.sh
source /etc/profile.d/mysql.sh
10.启动MySQL服务并设置开机启动
systemctl start mysql
systemctl enable mysql
11.修改MySQL的root用户密码。运行以下命令,并按界面提示设置密码
mysqladmin -u root password
12.测试登录MySQL数据库
mysql -uroot -p
步骤四:安装PHP
1.安装依赖包
yum install libmcrypt libmcrypt-devel mhash mhash-devel libxml2 libxml2-devel bzip2 bzip2-devel
2.下载稳定版源码包解压编译
cd
wget http://cn2.php.net/get/php-7.0.32.tar.bz2/from/this/mirror
cp mirror php-7.0.32.tar.bz2
tar xvf php-7.0.32.tar.bz2 -C /usr/local/src
cd /usr/local/src/php-7.0.32
./configure --prefix=/usr/local/php \
--with-config-file-scan-dir=/etc/php.d \
--with-apxs2=/usr/local/apache2/bin/apxs \
--with-config-file-path=/etc \
--with-pdo-mysql=mysqlnd \
--with-mysqli=/usr/local/mysql/bin/mysql_config \
--enable-mbstring \
--with-freetype-dir \
--with-jpeg-dir \
--with-png-dir \
--with-zlib \
--with-libxml-dir=/usr \
--with-openssl \
--enable-xml \
--enable-sockets \
--enable-fpm \
--with-bz2
make && make install
3.复制PHP的配置文件
cp php.ini-production /etc/php.ini
4.输入命令vi /usr/local/apache2/conf/httpd.conf打开Apache配置文件,按下i键开始编辑
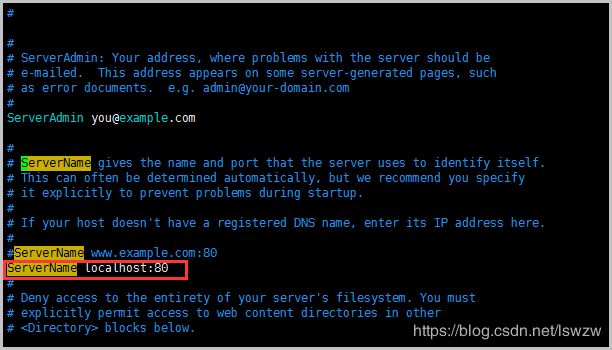
找到ServerName参数,添加ServerName localhost:80

找到Directory参数,注释掉Require all denied,添加Require all granted。

找到DirectoryIndex index.html,将它替换为DirectoryIndex index.php index.html

找到如下内容:

在后面添加如下内容:
AddType application/x-httpd-php .php
AddType application/x-httpd-php-source .phps

按下Esc键,然后输入:wq并回车以保存并关闭Apache配置文件。
5.添加Apache对解析PHP的支持
打开index.php文件
vi /usr/local/apache2/htdocs/index.php
按下i键进入编辑模式,并添加以下内容:
按下Esc键退出编辑模式,并输入:wq保存并关闭index.php文件
重启Apache服务。
systemctl restart httpd
步骤五:安装phpMyAdmin
1.准备phpMyAdmin数据存放目录
cd
mkdir -p /usr/local/apache2/htdocs/phpmyadmin
2.下载phpMyAdmin压缩包并解压
wget https://files.phpmyadmin.net/phpMyAdmin/4.0.10.20/phpMyAdmin-4.0.10.20-all-languages.zip
unzip phpMyAdmin-4.0.10.20-all-languages.zip
3.复制phpMyAdmin文件到准备好的数据存放目录。
mv phpMyAdmin-4.0.10.20-all-languages/* /usr/local/apache2/htdocs/phpmyadmin
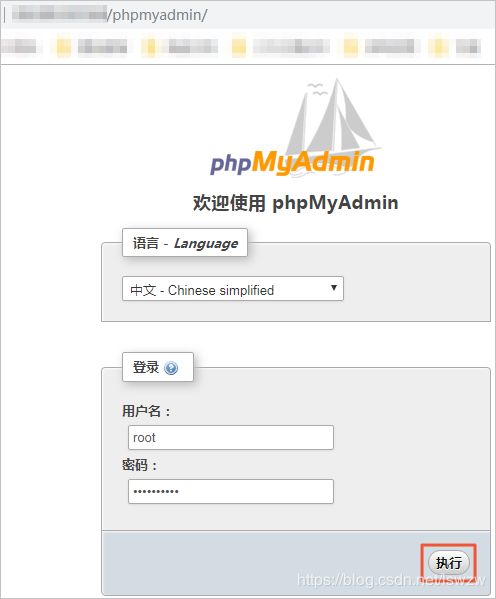
在本地机器浏览器输入 http:// 实例 IP/phpmyadmin 访问phpMyAdmin登录页面。如果出现以下页面,说明phpMyAdmin安装成功。

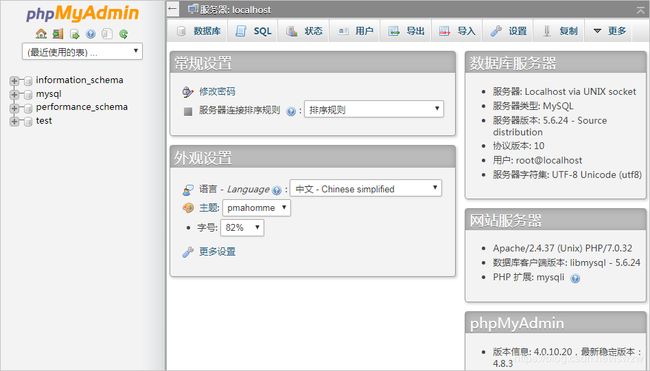
如果出现以下页面,说明连接MySQL成功。

