Spring Security 学习(一)认证与授权源码分析——一次痛苦的爬坑经历
一点感悟:
一个疏忽,花了 5h 解决了,哎。用一首歌来表达一下现在的心情:点击。
不过也算摸清了Spring Security 一点基本原理,没有白费的时间......
学习新知识的时候,遇到解决不了的问题一定不能心急,越是这个时候越要静下心来一步一步的去分析原理。静心、沉淀。
一、认证过程 :
废话不多说,在学习之前最好先把用到的英语单词熟悉一下。 AuthenticationManager(认证管理器接口),authenticate(认证的方法),ProviderManager,AuthenticationManager
官方文档:https://spring.io/guides/topicals/spring-security-architecture/
先来了解一下以下几个接口,方便后面的学习。
AuthenticationManager :
Authentication
The main strategy interface for authentication is
AuthenticationManagerwhich only has one method:public interface AuthenticationManager { Authentication authenticate(Authentication authentication) throws AuthenticationException; }An
AuthenticationManagercan do one of 3 things in itsauthenticate()method:
return an
Authentication(normally withauthenticated=true) if it can verify that the input represents a valid principal.throw an
AuthenticationExceptionif it believes that the input represents an invalid principal.return
nullif it can’t decide.
- 身份认证的主要接口为 Authentication,其中只有一个方法 authenticate,用来验证。
- 主要干三件事:
1. 如果能验证是正确的,就返回一个 Authentication 对象,并把 authenticated=true。
2. 如果没通过验证,则抛出一个异常。
3. 如果无法判断,则返回 null。
ProviderManager :
The most commonly used implementation of
AuthenticationManagerisProviderManager, which delegates to a chain ofAuthenticationProviderinstances. AnAuthenticationProvideris a bit like anAuthenticationManagerbut it has an extra method to allow the caller to query if it supports a givenAuthenticationtype:
- ProviderManager 是 Authentication接口 最常用的一个实现类。
- ProviderManager 会把验证请求委托给 AuthenticationManager。下面是 ProviderManager 的 authenticate 方法源码:
AuthenticationManager :
public interface AuthenticationProvider {

	Authentication authenticate(Authentication authentication)
			throws AuthenticationException;

	boolean supports(Class authentication);

}
- 只有通过了 support 即返回 true,才会继续调用 authenticate方法。
- 注意 AuthenticationManager 是一个接口。
而 AuthenticationManager 有一个子类 AbstractUserDetailsAuthenticationProvider,用于实现用户信息认证的 UserDetailsService 就是 AbstractUserDetailsAuthenticationProvider 的子类。说这一大堆肯定头晕了,看下面图就懂了。

总结一下过程:
AuthenticationManager 是实现认证的主要策略接口,其认证逻辑主要由子类 ProviderManager实现,而 ①ProviderManager 将委托给 AuthenticationProvider 类型的对象处理,AuthenticationProvider 有一个子类 AbstractUserDetailsAuthenticationProvider,此类中 authenticate 方法调用抽象方法 retrieveUser 来获取用户信息,该抽象方法由子类 DaoAuthenticationProvider 实现,DaoAuthenticationProvider是Spring Security中一个核心的Provider,对所有的数据库提供了基本方法和入口。
估计你已经不想往下看了,我主要是为以后自己看的....
AbstractUserDetailsAuthenticationProvider源码:
public Authentication authenticate(Authentication authentication)
        throws AuthenticationException {
    //取出用户名
    String username = (authentication.getPrincipal() == null) ? "NONE_PROVIDED" : authentication.getName();
    boolean cacheWasUsed = true;
    UserDetails user = this.userCache.getUserFromCache(username);

    if (user == null) {
        cacheWasUsed = false;
        try {
            //获取用户信息由子类实现即 DaoAuthenticationProvider
            user = retrieveUser(username, (UsernamePasswordAuthenticationToken) authentication);
        }
        catch (UsernameNotFoundException notFound) {
            logger.debug("User '" + username + "' not found");
            if (hideUserNotFoundExceptions) {
                throw new BadCredentialsException(messages.getMessage("msg...", "msg..."));
            }
            else {
                throw notFound;
            }
        }
        Assert.notNull(user, "msg...");
    }
    /**
     * 到此用户信息获取完毕
     * 下一步进行认证
     * 认证过程一共分为三步
     *  1. preAuthenticationChecks
     * 	2. additionalAuthenticationChecks(抽象方法,子类实现)
     * 	3. postAuthenticationChecks
     */
    try {
        //下面这两个方法是 UserDetailsChecker 接口的实现类
        //前检查由 DefaultPreAuthenticationChecks 类实现(主要判断当前用户是否锁定,过期,冻结User接口)
        preAuthenticationChecks.check(user);
        //由子类来完成更进一步的验证
        additionalAuthenticationChecks(user, (UsernamePasswordAuthenticationToken) authentication);
    }
    catch (AuthenticationException exception) {
        if (cacheWasUsed) {
            // There was a problem, so try again after checking
            // we're using latest data (i.e. not from the cache)
            cacheWasUsed = false;
            user = retrieveUser(username,
                    (UsernamePasswordAuthenticationToken) authentication);
            preAuthenticationChecks.check(user);
            additionalAuthenticationChecks(user,
                    (UsernamePasswordAuthenticationToken) authentication);
        }
        else {
            throw exception;
        }
    }
    postAuthenticationChecks.check(user);
    //如果没有缓存则进行缓存,则处的userCache是由NullUserCache类实现的,名如其义,该类的putUserInCache没做任何事
    if (!cacheWasUsed) {
        this.userCache.putUserInCache(user);
    }
    Object principalToReturn = user;
    if (forcePrincipalAsString) {
        principalToReturn = user.getUsername();
    }
    //将认证之后的信息封装成 token
    return createSuccessAuthentication(principalToReturn, authentication, user);
}
下面看一下 DaoAuthenticationProvider 源码:
private UserDetailsService userDetailsService;

protected final UserDetails retrieveUser(String username,
		UsernamePasswordAuthenticationToken authentication)
		throws AuthenticationException {

	prepareTimingAttackProtection();
	try {
                //1.类型为 UserDetails
		UserDetails loadedUser = this.getUserDetailsService().loadUserByUsername(username);
		if (loadedUser == null) {
			throw new InternalAuthenticationServiceException("msg...");
		}
		return loadedUser;
	}
	catch (UsernameNotFoundException ex) {
	    .....
	}
}
可以看出,获取用户信息最后是交由 DaoAuthenticationProvider 中 getUserDetailsService().loadUserByUsername(username) 进行加载,所以在写从数据库中获取用户信息时只需要实现UserDetailsService 并重写 loadUserByUsername() 方法就行了。注意返回的用户信息是 UserDetails 类型的,所以 model 需要实现 UserDetails。
private UserDetailsService userDetailsService;

UserDetails loadedUser = this.getUserDetailsService().loadUserByUsername(username);
自定义的UserDetails需要注入到 AuthenticationManagerBuilder 中才行,我就是忘了这一步.....
@Autowired
private UserService userService;


@Override
protected void configure(AuthenticationManagerBuilder auth) throws Exception {
    auth.userDetailsService(userService);
}
二、认证与授权总流程 :
说到这,应该对 Spring Security 认证原理有了初步的了解。再总结一下流程:
1.请求被 UsernamePasswordAuthenticationFilter 拦截 :
①把输入的用户名个密码封装成 Token 也就是 Authentication ,因为..Token 是 Authentication的子类
UsernamePasswordAuthenticationToken authRequest = new
UsernamePasswordAuthenticationToken(username, password);②调用 AuthenticationManager 的 authenticate 方法进行认证
return this.getAuthenticationManager().authenticate(authRequest);
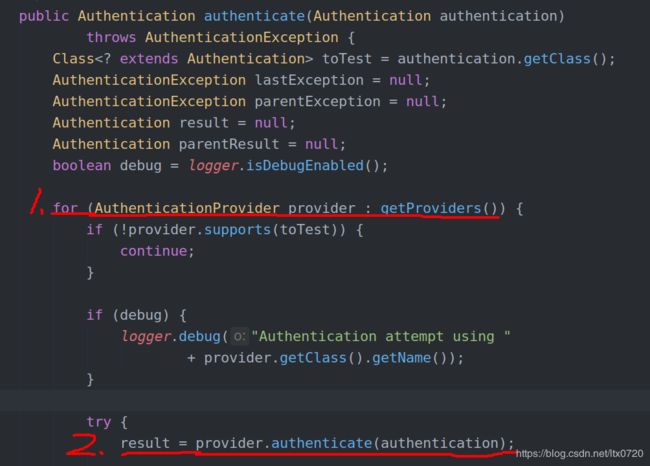
2.由 AuthenticationManager 将验证请求委托给 ProviderManager 执行:
ProviderManager 中 authenticate 方法源码:
Authentication result = null;

public Authentication authenticate(Authentication authentication) throws
    AuthenticationException {
    for (AuthenticationProvider provider : getProviders()) {
        result = provider.authenticate(authentication);
        return result;
    }
}
3.ProviderManager遍历 provider 执行验证:
在authenticate 方法中遍历 provider 执行验证,到这里我就发现还有一中方法实现自定义的验证,就是自定义一个类实现AuthenticationProvider 接口,重写 authenticate 与 support 方法。就像下面一样:
@Configuration
public class MyProvider implements AuthenticationProvider {

    @Autowired
    private UserMapper userMapper;

    @Autowired
    private PasswordEncoder passwordEncoder;

    @Override
    public Authentication authenticate(Authentication authentication) throws AuthenticationException {

        String username = (String)authentication.getPrincipal();
        //根据用户名查询处所有权限
        List list = userMapper.getPermissionByUsername(username);

        //构造权限集合
        List authorities = new ArrayList<>();
        for (Permission p:list){
            authorities.add(new SimpleGrantedAuthority(p.getPername()));
        }
        //构造一个 Authentication
        return new UsernamePasswordAuthenticationToken(authentication.getPrincipal(), authentication.getCredentials(), authorities);
    }

    @Override
    public boolean supports(Class authentication) {
        return true;
    }
}
4.DaoAuthenticationProvider 类执行验证:
如果没有自定义的 provider 验证逻辑,则会由实现于 ProviderManager接口的抽象类AbstractUserDetailsAuthenticationProvider 的子类 DaoAuthenticationProvider 进行认证,其认证过程:
1.调用 retrieveUser方法从数据库中取出数据
UserDetails loadedUser = this.getUserDetailsService().loadUserByUsername(username);2.执行3个校验方法
preAuthenticationChecks.check(user);
additionalAuthenticationChecks(user,
		(UsernamePasswordAuthenticationToken) authentication);
postAuthenticationChecks.check(user);
3.如果校验成功返回一个 Authentication 实例
return createSuccessAuthentication(principalToReturn, authentication, user);

protected Authentication createSuccessAuthentication(Object principal,
		Authentication authentication, UserDetails user) {
	// Ensure we return the original credentials the user supplied,
	// so subsequent attempts are successful even with encoded passwords.
	// Also ensure we return the original getDetails(), so that future
	// authentication events after cache expiry contain the details
	UsernamePasswordAuthenticationToken result = new UsernamePasswordAuthenticationToken(
			principal, authentication.getCredentials(),
			authoritiesMapper.mapAuthorities(user.getAuthorities()));
	result.setDetails(authentication.getDetails());
}