自动化运维--Python在大型网络管理中的应用案例
Python实验运行环境:
操作系统:Windows 8.1上跑CentOS 7(VMware虚拟机)
接触的LINUX版本就是CentOS,对比较热门的Ubuntu, Debian等并不熟,不同版本的LINUX有一些基本命令不一样,比如yum install和apt-get的区别,但这并不影响我们学习Python,如果读者对Linux不熟,希望你能花点时间学习下touch, chmod, cat, ls等等这些最基础的命令,以及掌握vim或者nano这些编辑文档的程序。
网络设备:GNS3运行的思科三层交换机
网络设备版本:思科IOS (vios_12-ADVENTERPRISEK9-M)
Python编辑器: Sublime Text 3.0 (很不错的编辑器,有朋友介绍Pycharm,还没来得及试用)
Python版本:2.7.5
最新的Python 3: Python 3.x是新的Python版本,将来终会淘汰Python 2成为最主流的版本。但是目前很多和计算机网络有关的模块比如Scapy, Trigger, easySNMP等在Python 3中并没得到很好的支持,就目前的趋势来看,离Python 3彻底淘汰Python 2至少还有10年的时间,而且2和3的区别虽然有,但是如果你彻底掌握了2的话,只需要一两天就能将3懂个80%,因此目前我们完全可以从2开始学起,另外2.7.5算是比较旧的版本,但是对初学者来说完全够用了。
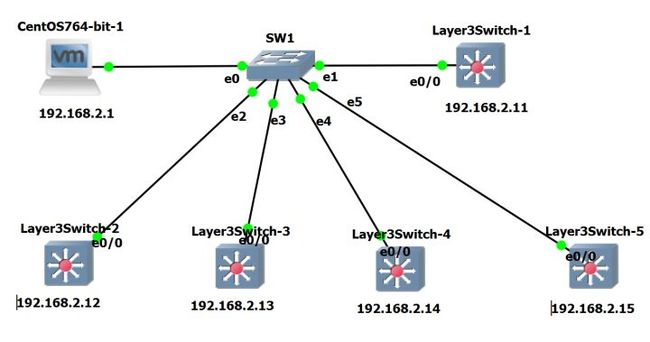
网络实验拓扑:
局域网IP地址段:192.168.2.0 /24
运行Python的客户端: 192.168.2.1
Layer3Switch-1: 192.168.2.11
Layer3Switch-2: 192.168.2.12
Layer3Switch-3: 192.168.2.13
Layer3Switch-4: 192.168.2.14
Layer3Switch-5: 192.168.2.15
所有的交换机已经预配好了SSH,用户名: python 密码:123
网络实验拓扑
- 要让Python通过SSH远程登陆网络设备,主要有Paramiko和Netmiko两种模块可以使用(telnet的话需要使用telnetlib模块,但是鉴于telnet的安全性,不建议使用,关于telnet的应用以后有机会再讲)。Paramiko和Netmiko的区别在于后者是前者的命令简化版本,且支持多厂商设备,但是笔者本人更偏爱Paramiko,因此代码里将使用Paramiko来SSH登陆设备。
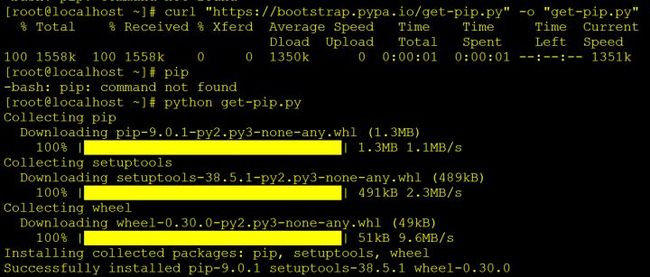
- Paramiko并不是Python自带的package,我们必须下载并安装Paramiko,要安装Paramiko,首先要安装pip(yum install不支持), pip的作用是用来安装和管理Python pacakges的,在CentOS中安装Paramiko的步骤如下(因为是单纯的实验环境,我是直接用的root账户):
A. 先安装pip
curl "https://bootstrap.pypa.io/get-pip.py" -o "get-pip.py"
python get-pip.py
在CentOS 7里安装pip
B. 安装好pip后,接着安装paramiko
pip install paramiko
用pip安装Paramiko
C. 安装好Paramiko后,打开Python测试是否可以使用import paramiko来引用它,如果没报错,则说明安装成功。
测试Paramiko是否安装成功
实验1:
实验目的:
- 用Python实现SSH登陆单个交换机(192.168.2.11),为其loop0端口配置1.1.1.1 /32这个IP。
- 因为是第一个实验,为求最简单,最直观的代码,这里我们在代码里预设IP,username, password,不使用raw_input()函数和getpass模块。
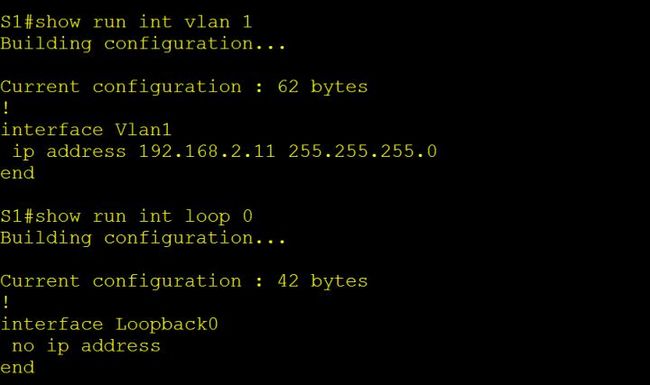
- 运行代码前,首先确认S1上的配置,此时S1上的loop0端口并没有IP
执行代码前S1配置
- 在CentOS上创建一个名为lab1.py的文件,将其改为可执行(否则等会儿你无法运行该script文件),然后用vim打开该文件,然后放入下列代码
#!/usr/bin/env python
import paramiko
import time

ip = "192.168.2.11"
username = "python"
password = "123"

ssh_client = paramiko.SSHClient()
ssh_client.set_missing_host_key_policy(paramiko.AutoAddPolicy())
ssh_client.connect(hostname=ip,username=username,password=password)

print "Sucessfully login to ", ip

command = ssh_client.invoke_shell()

command.send("configure terminal\n")
command.send("int loop 0\n")
command.send("ip address 1.1.1.1 255.255.255.255\n")
command.send("end\n")
command.send("wr mem\n")
time.sleep(1)
output = command.recv(65535)
print output

ssh_client.close
实验1代码部分讲解:
- 除了Paramiko外,我们还import了time这个Python自带的模块,它的作用后面会讲到
- ip, username, password这三个变量很直接明了,只需注意它们的类型必须是string(字符串)。
- sshclient = paramiko.SSHClient(), 调用paramiko的SSHClient()方法,将其assign给ssh_client这个变量。顾名思义,这里我们的CentOS主机是做SSH client,而SSH server则是我们要登陆的S1交换机(192.168.2.11)。
- 默认情况下,Paramiko会拒绝任何未知的SSH public keys,这里我们使用ssh_client.set_missing_host_key_policy(paramiko.AutoAddPolicy()) 来让Paramiko接受来自SSH Server端(也就是S1)提供的public key。
- ssh_client.connect(hostname=ip,username=username,password=password),很好理解,调用Paramiko的connect()函数,使用我们预设好的ip, username, password来登陆S1。
- 如果登陆成功,用print "Sucessfully login to ", ip来提示用户登录成功,并显示所登陆的交换机的ip地址,这里为192.168.2.11
- command = ssh_client.invokeshell(),调用paramiko的invoke_shell()方法,将其assign给command这个变量。
- 现在可以让command配合send()这个函数来对交换机发号施令了,后面的命令就不讲了,这些对网工来说应该是整个script里面最熟悉的部分了。
- time.sleep(1),前面提到了我们import了time这个模块。有时候系统运行script时会有延迟,它的作用是让系统稍侯1秒钟,再执行下面的语句。
- output = command.recv(65535),python截屏本次运行script后的所有输出记录,将其assign给output这个变量。
- print output, 再将output打印出来,这样你在运行python的过程中就能清楚看到python sciprt对你的交换机做了些什么。
- ssh_client.close,最后记得养成好习惯,退出SSH。
下面运行这段代码,看看效果:
代码执行效果
运行成功!
Python成功登录了192.168.2.11,帮我们执行了要配置的命令,现在再登录S1,看看变化, S1的loop 0端口已经成功配置了1.1.1.1 /32这个IP。
代码执行后S1配置
实验2:
实验目的:
- 配合getpass模块和raw_input()函数实现交互式的SSH用户名和密码输入。
- 配合for loop同时给5台交换机配置VLAN 10至VLAN 20。
执行代码前S1配置
执行代码前S2配置
执行代码前S3配置
执行代码前S4配置
执行代码前S5配置
#!/usr/bin/env python

import paramiko
import time
import getpass


username = raw_input('Username: ')
password = getpass.getpass('Password: ')

for i in range(11,16):
    ip = "192.168.2." + str(i)
    ssh_client = paramiko.SSHClient()
    ssh_client.set_missing_host_key_policy(paramiko.AutoAddPolicy())
    ssh_client.connect(hostname=ip,username=username,password=password)
    print "Successfully connect to ", ip
    command = ssh_client.invoke_shell()
    command.send("configure terminal\n")
    for n in range (10,21):
    	print "Creating VLAN " + str(n)
    	command.send("vlan " + str(n) +  "\n")
    	command.send("name Python_VLAN " + str(n) +  "\n")
    	time.sleep(0.5)

    command.send("end\n")
    command.send("wr mem\n")
    time.sleep(2)
    output = command.recv(65535)
    print output

ssh_client.close
实验2代码部分讲解:
- 这里import了getpass这个模块,用来提示用户输入密码。它和raw_input()函数一样,都是python的交互式功能,区别是,如果用rawinput()来提示输入密码的话,用户输入的密码是明文可见的,如果你身边坐了他人,密码就这么暴露了。而getpass输入密码时,则是不可见的,安全性很高,所以强烈建议使用getpass来输入密码,使用raw_input()来输入用户名
- 由于这里S1-S5五个交换机的ip是连续的,192.168.2.11 - 15, 这样我们可以配合for i in range(11,16)做一个简单的for loop,然后以此配合下一行代码ip = "192.168.2." + str(i)来实现循环(批量)登录交换机S1至S5。注意:这里的i是整数,整数不能和字符串相“+”,所以要用str(i)先将i转化成字符串。
- for n in range (10,21): 同样的道理,我们要创建VLAN 10 至 VLAN 20,VLAN id是连续的,所以这里又可以配合一个简单的for loop达到循环配置VLAN10 - 20。
执行代码来看效果
https://vdn.vzuu.com/SD/dbdaeb74-30d3-11e8-aacf-0242ac112a0a.mp4?auth_key=1541477647-0-0-c4aea7387f2867d63006cc94e3223824&expiration=1541477647&disable_local_cache=1
最后登陆所有交换机一一验证,检查代码是否创建了VLAN 10 至 20
https://vdn.vzuu.com/SD/7444c024-30d4-11e8-8948-0242ac112a0a.mp4?auth_key=1541477647-0-0-82fcc7ee4cb63b040efceba730388068&expiration=1541477647&disable_local_cache=1
实验3:
实验目的:
- 在生产环境中,交换机的管理ip地址基本不可能像实验环境中这样11到15连续的,有些交换机的管理ip甚至在不同的网段,这种情况下,我们就不能简单的用for loop来循环ip地址的最后一段来登录交换机了。这里我们要额外开一个文本文件,把我们需要登录的交换机ip全部写进去,然后用for loop配合open()函数来批量登录所有交换机。
- 用上面的方法登录所有交换机,开启EIGRP .
开始实验3前,我们需要做两个准备:
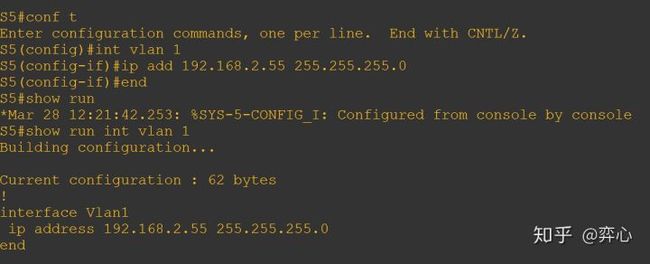
- 把S5的管理地址从192.168.2.15改成192.168.2.55
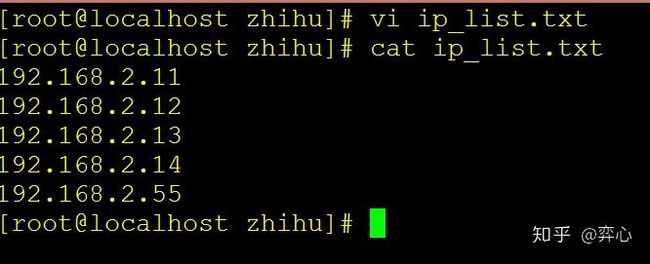
- 创建一个名为ip_list.txt的文件,把S1,S2,S3,S4,S5交换机的管理IP地址放进去
把S5的地址改为192.168.2.55
创建一个ip_list.txt文件,把所有交换机的管理IP放进去
准备就绪后,老规矩创建lab3.py,把它改成可执行,然后放入下列代码
#!/usr/bin/env python

import paramiko
import time
import getpass

username = raw_input('Username: ')
password = getpass.getpass('password: ')

f = open("ip_list.txt","r")
for line in f.readlines():
    ip = line.strip()
    ssh_client = paramiko.SSHClient()
    ssh_client.set_missing_host_key_policy(paramiko.AutoAddPolicy())
    ssh_client.connect(hostname=ip,username=username,password=password)
    print "Successfully connect to ", ip
    remote_connection = ssh_client.invoke_shell()
    remote_connection.send("conf t\n")
    remote_connection.send("router eigrp 1\n")
    remote_connection.send("end\n")
    remote_connection.send("wr mem\n")
    time.sleep(1)
    output = remote_connection.recv(65535)
    print output

f.close()
ssh_client.close
实验3代码部分讲解:
- 用open("ip_list.txt", "r")来打开我们实验前创建好了的ip_list.txt这个保存所有交换机管理地址的文档,后面的"r"表示只读,可写可不写,因为默认就是它。
- for line in f.readlines(): readlines()方法返回的是一个列表,正好可以用for loop读取ip_list.txt文档里的每一行内容,每一行都是交换机的管理IP地址。
- ip = line.strip(),用strip()去掉多于的空格然后把结果assign给ip这个变量。
- f.close(), 文件有开有关,养成好习惯,用完后记得关闭。也可以用with as的语句来写,这样不需要用close()来关闭已打开的文件,这个看个人喜好,初学者用简单的 f = open(),f.close()就够用了。
老规矩,执行代码前登陆所有交换机,确认目前没有EIGRP开启:
执行实验3代码前S1配置
执行实验3代码前S2配置
执行实验3代码前S3配置
执行实验3代码前S4配置
执行实验3代码前S5配置
一切就绪后,执行代码看效果:
https://vdn.vzuu.com/SD/bccb2d1c-328a-11e8-9b3f-0242ac112a0c.mp4?auth_key=1541477951-0-0-6368b1877b9c8d90c1c45ac369069e62&expiration=1541477951&disable_local_cache=1
最后登陆所有交换机一一验证EIGRP是否已经开启:
https://vdn.vzuu.com/SD/4bbae350-328b-11e8-88f4-0242ac112a0d.mp4?auth_key=1541477950-0-0-509508d68cdd38f7ead0a9887e1fa685&expiration=1541477950&disable_local_cache=1
实验4:
前面的例子提到了,要使用Python来批量连接网络设备,可以把设备的IP地址写入一个文本文件,然后在代码里使用for循环配合open()函数以及readlines()函数逐行读取该文本文件里的IP地址,达到循环批量登录多台网络设备的目的。
在成功登录网络设备后,我们又可以配合command.send()来对网络设备发号施令,但在前面的例子中我们都是将要输入的命令预先写在了代码里面,比如command.send("conf t\n"),command.send("router eigrp 1\n"), command.send("end\n")。
举例如下:
# -- coding: UTF-8 --
import paramiko
import time
import getpass
username = raw_input('Username: ')
password = getpass.getpass('password: ')
f = open("ip_list.txt","r")
for line in f.readlines():
  ip = line
  ssh_client = paramiko.SSHClient()
  ssh_client.set_missing_host_key_policy(paramiko.AutoAddPolicy())
  ssh_client.connect(hostname=ip,username=username,password=password)
  print username, " You have successfully connect to ", ip
  command = ssh_client.invoke_shell()
#在代码里预设好要输入的命令
  command.send("conf t\n")
  command.send("router eigrp 1\n")
  command.send("end\n")
  time.sleep(1)
  output = remote_connection.recv(65535)
  print output
f.close()
ssh_client.close
这种将配置命令预设在代码里的方法便于初学者理解和学习,在只有几台设备的实验环境中常用。但是在有成千上万台网络设备需要管理的生产环境中,这种方法显得很笨拙,缺乏灵活性。举例来说,假设你的生产环境中有不同型号,不同操作系统,不同命令格式的设备各1000台,比如思科的3750和3850交换机,前者跑的是IOS,后者跑的是IOS-XE,你要分别给它们批量修改QoS的配置,因为两者的命令格式差异巨大(一个是MLS QOS,一个是MQC QOS),你必须反复修改command.send()这个部分的代码,如果只是简单数条命令还好办,一旦遇到大规模的配置,那这种方法的效率会很低下。
解决这个问题的思路是分别创建两个文本文件,一个用来存放配置3750要用到的命令集,另一个用来存放配置3850要用到的命令集,然后在Python脚本里通过for循环加open()来读取两个文件里的内容以达到分别给所有3750和3850交换机做QoS配置的目的,这样做的好处是无须修改command.send()这个部分的代码,因为所有的命令行已经在文本文件里预先设置好了。
实验背景:
假设你现在手边有3台管理ip地址在192.168.100.x /24网段的3750交换机以及3台管理ip地址在172.16.100.x/24网段的3850交换机,它们的hostname和管理ip地址如下:
3750_1: 192.168.100.11
3750_2: 192.168.100.22
3750_3: 192.168.100.33
3850_1: 172.16.100.11
3850_2: 172.16.100.22
3850_3: 172.16.100.33
实验目的:
你需要同时修改所有3750和3850的QoS配置,更改它们出队列(output queue)的队列参数集2(queue-set 2)的缓存(buffers)配置,给队列1,2,3,4分别分配15%, 25%, 40%, 20%的缓存 (默认状况下是25%,25%,25%,25%)。
实验步骤:
- 创建lab4.py,这步就略过不表了。
- 首先创建两个名为command_3750.txt和ip_3750.txt的文本文件,分别用来保存我们将要配置3750的QoS命令,以及所有3750交换机的IP地址。
imacs-iMac:book-example imac$ cat command_3750.txt
mls qos queue-set output 1 buffers 15 25 40 20
imacs-iMac:book-example imac$ cat ip_3750.txt
192.168.100.11
192.168.100.22
192.168.100.33
同理,再创建两个名为command_3850.txt和ip_3850.txt的文本文件,分别用来保存我们将要配置3850的QoS命令,以及所有3850交换机的IP地址。
imacs-iMac:book-example imac$ cat command_3850.txt
configure terminal
class-map match-any cos7
match cos 7
class-map match-any cos1
match cos 1
exit
policy-map queue-buffer
class cos7
bandwidth percent 10
queue-buffers ratio 15
class cos1
bandwidth percent 30
queue-buffers ratio 25
exit
exit
interface gi1/0/1
service-policy output queue-buffer
end
wr mem
imacs-iMac:book-example imac$ cat ip_3850.txt
172.16.100.11
172.16.100.22
172.16.100.33
不过这时新的问题又来了,每次配备不同型号的设备,我们必须手动修改open()函数所打开的配置文本文件以及ip地址文件,比如在给3750做配置的时候,我们要open('command_3750.txt')以及open('ip_3750.txt'), 给3850做配置的时候,我们又要open('command_3850.txt')以及open('ip_3850.txt'),这样一来二去修改配置脚本的做法大大缺乏灵活性。
如果说只有两种不同型号,不同命令格式的设备还能应付的话,那么当你的生产环境中有3750(IOS),3850(IOS-XE), Nexus 3k/5k/7k/9k (NX-OS), CRS3/ASR9K (IOS-XR)甚至其他厂商的设备,而你又接到任务要对所有这些设备同时修改某个共有的配置(比如网络新添加了某台TACACS服务器,要统一给所有设备修改AAA配置,亦或者网络新添加了某台NMS系统,要统一给所有设备修改SNMP配置),因为不同OS的配置命令完全不同,这时你就能体会到痛苦了。这时可以用到sys.argv来解决这个问题。
实验4代码:
# -- coding: UTF-8 --
import paramiko
import time
import getpass
import sys

username = raw_input('Username: ')
password = getpass.getpass('password: ')
ip_file = sys.argv[1]
cmd_file = sys.argv[2]

iplist = open(ip_file, 'r')
for line in iplist.readlines():
    ip = line.strip()
    ssh_client = paramiko.SSHClient()
    ssh_client.set_missing_host_key_policy(paramiko.AutoAddPolicy())
    ssh_client.connect(hostname=ip,username=username,password=password)
    print "You have successfully connect to ", ip
    command = ssh_client.invoke_shell()
    cmdlist = open(cmd_file, 'r')
    cmdlist.seek(0)
    for line in cmdlist.readlines():
        command.send(line + "\n")
        time.sleep(2)
    cmdlist.close()
    output = command.recv(65535)
    print output

iplist.close()
ssh_client.close
实验4代码部分讲解:
- 因为要用到sys.argv,所以这里import了sys模块。
- 「argv」是「argument variable」参数变量的简写形式,这个变量返回的是一个列表,argv[0] 一般是被调用的脚本的文件名或全路径,从argv[1]开始就是传入的数据了。举个例子,我们现在返回linux,执行下面这个命令:
imacs-iMac:book-example imac$ python lab4.py ip_3750.txt cmd_3750.txt
这时argv = ['lab4.py', 'ip_3750.txt', 'cmd_3750.txt']
我们代码里的:
ip_file = sys.argv[1],此时也就等同于ip_file = ip_3750.txt
cmd_file = sys.argv[2], 此时也就等同于cmd_file = cmd_3750.txt
同理,如果这时我们在linux执行命令:
imacs-iMac:book-example imac$ python lab4.py ip_3850.txt cmd_3850.txt
那么此时ip_file = ip_3850.txt, cmd_file = cmd_3850.txt
- 由此可见,配合sys.argv,我们可以很灵活地选用我们脚本需要调用的文本文件,而无需反反复复地修改脚本代码。
最后执行代码看效果:
imacs-iMac:book-example imac$ python lab4.py ip_3750.txt cmd_3750.txt
Username: python
password:
You have successfully connect to 192.168.100.11
3750_1#conf t
3750_1(config)#mls qos queue-set output 1 buffers 15 25 40 20
3750_1(config)#end
3750_1#wr mem
Building configuration...
[OK]

You have successfully connect to 192.168.100.22
3750_2#conf t
3750_2(config)#mls qos queue-set output 1 buffers 15 25 40 20
3750_2(config)#end
3750_2#wr mem
Building configuration...
[OK]

You have successfully connect to 192.168.100.33
3750_3#conf t
3750_3(config)#mls qos queue-set output 1 buffers 15 25 40 20
3750_3(config)#end
3750_3#wr mem
Building configuration...
[OK]


imacs-iMac:book-example imac$ python lab4.py ip_3850.txt cmd_3850.txt
Username: python
password:

You have successfully connect to 172.16.100.11
3850_1#configure terminal
Enter configuration commands, one per line.  End with CNTL/Z.
3850_1(config)#class-map match-any cos7
3850_1(config-cmap)#match cos 7
3850_1(config-cmap)#class-map match-any cos1
3850_1(config-cmap)#match cos 1
3850_1(config-cmap)#exit
3850_1(config)#policy-map queue-buffer
3850_1(config-pmap)#class cos7
3850_1(config-pmap-c)#bandwidth percent 10
3850_1(config-pmap-c)#queue-buffers ratio 15
3850_1(config-pmap-c)#class cos1
3850_1(config-pmap-c)#bandwidth percent 30
3850_1(config-pmap-c)#queue-buffers ratio 25
3850_1(config-pmap-c)#exit
3850_1(config-pmap)#exit
3850_1(config)#interface gi1/0/1
3850_1(config-if)#service-policy output queue-buffer
3850_1(config-if)#end
3850_1#wr mem
Building configuration...
Compressed configuration from 62654 bytes to 19670 bytes[OK]

You have successfully connect to 172.16.100.22
3850_2#configure terminal
Enter configuration commands, one per line.  End with CNTL/Z.
3850_2(config)#class-map match-any cos7
3850_2(config-cmap)#match cos 7
3850_2(config-cmap)#class-map match-any cos1
3850_2(config-cmap)#match cos 1
3850_2(config-cmap)#exit
3850_2(config)#policy-map queue-buffer
3850_2(config-pmap)#class cos7
3850_2(config-pmap-c)#bandwidth percent 10
3850_2(config-pmap-c)#queue-buffers ratio 15
3850_2(config-pmap-c)#class cos1
3850_2(config-pmap-c)#bandwidth percent 30
3850_2(config-pmap-c)#queue-buffers ratio 25
3850_2(config-pmap-c)#exit
3850_2(config-pmap)#exit
3850_2(config)#interface gi1/0/1
3850_2(config-if)#service-policy output queue-buffer
3850_2(config-if)#end
3850_2#wr mem
Building configuration...
Compressed configuration from 62654 bytes to 19670 bytes[OK]

You have successfully connect to 172.16.100.33
3850_3#configure terminal
Enter configuration commands, one per line.  End with CNTL/Z.
3850_3(config)#class-map match-any cos7
3850_3(config-cmap)#match cos 7
3850_3(config-cmap)#class-map match-any cos1
3850_3(config-cmap)#match cos 1
3850_3(config-cmap)#exit
3850_3(config)#policy-map queue-buffer
3850_3(config-pmap)#class cos7
3850_3(config-pmap-c)#bandwidth percent 10
3850_3(config-pmap-c)#queue-buffers ratio 15
3850_3(config-pmap-c)#class cos1
3850_3(config-pmap-c)#bandwidth percent 30
3850_3(config-pmap-c)#queue-buffers ratio 25
3850_3(config-pmap-c)#exit
3850_3(config-pmap)#exit
3850_3(config)#interface gi1/0/1
3850_3(config-if)#service-policy output queue-buffer
3850_3(config-if)#end
3850_3#wr mem
Building configuration...
Compressed configuration from 62654 bytes to 19670 bytes[OK]
实验5:
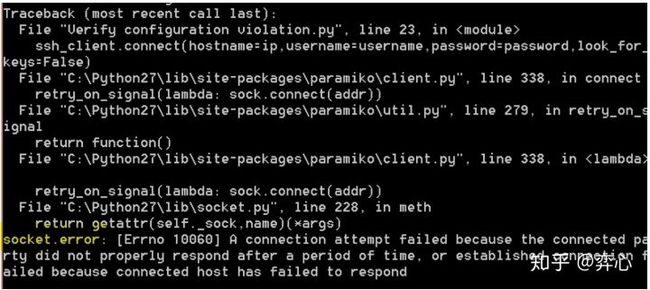
在网络设备数量超过千台甚至上万台的大型企业网中,难免会遇到某些设备管理IP不通,SSH连接失败的情况,设备数量越多,这种情况发生的几率越大。这个时候如果你想用Python批量配置所有的设备,就一定要注意这种情况,很有可能你的脚本跑了还不到一半就因为中间某一个连接不通的设备而停止了。比如说你有3000台交换机需要统一更改本地用户名和密码,前500台交换机的连通性都没问题,第501台交换机因为某个网络问题导致管理IP不可达,SSH连不上了,这个时候Python会返回一个socket.error: [Errno 10060] A connection
attempt failed because the connected party did not properly respond after a
period of time, or established connection failed because connected host has
failed to respond 的错误(如下图),然后你的脚本就此停住了!脚本不会再对剩下的2500台交换机做配置,“挂机"失败!
Socket.error报错
同样的问题也会发生在当你输入了错误的交换机用户名和密码之后,或者某些交换机和其他大部分交换机用户名和密码不一致的时候(因为我们只能输入一次用户名和密码,用户名/密码不一致会导致个别交换机无法登陆的情况发生),也许你会问大型企业网不都是统一配置AAA配合TACACS或者RADIUS做用户访问管理吗,怎么还会出现登陆账号和密码不一样的问题?这个现象就发生在笔者目前所任职的沙特阿卜杜拉国王科技大学,学校里的TACACS服务器(思科ACS)已经服役9年,现在的问题是每天早晨该ACS会“失效”,必须手动重启ACS所在的服务器才能解决问题,在ACS无法正常工作期间,我们只能通过网络设备的本地账号和密码登录,鉴于此,我们已经部署了思科的ISE来替代ACS做TACACS服务器, 但由于学校网络过于庞大,迁徙过程漫长,这就导致了部分设备已经迁徙,使用上了ISE上配置的账号和密码,而另一部分还没有迁徙的设备在ACS出问题的时候只能用本地的账号和密码,这就出现了两套账号和密码的情况,后果就是使用paramiko来SSH登陆网络设备的python会返回paramiko.ssh_exception.AuthenticationException:
Authentication failed这个错误(如下图),导致你的脚本戛然而止,无法继续运行。
用户名/密码不匹配造成Authentication failed报错
要解决上述两个问题也很简单,这里我们可以用到Python中的try, except异常处理语句,来让你的脚本在遇到上述出现设备连通性故障以及用户认证无法通过的情况时,继续给后面的设备做配置,而不会因为某个故障的设备而停下来。
实验背景:
用回Lab1 - 3里用到的网络拓扑,将交换机S3 (192.168.2.13)的密码从123改为456, 将S4(192.168.2.14)的e0/0端口断掉。
实验目的:
创建一个带有try,except异常处理语句的python脚本来批量在交换机S1-S5上执行show clock命令,让python脚本在S3,S4分别因为用户名密码不匹配,以及连通性出现故障的情况下,依然可以不受干扰,接着配置S5。
实验步骤:
1. 首先将S3的密码从123改为456
2. 再将S4的端口e0/0断掉
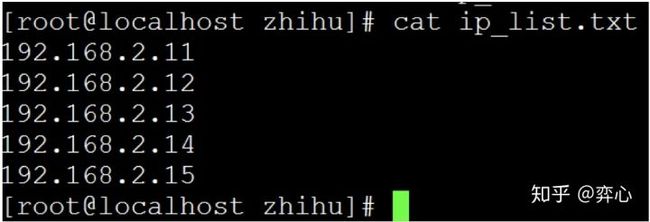
3. 在运行python的客户端上创建一个名为ip_list.txt的文本文件,内含S1-S5的IP
4. 在运行python的客户端上继续创建一个名为cmd.txt的文本文件,写入我们要在S1-S5上执行的命令:show clock
5. 创建一个lab5.py脚本, 然后放入下面代码
实验5代码:
import paramiko
import time
import getpass
import sys
import socket

username = raw_input('Username: ')
password = getpass.getpass('password: ')
ip_file = sys.argv[1]
cmd_file = sys.argv[2]

switch_with_authentication_issue = []
switch_not_reachable = []

iplist = open(ip_file, 'r')
for line in iplist.readlines():
    try:
        ip = line.strip()
        ssh_client = paramiko.SSHClient()
        ssh_client.set_missing_host_key_policy(paramiko.AutoAddPolicy())
        ssh_client.connect(hostname=ip,username=username,password=password,look_for_keys=False)
        print "You have successfully connect to ", ip
        command = ssh_client.invoke_shell()
        cmdlist = open(cmd_file, 'r')
        cmdlist.seek(0)
        for line in cmdlist.readlines():
            command.send(line + "\n")
        time.sleep(2)
        cmdlist.close()
        output = command.recv(65535)
        print output
    except paramiko.ssh_exception.AuthenticationException:
        print "User authentication failed for " + ip + "."
        switch_with_authentication_issue.append(ip)
    except socket.error:
        print ip +  " is not reachable."
        switch_not_reachable.append(ip)

iplist.close()
ssh_client.close

print '\nUser authentication failed for below switches: '
for i in switch_with_authentication_issue:
    print i

print '\nBelow switches are not reachable: '
for i in switch_not_reachable:
    print i
实验5代码部分讲解:
- 为了使用try-except来应对网络设备不可达引起的socket.error,这里我们必须import socket。
- 创建两个空列表,取名为switch_with_authentication_issue和switch_not_reachable, 分别在脚本最后配合for循环来统计有哪些设备是因为认证问题无法登录,有哪些是因为设备本身不可达而无法登录。
- 在for循环下使用try-except, 用excpet paramiko.ssh_exception.AuthenticationException:来应对用户名/密码不匹配时返回的错误代码,将出现该错误的交换机的管理IP地址用.append(ip)方法放入switch_with_authentication_issue这个列表中,同理用except socket.error:来应对交换机不可达时返回的错误代码,将出现该错误的交换机的管理IP地址用append(ip)方法放入switch_not_reachable这个列表中。
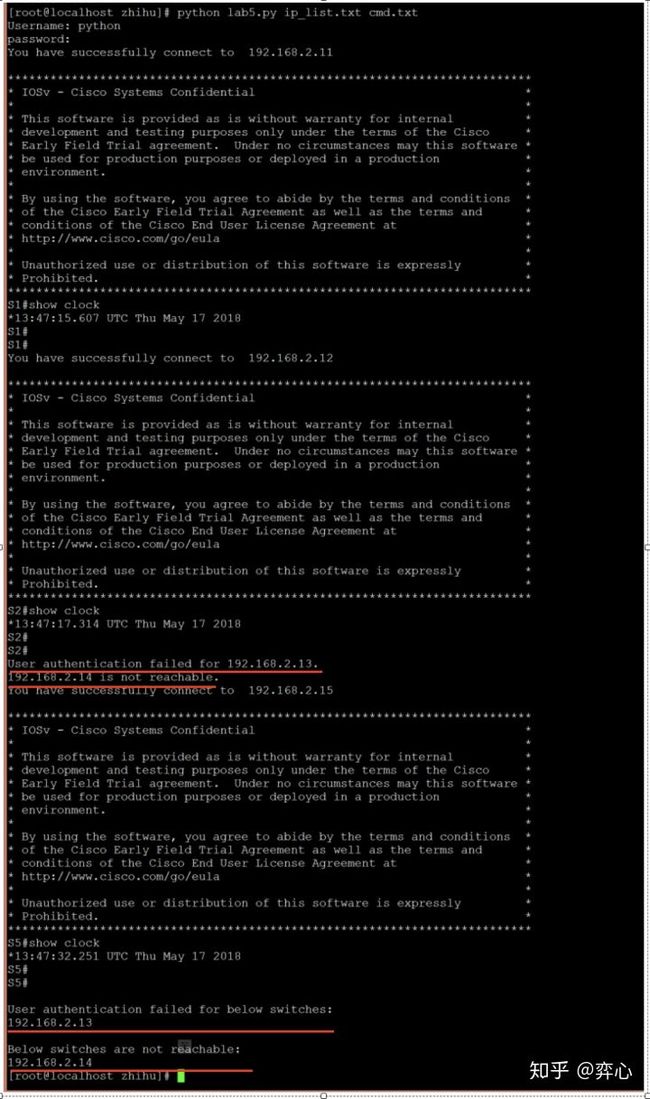
最后执行代码看效果:
注意重点部分已经用红线标注:
- 本应出现的paramiko.ssh_exception.AuthenticationException错误已经被User authentication failed for 192.168.2.13取代,并且python脚本并未就此停止运行,而是继续尝试登录下一个交换机S4,也就是192.168.2.14。
- 本应出现的paramiko.ssh_exception.AuthenticationException:Authentication failed错误已经被192.168.2.14 is not reachable取代。并且python脚本并未就此停止运行,而是继续尝试登录下一个交换机S5,也就是192.168.2.15。
- 在脚本的最后标注出了有哪些交换机出现了用户认证失败的情况,有哪些交换机出现了不可达的情况。
