Centos7.4安装部署LNMP环境+zabbix3.4.2
Centos7.4安装部署LNMP环境+zabbix3.4.2
一、部署流程
1.安装nginx
2.安装mysql
3.安装php-fpm
4.测试LNMP黄精
5.zabbix-server安装
6.zabbix-agentd安装
二、安装nginx
[root@i-bofspu7g ~]# groupadd nginx
[root@i-bofspu7g ~]# useradd -r -g nginx  nginx
[root@i-bofspu7g ~]# id nginx
uid=498(nginx) gid=500(nginx) groups=500(nginx)

[root@i-bofspu7g ~]# wget http://nginx.org/download/nginx-1.10.2.tar.gz
[root@i-bofspu7g ~]# tar axf nginx-1.10.2.tar.gz  -C /usr/local/

[root@i-bofspu7g ~]# yum groupinstall "Development tools" -y
[root@i-bofspu7g ~]# yum -y install gcc wget gcc-c++ automake autoconf libtool libxml2-devel libxslt-devel perl-devel perl-ExtUtils-Embed pcre-devel openssl-devel

[root@host-10-101-16-202 nginx-1.10.2]# ./configure --prefix=/usr/local/nginx --sbin-path=/usr/sbin/nginx --conf-path=/etc/nginx/nginx.conf --error-log-path=/var/log/nginx/error.log --http-log-path=/var/log/nginx/access.log --pid-path=/var/run/nginx.pid --lock-path=/var/run/nginx.lock --http-client-body-temp-path=/var/tmp/nginx/client --http-proxy-temp-path=/var/tmp/nginx/proxy --http-fastcgi-temp-path=/var/tmp/nginx/fcgi --http-uwsgi-temp-path=/var/tmp/nginx/uwsgi --http-scgi-temp-path=/var/tmp/nginx/scgi --user=nginx --group=nginx --with-pcre --with-http_v2_module --with-http_ssl_module --with-http_realip_module --with-http_addition_module --with-http_sub_module --with-http_dav_module --with-http_flv_module --with-http_mp4_module --with-http_gunzip_module --with-http_gzip_static_module --with-http_random_index_module --with-http_secure_link_module --with-http_stub_status_module --with-http_auth_request_module --with-mail --with-mail_ssl_module --with-file-aio --with-ipv6 --with-http_v2_module --with-threads --with-stream --with-stream_ssl_module

[root@i-bofspu7g nginx-1.10.2]# mkdir -pv /var/tmp/nginx/client
[root@i-bofspu7g nginx-1.10.2]# make && make install
[root@i-bofspu7g nginx-1.10.2]# chmod +x /etc/init.d/nginx
nginx启动脚本
[root@i-bofspu7g nginx-1.10.2]#vim /etc/init.d/nginx
#!/bin/sh
#
# nginx - this script starts and stops the nginx daemon
#
# chkconfig:   - 85 15
# description: Nginx is an HTTP(S) server, HTTP(S) reverse \
#               proxy and IMAP/POP3 proxy server
# processname: nginx
# config:      /etc/nginx/nginx.conf
# config:      /etc/sysconfig/nginx
# pidfile:     /var/run/nginx.pid
# Source function library.
. /etc/rc.d/init.d/functions
# Source networking configuration.
. /etc/sysconfig/network
# Check that networking is up.
[ "$NETWORKING" = "no" ] && exit 0
nginx="/usr/sbin/nginx"
prog=$(basename $nginx)
NGINX_CONF_FILE="/etc/nginx/nginx.conf"
[ -f /etc/sysconfig/nginx ] && . /etc/sysconfig/nginx
lockfile=/var/lock/subsys/nginx
start() {
    [ -x $nginx ] || exit 5
    [ -f $NGINX_CONF_FILE ] || exit 6
    echo -n $"Starting $prog: "
    daemon $nginx -c $NGINX_CONF_FILE
    retval=$?
    echo
    [ $retval -eq 0 ] && touch $lockfile
    return $retval
}
stop() {
    echo -n $"Stopping $prog: "
    killproc $prog -QUIT
    retval=$?
    echo
    [ $retval -eq 0 ] && rm -f $lockfile
    return $retval
killall -9 nginx
}
restart() {
    configtest || return $?
    stop
    sleep 1
    start
}
reload() {
    configtest || return $?
    echo -n $"Reloading $prog: "
    killproc $nginx -HUP
RETVAL=$?
    echo
}
force_reload() {
    restart
}
configtest() {
$nginx -t -c $NGINX_CONF_FILE
}
rh_status() {
    status $prog
}
rh_status_q() {
    rh_status >/dev/null 2>&1
}
case "$1" in
    start)
        rh_status_q && exit 0
    $1
        ;;
    stop)
        rh_status_q || exit 0
        $1
        ;;
    restart|configtest)
        $1
        ;;
    reload)
        rh_status_q || exit 7
        $1
        ;;
    force-reload)
        force_reload
        ;;
    status)
        rh_status
        ;;
    condrestart|try-restart)
        rh_status_q || exit 0
            ;;
    *)
      echo $"Usage: $0 {start|stop|status|restart|condrestart|try-restart|reload|force-reload|configtest}"
        exit 2
esac
三、安装mysql
由于阿里云上的服务器的yum默认是mariadb,本人bu习惯,也不喜欢,所以卸载了mariadb,重新下载mysql的yum.....

卸载操作,可以自己百度!当然你也可以直接安装mariadb :yum -y install mariadb mariadb-server mariadb-devel

[root@host-10-101-16-202 ~]# yum install mysql mysql-server mysql-devel -y

[root@host-10-101-16-202 ~]# mysql
Welcome to the MySQL monitor.  Commands end with ; or \g.
Your MySQL connection id is 148
Server version: 5.1.73 Source distribution

Copyright (c) 2000, 2013, Oracle and/or its affiliates. All rights reserved.

Oracle is a registered trademark of Oracle Corporation and/or its
affiliates. Other names may be trademarks of their respective
owners.

Type 'help;' or '\h' for help. Type '\c' to clear the current input statement.

mysql>

创建zabbix数据库
mysql> create database zabbix default charset utf8;
Query OK, 1 row affected (0.00 sec)

mysql> grant all privileges on zabbix.* to 'zabbix'@10.10.16.20 identified by 'zabbix';
Query OK, 0 rows affected (0.00 sec)

mysql> select user,host from mysql.user;
+--------+---------------+
| user   | host          |
+--------+---------------+
| root   | 127.0.0.1     |
| zabbix | 10.10.16.20 |
| root   | ::1           |
|        | localhost     |
| root   | localhost     |
| root   | salt-master   |
+--------+---------------+
6 rows in set (0.00 sec)

mysql> flush privileges;
Query OK, 0 rows affected (0.00 sec)


导入zabbix表结构
方法一:
[root@salt-master opt]# mysql -u root -p zabbix < /root/zabbix-3.4.2/database/mysql/schema.sql
Enter password:zhangjunchao

[root@salt-master opt]# mysql -u root -p zabbix < /root/zabbix-3.4.2/database/mysql/images.sql
Enter password: zhangjunchao

[root@salt-master opt]# mysql -u root -p zabbix < /root/zabbix-3.4.2/database/mysql/data.sql
Enter password: zhangjunchao

方法二:yum安装zabbix导入zabbix表结构
zcat /usr/share/doc/zabbix-server-mysql-3.4.0/create.sql.gz | mysql -uzabbix -pzabbix zabbix
四、安装php-fpm
安装依赖包
[root@salt-master ~]# yum install libmcrypt libmcrypt-devel mhash mhash-devel libxml2 libxml2-devel bzip2 bzip2-devel  ncurses ncurses-devel curl curl-devel libjpeg libjpeg-devel libpng libpng-devel freetype freetype-devel zlib zlib-devel glibc glibc-devel glib2 glib2-devel bzip2 bzip2-devel krb5 krb5-devel libidn libidn-devel e2fsprogs e2fsprogs-deve libidn libidn-devel openssl openssl-devel openldap openldap-devel nss_ldap openldap-clients openldap-servers net-snmp net-snmp-devel libevent-devel libjpeg-devel  libmcrypt-devel

yum安装php-fpm
yum install -y php php-devel php-fpm php-mysql php-common php-devel php-gd libjpeg* php-imap php-ldap php-odbc php-pear php-xml php-xmlrpc php-mbstring php-mcrypt php-bcmath php-mhash libmcrypt libmcrypt-devel

编译安装
[root@host-10-10-16-20 etc]# ./configure --prefix=/usr/local/php --with-config-file-scan-dir=/etc/php.d --with-config-file-path=/etc  --with-mysqli=/usr/bin/mysql_config --enable-mbstring --with-freetype-dir --with-jpeg-dir --with-png-dir --with-zlib --with-libxml-dir=/usr --with-openssl -enable-xml --enable-sockets --enable-fpm --with-mcrypt --with-bz2 --with-curl --enable-bcmath --with-gettext --with-pcre-regex --enable-xml --enable-fpm --with-imap-ssl --with-mhash --with-xmlrpc --with-gd
[root@host-10-10-16-20 php-5.5.38]# make && make install

配置php-fpm
[root@host-10-101-16-202 ~]# cp /root/php-5.5.38/php.ini-production  /etc/php.ini
[root@host-10-101-16-202 ~]# cp /usr/local/php/etc/php-fpm.conf.default  /usr/local/php/etc/php-fpm.conf
[root@nfs1 opt]# vim /etc/php.ini
[root@nfs1 opt]# sed -i 's/upload_max_filesize = 2M/upload_max_filesize = 50M/g' /etc/php.ini
[root@nfs1 opt]# sed -i 's/;date.timezone =/date.timezone =PRC/' /etc/php.ini
[root@nfs1 opt]# sed -i 's/max_execution_time = 30/max_execution_time = 600/g' /etc/php.ini
[root@nfs1 opt]# sed -i 's/max_input_time = 60/max_input_time = 600/g' /etc/php.ini
[root@nfs1 opt]# sed -i 's/memory_limit = 128M/memory_limit = 256M/g' /etc/php.ini
[root@nfs1 opt]# sed -i 's/post_max_size = 8M/post_max_size = 16M/g' /etc/php.ini

启动php-fpm
[root@host-10-101-16-202 ~]# cp /root/php-5.5.38/sapi/fpm/init.d.php-fpm /etc/init.d/php-fpm
[root@host-10-101-16-202 ~]# chmod +x /etc/init.d/php-fpm
[root@host-10-101-16-202 ~]# service php-fpm start

添加nginx对fastcgi的支持
[root@host-10-101-16-202 ~]# vi /etc/nginx/nginx.conf
        location ~ \.php$ {
        root           /usr/local/nginx/html;
        fastcgi_pass   127.0.0.1:9000;
        fastcgi_index  index.php;
        fastcgi_param  SCRIPT_FILENAME  /usr/local/nginx/html/$fastcgi_script_name;
        include        fastcgi_params;
    }

[root@host-10-10-16-20 ~]# nginx  -s reload
在/usr/local/nginx/html/新建index.php的测试页面,内容如下:
五、安装zabbix-server
[root@nfs1 zabbix-3.2.4]# groupadd zabbix
[root@nfs1 zabbix-3.2.4]# useradd -g zabbix zabbix -s /sbin/nologin

[root@host-10-101-16-202 zabbix-3.4.2]# ./configure --prefix=/usr/local/zabbix --enable-server --enable-agent --enable-proxy --with-mysql=/usr/lib64/mysql/mysql_config --with-net-snmp --with-libcurl --with-libxml2

[root@host-10-10-16-20 zabbix-3.4.2]# make && make install
[root@host-10-10-16-20 ~]# chown zabbix:zabbix /usr/local/zabbix/ -R

[root@host-10-10-16-20 zabbix-3.4.2]# egrep -Ev "^#|^$" /usr/local/zabbix/etc/zabbix_server.conf
ListenPort=10051
LogFile=/tmp/zabbix_server.log
DBHost=10.101.16.202
DBName=zabbix
DBUser=zabbix
DBPassword=zabbix
DBSocket=/var/lib/mysql/mysql.sock   #实际的mysql.sock地址
Timeout=4
AlertScriptsPath=/usr/local/zabbix/share/zabbix/alertscripts   #zabbix存放外部告警脚本目录
LogSlowQueries=3000

配置zabbix的web界面
[root@nfs1 zabbix-3.2.4]# cp -rp  /root/zabbix-3.2.4/frontends/php/*  /usr/local/nginx/html/
[root@nfs1 zabbix-3.2.4]# ls /usr/local/nginx/html/

[root@host-10-101-16-202 html]# vi /usr/local/nginx/html/conf/zabbix.conf.php
[root@host-10-101-16-202 html]# cat  /usr/local/nginx/html/conf/zabbix.conf.php
六、安装zabbix-agentd
1、准备安装:[root@nfs2 zabbix-3.2.4]# yum install gcc* pcre* -y

2、创建zabbix用户和组
[root@www zabbix]# # groupadd zabbix
[root@www zabbix]# # useradd -g zabbix zabbix -s /sbin/nologin

3、解压zabbix源码包并编译安装
[root@www zabbix]# tar axf zabbix-3.2.4.tar.gz
[root@www zabbix]# cd zabbix-3.2.4
[root@www zabbix-3.2.4]# ./configure --prefix=/usr/local/zabbix --enable-agent
[root@www zabbix-3.2.4]# make &&  make install

4、拷贝zabbix客户端启动脚本到/etc/init.d目录下
[root@KMVS-CENTOS tru64]# cp /opt/zabbix-3.2.4/misc/init.d/tru64/zabbix_agentd  /etc/init.d/zabbix_agentd
[root@KMVS-CENTOS tru64]# chmod +x /etc/init.d/zabbix_agentd

5、修改zabbix_agentd启动脚本,将DAEMON启动命令路径修改为安装时指定的路径

方法一:
[root@KMVS-CENTOS tru64]# vim /etc/init.d/zabbix_agentd
DAEMON=/usr/local/sbin/zabbix_agentd                 #修改前脚本启动服务的路径
DAEMON=/usr/local/zabbix/sbin/zabbix_agentd          #修改后脚本启动服务的路径

方法二:
[root@KMVS-CENTOS tru64]# ln -s /usr/local/zabbix/sbin/* /usr/local/sbin/
[root@KMVS-CENTOS tru64]# ln -s /usr/local/zabbix/bin/* /usr/local/bin/

6、zabbix_agentd配置
LogFile=/tmp/zabbix_agentd.log
Server=10.10.16.12(服务端的IP地址)
Hostname=host-47-106-141-17(agentd端的主机名)
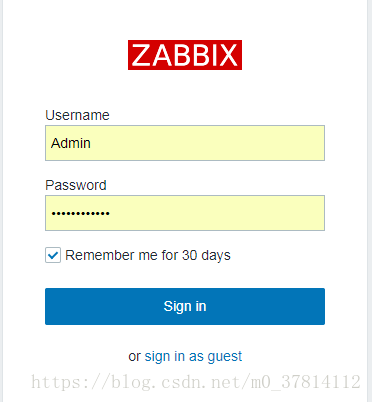
七、测试登录zabbix
