微信小程序云开发-树洞小程序Treehole(评论帖子/发布话题实现)
这一节介绍的是评论帖子,还有发布话题功能的实现。
首先说说评论帖子的功能。
先看一下效果图:
从上一节可知,进行评论跳转的时候需要带来一些关于帖子的数据。
这一个页面对于布局来说,也是十分的重要。评论栏固定在底部, 评论之后实时刷新,删除自己的评论等。
首先是布局的wxml
{{PostUserData[0].Username}}
{{PageData.Time}}
{{PageData.Context}}
{{item.name}}
{{item.PageTime}}
{{item.context}}
下面是实现功能的js代码,定义所需要用到的变量data。
var time = require('../../utils/util.js')
var app = getApp();
const db = wx.cloud.database();
Page({
  /**
   * 页面的初始数据
   */
  data: {
    discussShow: false,
    inputMessage: '',
    SendTime: '',
    Time: '',
    HeadImageUrl: '',
    UserName: '',
    PageId: '',
    UpPageId: '',
    RemoveId: '',
    PostUserId: '',
    ReplyOpenId: '',
    PageData: [],
    dataArray: [],
    PostUserData: [],
  },
进入页面时候,首先要获取是否已经别人评论的信息。
像这个效果图中,在之前已经有其他人进行评论,现在就要把其内容显示出来。
onLoad: function (options) {
    var that = this;
    wx.getStorage({
      key: 'key',
      success(res) {
        that.setData({
          PageId: res.data.post_id,
          PostUserId: res.data.postopenid
        })

        //根据贴子ID来查找贴子的内容
        db.collection('Assistant_DataSheet').doc(that.data.PageId).get({
          success: function (res) {
            that.setData({
              PageData: res.data
            })
           // console.log("我是第一个", that.data.PageData.Photo_arr)
          }
        })

       // console.log("我是pageid", that.data.PageId)
        //根据贴子的ID获取贴子下面的回复内容
        db.collection('My_ReplyData').where({
          PageId: that.data.PageId
        }).get({
          success: function (res) {
            that.setData({
              dataArray: res.data,
              RemoveId: res.data._id
            })
            //console.log("我是记录ID",RemoveId)
           // console.log("我是第三个")
          }
        })

        //根据发帖人的openid查找他的头像和用户名
        db.collection('Assistant_User').where({
          _openid: that.data.PostUserId
        }).get({
          success: function (res) {
            that.setData({
              PostUserData: res.data
            })
            //console.log("我是第二个", that.data.PostUserData)
          }
        })

        //获取自己的头像和用户名,使其可以在评论栏显示。
        db.collection('Assistant_User').where({
          _openid: app.globalData.openid
        }).get({
          success: function (res) {
            that.setData({
              HeadImageUrl: res.data[0].User_head_url,
              UserName: res.data[0].Username,
              ReplyOpenId: res.data[0]._openid
            })
           // console.log("我是用户的头像和姓名:", that.data.HeadImageUrl)
          }
        })
      }
    })
  },
下面的评论栏其实是一个窗口,在我们需要写评论给的时候点击会弹出键盘。
填写完成之后,进行提交,把数据添加到数据库当中。
formSubmit: function (e) {
    var that = this;
    wx.showToast({
      title: '评论成功',
      icon: 'none'
    })
    //console.log(e.detail.value)
    this.setData({
      discussShow: true,
      inputMessage: e.detail.value.userName,
      SendTime: Date.now(),
      Time: time.formatTime(new Date)
    })

    wx.cloud.callFunction({
      name: 'reply',
      data: {
        Page_id: that.data.PageId
      },
      success: function (res) {
       // console.log(res.result)
      }
    })

    db.collection('My_ReplyData').add({
      data: {
        context: that.data.inputMessage,
        image: that.data.HeadImageUrl,
        time: that.data.SendTime,
        name: that.data.UserName,
        PageId: that.data.PageId,
        PostUserId: that.data.PostUserId,
        PageTime: that.data.Time
      }, success: function (res) {
        that.setData({
          inputMessage: ''
        })
        //刷新页面数据
        db.collection('My_ReplyData').where({
          PageId: that.data.PageId
        }).get({
          success: function (res) {
            that.setData({
              dataArray: res.data
            })
          }
        })
      }
    })
  },
删除评论跟删除帖子是一个道理,判断评论保存的openid跟当前用户的openid是否相同,即可删除本人的评论。
  Remove_Post: function (e) {
    let that = this
    wx.showModal({
      title: '提示',
      content: '请问是否删除本条评论?',
      success: function (res) {
        if (res.confirm) {
         // console.log(e.currentTarget.dataset.post_id)//事件的id
          wx.cloud.callFunction({
            name: 'Remove_Reply',
            data: {
              Page_id: e.currentTarget.dataset.post_id,
            },
            success: function (res) {
            //  console.log("删除成功!")
              //刷新页面数据
              db.collection('My_ReplyData').where({
                PageId: that.data.PageId
              }).get({
                success: function (res) {
                  that.setData({
                    dataArray: res.data
                  })
                }
              })
            }
          })

          wx.cloud.callFunction({
            name: 'Remove_Reply_DataSheet',
            data: {
              Page_id: that.data.PageId,
            },
            sucesss: function (res) {
             // console.log("我也删除成功!")
            }
          })
        }
      }
    })


  },
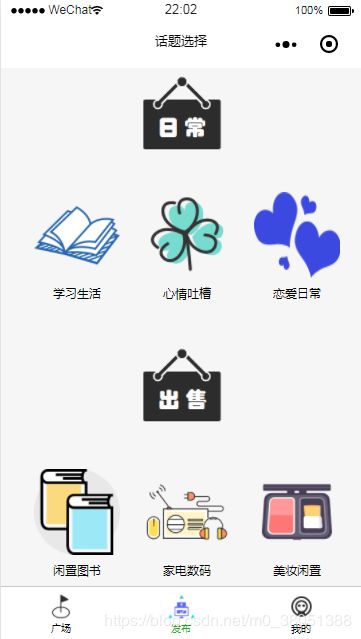
接下来是发布帖子的介绍,跳转到发布帖子的页面主要是通过下面的tabBar,进入的页面是这样的。
布局的wxml文件:
        学习生活


        心情吐槽


        恋爱日常


        闲置图书


        家电数码


        美妆闲置
在这个页面中我们要获取标签信息。
// miniprogram/pages/Choose_Type/Choose_Type.js
Page({

  data: {

  },

  onLoad: function (options) {

  },
  Touch:function(e){
    //console.log(parseInt(e.currentTarget.dataset.touch_id))//点击的对应的事件

    //1-学习生活 2心情 3恋爱 交易 4图书 5家电数码 6美妆闲置
    let Temp_Type;
    let item = parseInt(e.currentTarget.dataset.touch_id);
    switch (item){
      case 1:Temp_Type = "学习生活";break;
      case 2: Temp_Type = "心情吐槽";break;
      case 3: Temp_Type = "恋爱日常";break;
      case 4: Temp_Type = "闲置图书";break;
      case 5: Temp_Type = "家电数码";break;
      case 6: Temp_Type = "美妆闲置";break;
    }
    wx.setStorage({
      key: 'PostType',
      data: Temp_Type,
    })
    if(item>=1 && item<=3){
      wx.navigateTo({
        url: '../Creat_Topic/Creat_Topic',
      })
    }
    else{
      wx.navigateTo({
        url: '../Creat_Sell_post/Creat_Sell_post',
      })
    }

  },

})
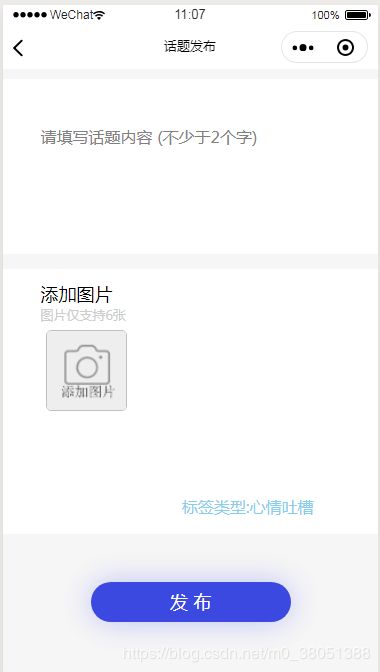
选择之后,标签信息携带过去,因为是分为两个不同的栏目,所以对应的页面也是不相同。
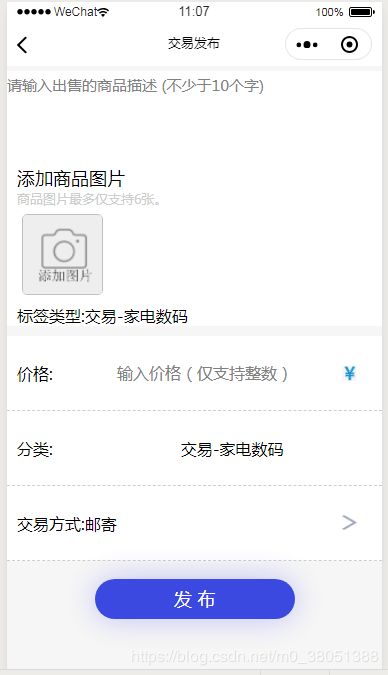
下面的话我们直接讲解发布交易帖子的功能,因为发布交易的帖子功能其实也包含了普通帖子的功能。
掌握其中一个另外一个原理也相同。
惯例还是布局的wxml
添加商品图片
商品图片最多仅支持6张。
标签类型:交易-{{PostType}}
价格:
分类: 交易-{{PostType}}
交易方式:{{SellTypearr[SellTypeindex]}}
接下来的是一些定义还有一些比较简单的功能函数。
这里的SellTypearr是作为picker的选项。picker下拉滚动选择器控件就有滑动轮选的那种效果。
data: {
    SellTypeindex: 0,
    number: 1,
    SellTypearr: ["邮寄","当面交易","自提"],
    PostType: '',
    avatarUrl: '../../images/user-unlogin.png',
    user_openid: app.globalData.openid,
    telValue: "",
    UserInfo: '',
    Price : 0
  },
  getInput: function (e) {
    this.setData({
      telValue: e.detail.value
    })
  },
  getPriceinput:function(e){
    this.setData({
      Price: e.detail.value
    })
  },
  bindPickerChange: function (e) {
    this.setData({
      SellTypeindex: e.detail.value
    })
  },
  clickimage: function (e) {
    var index = e.target.dataset.index
    //var current = e.target.dataset.src;
    wx.previewImage({
      //current: current, // 当前显示图片的http链接
      urls: [this.data.Filepath[index]], // 需要预览的图片http链接列表
    })
  },
添加图片和删除图片(没有点击发布之前是没有上传的。)
addImage: function (e) {
    var that = this
    wx.chooseImage({
      count: 6,
      sizeType: ['compressed'],
      sourceType: ['album', 'camera'],
      success: function (res) {

        that.setData({
          Filepath: res.tempFilePaths,
          number: res.tempFilePaths.length + 1
        })
      }
    })
  },
  deleteImage: function (e) {
    var that = this
    var index = e.target.dataset.index
    var tempFilePaths = that.data.Filepath
    wx.showModal({
      title: '提示',
      content: '确定要删除此图片吗?',
      success: function (res) {
        if (res.confirm) {
          console.log('点击确定了');
          tempFilePaths.splice(index, 1);
        } else if (res.cancel) {
          console.log('点击取消了');
          return false;
        }
        that.setData({
          Filepath: tempFilePaths,
          number: that.data.number - 1
        });
        console.log(that.data.Filepath);
      }
    })

  },
发布功能的一切就在这个upload函数当中。
判断字数是否足够,把图片还有内容信息添加到数据库中,完成后进行跳转。
upload: function () {

    var that = this

    let price = parseInt(this.data.Price);
    let SellTypeindex = this.data.SellTypeindex;
    if (that.data.telValue.length > 10 && price != 0 && that.data.number>1) {
      wx.showLoading({
        title: '上传中...',
      })
      Promise.all(that.data.Filepath.map((value) => {
        return wx.cloud.uploadFile({
          cloudPath: Date.now() + parseInt(Math.random() * 100) + value.match(/\.[^.]+?$/)[0],
          filePath: value,
        })
      })).then(res => {
        return res.map((res) => {
          return res.fileID
        });
      }).then(res => {

        console.log(app.globalData.openid)
        const _id = app.globalData.openid
        const db = wx.cloud.database({ env: 'textllinpro-5br77' })
        return db.collection('Assistant_Sell_DataSheet').add({ //添加帖子
          data: {
            Context: that.data.telValue,
            Photo_arr: res,
            Intention: [],
            Price: price,
            Intention_Record_num: 0,
            Deal_Type: that.data.SellTypearr[SellTypeindex],
            Time: util.formatTime(new Date()),
            Type: that.data.PostType,
          }
        }).then(res => {
          wx.hideLoading();
          wx.showToast({
            title: '成功',
            icon: 'success',
            duration: 1000,
            success: function () {
              console.log(res)
              wx.switchTab({
                url: '../Main_page/Main_page',
              })
            }
          })
        }).catch((ex) => {
          console.log(ex);
        })
      })

    }
    else {
      wx.showToast({
        title: '请检查输入的数据是否有误!',
        duration: 1000,
        mask: true,
        icon: 'none',
      })
    }

  },
不要忘了进来的时候获取标签。
 onLoad: function (options) {

    var that = this
    wx.getStorage({
      key: 'PostType',
      success(res) {
        that.setData({
          PostType: res.data
        })
      }
    })
    wx.getStorage({
      key: 'Userinfo',
      success(res) {
        that.setData({
          UserInfo: res
        })
      }
    })
  }
这一节完。
下一节就介绍个人页面中的所有功能。
谢谢大家。


