SSM(Spring+SpringMVC+Mybatis)登录实例
1.创建Web Project项目
2.加载jar包
Mybatis和spring整合包:mybatis-spring-1.2.2.jar;
Mybatis核心和Mybatis依赖包;
Spring的jar(包括springmvc的jar包);
数据库驱动包;
第三方数据库连接池;
点击下面链接可下载当前所需所有jar包:
点击打开链接
3.创建所需配置文件
创建Spring配置文件:
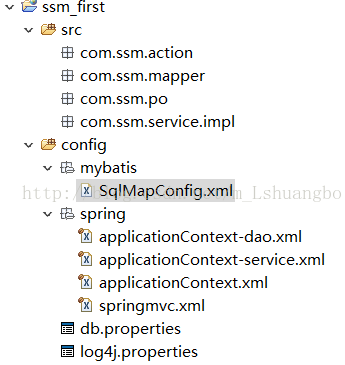
spring/applicationContext.xml:Spring配置文件(配置公用内容:数据源、事务);spring/applicationContext-dao.xml:spring和mybatis整合的配置(SqlSessionFactory、mapper配置),配置与持久层相关接口的加载;spring/applicationContext-service.xml:配置业务接口;
spring/springmvc.xml:springmvc的全局配置文件,整合过程中我们需要在这里配置组件扫描action,处理器映射器、处理器适配器和视图解析器。创建Mybatis配置文件:mybatis/SqlMapConfig.xml:mybatis全局配置文件。配置文件:
log4j.properties:日志配置文件;db.properties:数据库连接配置文件。此项目目录如下:
4.properties配置文件源代码
log4j.properties配置文件基本不需要做任何修改。
db.properties里配置的是连接数据库所需的值,在这里统一管理。# Global logging configuration log4j.rootLogger=DEBUG, stdout # Console output... log4j.appender.stdout=org.apache.log4j.ConsoleAppender log4j.appender.stdout.layout=org.apache.log4j.PatternLayout log4j.appender.stdout.layout.ConversionPattern=%5p [%t] - %m%n
jdbc.driver=com.mysql.jdbc.Driver
jdbc.url=jdbc:mysql://localhost:3306/databasename
jdbc.username=databaseusername
jdbc.password=databasepassword
jdbc.maxActive=3
jdbc.maxIdle=1
5.准备环境
在application.xml中配置数据源。
	mybatis1218_ssm


		contextConfigLocation
		/WEB-INF/classes/spring/applicationContext.xml,/WEB-INF/classes/spring/applicationContext-*.xml


		org.springframework.web.context.ContextLoaderListener


		CharacterEncodingFilter
		org.springframework.web.filter.CharacterEncodingFilter

			encoding
			utf-8


		CharacterEncodingFilter
		/*


		index.html
		index.htm
		index.jsp
		default.html
		default.htm
		default.jsp
6.整合持久层
将Mybatis和Spring整合,目标是将生成的mapper交由spring管理,sqlSessionFactory交由spring来创建。
有两种方法,一种是原始DAO方法,创建dao接口和dao实现类,在applicationContext.xml中为dao创建相应bean;第二种是使用动态代理的方法,并且使用mapper批量扫描器扫描mapper接口。此项目使用第二种方法。
先从Mybatis逆向工程开始。Mybatis是ORM框架(对象关系映射),及表与对象之间的映射,与Hibernate相同,但Mybatis是一个不完全ORM框架,因为它需要程序员去编写SQL语句,自动去完成向SQL中映射输入参数,SQL查询结果映射成java对象。逆向工程可以使用插件的方式,也可以使用JAVA程序的方式,这里使用后者,程序里的内容也是基本固定的,我们只需要根据需要修改里边的XML文件即可,执行逆向工程生成所需po类、mapper接口和mapper.xml文件,后两者要放在同一个包内。逆向工程程序可从下面下载。
点击打开链接
下面是我的逆向工程中修改后的generatorConfig.xml文件,主要修改数据库连接信息、mapper接口与mapper.xml映射文件生成位置、所需生成表与表生成位置。
在applicationContext-dao.xml中配置mapper(让spring生成动态代理),在beans中加入以下配置。
7.整合业务层
由Spring管理Service,Service通过Spring调用mapper,有Spring进行事务配置。
开发Service接口。
package com.ssm.service;

import com.ssm.po.SafeUser;

public interface UserService {

	/**
	 * 登录验证
	 * @param type 登录账号类型
	 * @param account 登录账号
	 * @param userPassword 密码
	 * @return  validate true通过 false未通过
	 * @throws Exception
	 */
	public SafeUser loginValidate(String type, String account, String userPassword) throws Exception;
}
package com.ssm.service.impl;

import java.util.ArrayList;
import java.util.List;

import org.springframework.beans.factory.annotation.Autowired;

import com.ssm.mapper.SafeUserMapper;
import com.ssm.po.SafeUser;
import com.ssm.po.SafeUserExample;
import com.ssm.service.UserService;

public class UserServiceImpl implements UserService {

	@Autowired
	SafeUserMapper safeUserMapper;

	@Override
	public SafeUser loginValidate(String type, String account,
			String userPassword) throws Exception {
		List users = new ArrayList();
		//定义查询对象
		SafeUserExample userExample = new SafeUserExample();
		SafeUserExample.Criteria criteria = userExample.createCriteria();

		if (type.equals("tel")) {
			//使用手机登录
			criteria.andUserTelEqualTo(account);
		}else if (type.equals("email")) {
			//使用邮箱登录
			criteria.andUserEmailEqualTo(account);
		}else if (type.equals("id")) {
			//使用ID登录
			criteria.andUserIdEqualTo(account);
		}else {
			return null;
		}

		criteria.andUserPasswordEqualTo(userPassword);
		users = safeUserMapper.selectByExample(userExample);
		if(users.size()==1) {
			//找到一条记录,用户存在
			return users.get(0);
		}

		return null;
	}

}
8.整合控制层
在action中通过Spring调用Service。在web.xml中配置SpringMVC的前端控制器。
		springmvc
		org.springframework.web.servlet.DispatcherServlet


			contextConfigLocation
			classpath:spring/springmvc.xml


		springmvc
		*.action
package com.ssm.action;

import javax.servlet.http.HttpSession;

import org.springframework.beans.factory.annotation.Autowired;
import org.springframework.stereotype.Controller;
import org.springframework.ui.Model;
import org.springframework.web.bind.annotation.RequestMapping;

import com.ssm.po.SafeUser;
import com.ssm.service.UserService;

@Controller
@RequestMapping("/user")
public class UserAction {

	@Autowired
	private UserService userService;

	@RequestMapping("/login")
	public String loginVailet(Model model, HttpSession session, String account, String pwd) throws Exception {
		SafeUser user = new SafeUser();
		user = userService.loginValidate("tel", account, pwd);
		if (user!=null) {
			session.setAttribute("user", user);
			return "test";
		}

		return "redirect:../index.jsp";
	}
}
9.编写界面
成功页面test.jsp,路径为WEB-INF/jsp/test.jsp。<%@ page language="java" import="java.util.*" pageEncoding="UTF-8"%>
<%
String path = request.getContextPath();
String basePath = request.getScheme()+"://"+request.getServerName()+":"+request.getServerPort()+path+"/";
%>
主页
${user.userTel }
<%@ page language="java" import="java.util.*" pageEncoding="UTF-8"%>
<%
String path = request.getContextPath();
String basePath = request.getScheme()+"://"+request.getServerName()+":"+request.getServerPort()+path+"/";
%>
登录
接下来进入登录页面即index.jsp中测试即可。
下面是工程源代码。
点击打开链接
