一、前言
网上各种各样的列子,大部分都是复制,粘贴!按说明操作完全搭建不起来,决定亲自操作一把!@供大家学习参考。
1、环境简绍
centOS7、VMware15.0.0、zookeeper-3.4.10
1、安装zookeeper,怎么下载就不说了,如果下载都不会,您嘞该转行了!开个玩笑!!
xft客户端将zookeeper-3.4.10.tar.gz上传到/home/zookeeper中(看自己情况)
解压tar -zxvf zookeeper-3.4.10.tar.gz
修改配置文件
cp /home/zookeeper/zookeeper-3.4.10/conf/zoo_sample.cfg /home/zookeeper /zookeeper-3.4.10/conf/zoo.cfg (其实就是将zoo_sample.cfg复制一份,名字修改为zoo.cfg)
设置 vim zoo.cfg
# The number of milliseconds of each tick
tickTime=2000
# The number of ticks that the initial
# synchronization phase can take
initLimit=10
# The number of ticks that can pass between
# sending a request and getting anacknowledgement
syncLimit=5
# the directory where the snapshot isstored.
# do not use /tmp for storage, /tmp here isjust
# example sakes.
dataDir=/opt/zookeeper/data
# the port at which the clients willconnect
clientPort=2181
# the maximum number of client connections.
# increase this if you need to handle moreclients
#maxClientCnxns=60
#
# Be sure to read the maintenance sectionof the
# administrator guide before turning onautopurge.
#
#http://zookeeper.apache.org/doc/current/zookeeperAdmin.html#sc_maintenance
#
# The number of snapshots to retain indataDir
#autopurge.snapRetainCount=3
# Purge task interval in hours
# Set to "0" to disable autopurge feature
#autopurge.purgeInterval=1
dataLogDir=/opt/zookeeper/dataLog
server.1=master:2888:3888
server.2=slave1:2888:3888
server.3=slave2:2888:3888
备注:黑体部分是我们需要配置的地方
将dataDir 、dataLogDir创建出来
mkdir /opt/zookeeper/data
mkdir /opt/zookeeper/dataLog
在/opt/zookeeper/data目录下新建myid并设置server.1中.后面的数字
vim myid
1
:wq!
cat myid
1
将master slave1 slave2映射到host的文件中
vim /etc/host
192.168.6.10 master
192.168.6.11 slave1
192.168.6.12 slave2
:wq!
设置环境变量
vim /etc/profile
export ZOOKEEPER_HOME=/home/zookeeper/zookeeper-3.4.10
export PATH=$PATH:$ZOOKEEPER_HOME/bin
:wq!
设置开机启动
在/etc/rc.d/init.d目录下新建zookeeper,并编辑
vim zookeeper
#!/bin/bash
#chkconfig: 2345 10 90
#description: service zookeeper
export JAVA_HOME=/usr/java/jdk1.8.0_11
export ZOO_LOG_DIR=/opt/zookeeper/dataLog
ZOOKEEPER_HOME=/home/zookeeper/zookeeper-3.4.10
su root ${ZOOKEEPER_HOME}/bin/zkServer.sh "$1"
:wq!
为新建的/etc/rc.d/init.d/zookeeper文件添加可执行权限,命令是:
chmod +x /etc/rc.d/init.d/zookeeper
把zookeeper这个脚本添加到开机启动项里面,命令是:
chkconfig --add zookeeper
如果想看看是否添加成功,命令是:
chkconfig --list
查看2181端口是否启用,执行命令:
lsof -i:2181
启动zookeeper
cd /home/zookeeper/zookeeper-3.4.10/bin
./ zkServer.sh start
停止 ./zkServer.shstop
查看状态 ./zkServer.sh status
复制该机器上的zookeeper-3.4.10到其他服务器上(如果不想集群,下面绕过!)
cd /home/
scp -r zookeeper slave1:/home/
scp -r zookeeper slave2:/home/
slave1、slave2(slave1、slave2上面已经加入到hosts文件中了,否则你的用ip地址)做上面相同的配置
查看zookeeper启动状态
方法一
service zookeeper status
方法二
lsof -i:2181
方法三
netstat -lntup
客户端连接
cd /home/zookeeper/zookeeper-3.4.10/bin/
./zkCli.sh -server 192.168.6.11:2181
二、上面环境准备好后就可以开发项目了
1、用IDEA开发(eclipse也是可以的,只是eclipse对xml提示太差!)
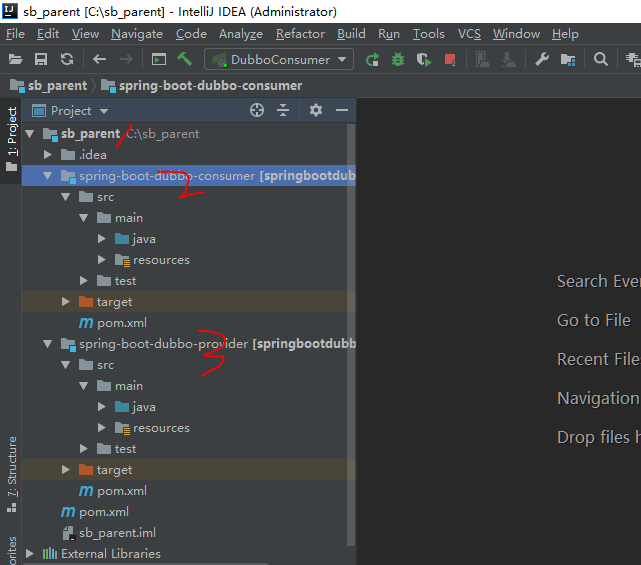
2、先看下项目结构maven项目,按结构创建好项目
3、配置pom.xml
sb_parent是maven父工程 pom.xml
xmlns:xsi="http://www.w3.org/2001/XMLSchema-instance" xsi:schemaLocation="http://maven.apache.org/POM/4.0.0 http://maven.apache.org/xsd/maven-4.0.0.xsd">
spring-boot-dubbo-provider 配置pom.xml(默认的)
xmlns:xsi="http://www.w3.org/2001/XMLSchema-instance" xsi:schemaLocation="http://maven.apache.org/POM/4.0.0 http://maven.apache.org/xsd/maven-4.0.0.xsd">
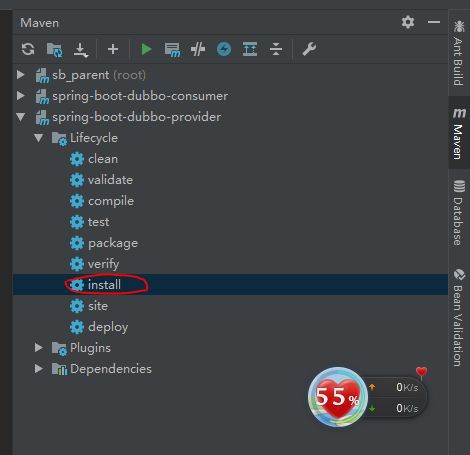
将spring-boot-dubbo-provider安装到本地仓库
spring-boot-dubbo-consumer 配置pom.xml
xmlns:xsi="http://www.w3.org/2001/XMLSchema-instance" xsi:schemaLocation="http://maven.apache.org/POM/4.0.0 http://maven.apache.org/xsd/maven-4.0.0.xsd">
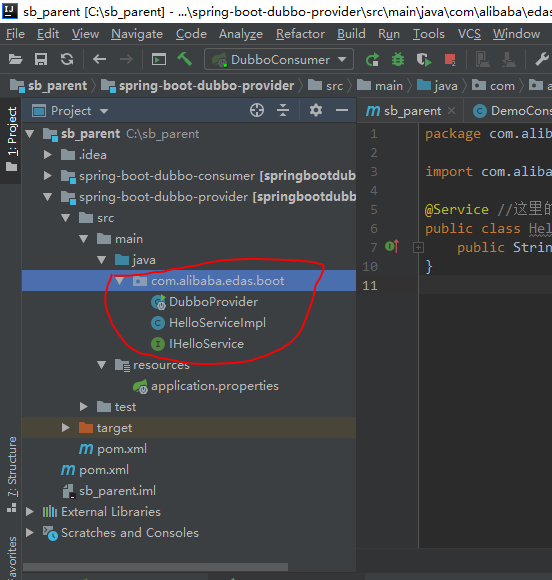
spring-boot-dubbo-provider 项目类创建
IHelloService.java
HelloServiceImpl.java
DubboProvider.java
package com.alibaba.edas.boot;
public interface IHelloService {
StringsayHello(String str);
}
package com.alibaba.edas.boot;
import com.alibaba.dubbo.config.annotation.Service;
@Service //这里的 Service 注解是 Dubbo 提供的一个注解类,类的全名称为
public class HelloServiceImplimplements IHelloService {
public StringsayHello(String name) {
return "Hello, " + name +" (from Dubbo with Spring Boot)";
}
}
package com.alibaba.edas.boot;
import org.springframework.boot.SpringApplication;
import org.springframework.boot.autoconfigure.SpringBootApplication;
@SpringBootApplication
public class DubboProvider {
public static void main(String[] args) {
SpringApplication.run(DubboProvider.class,args);
}
}
application.properties
# Base packages to scan Dubbo Components (e.g @Service , @Reference)
dubbo.scan.basePackages=com.alibaba.edas.boot
dubbo.application.name=dubbo-provider-demo
dubbo.registry.address=zookeeper://192.168.255.10:2181
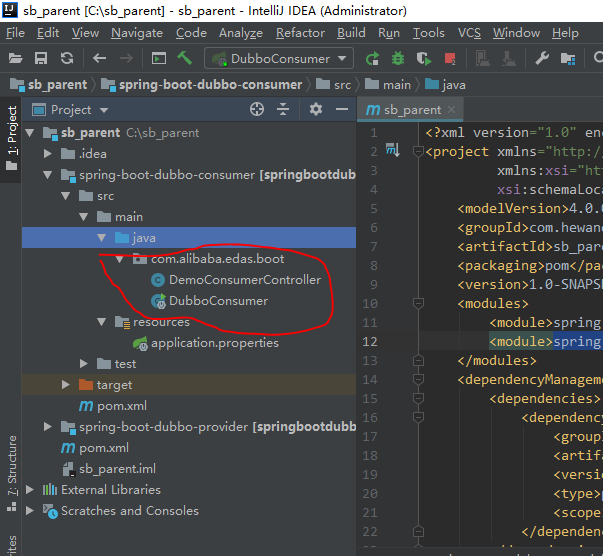
spring-boot-dubbo-consumer 项目类创建
DemoConsumerController.java
package com.alibaba.edas.boot;
import com.alibaba.dubbo.config.annotation.Reference;
import org.springframework.web.bind.annotation.PathVariable;
import org.springframework.web.bind.annotation.RequestMapping;
import org.springframework.web.bind.annotation.RestController;
@RestController
public class DemoConsumerController
{
@Reference //alibaba的注解 前提是已经导入了 spring-boot-dubbo-provider的jar包(用maven的install首先将其安装到本地仓库)
private IHelloServicedemoService;
@RequestMapping("/sayHello/{name}")//REST风格
public StringsayHello(@PathVariable String name)
{
return demoService.sayHello(name);
}
}
DubboConsumer.java
package com.alibaba.edas.boot;
import org.springframework.boot.SpringApplication;
import org.springframework.boot.autoconfigure.SpringBootApplication;
@SpringBootApplication
public class DubboConsumer {
public static void main(String[] args) {
SpringApplication.run(DubboConsumer.class,args);
}
}
application.properties
##server.port=8089 springBoot 同时启动多个项目,需要修改端口
server.port=8089
dubbo.application.name=dubbo-consumer-demo
dubbo.registry.address=zookeeper://192.168.255.10:2181
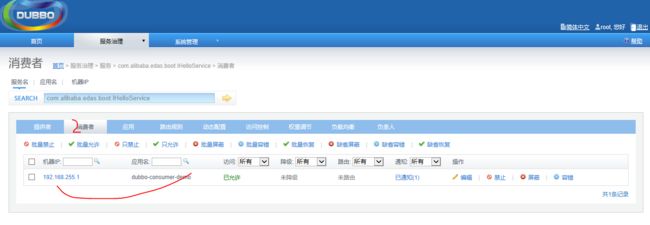
运行 DubboProvider.java、DubboConsumer.java
登路dubbo管理控制台(怎么安装百度),下载对应.war扔进tomcat webapp下面就可以了,当然还需修改点东西@zookeeper注册中心地址
http://192.168.255.10:8080/dubbo-admin
