微信小程序 模板消息
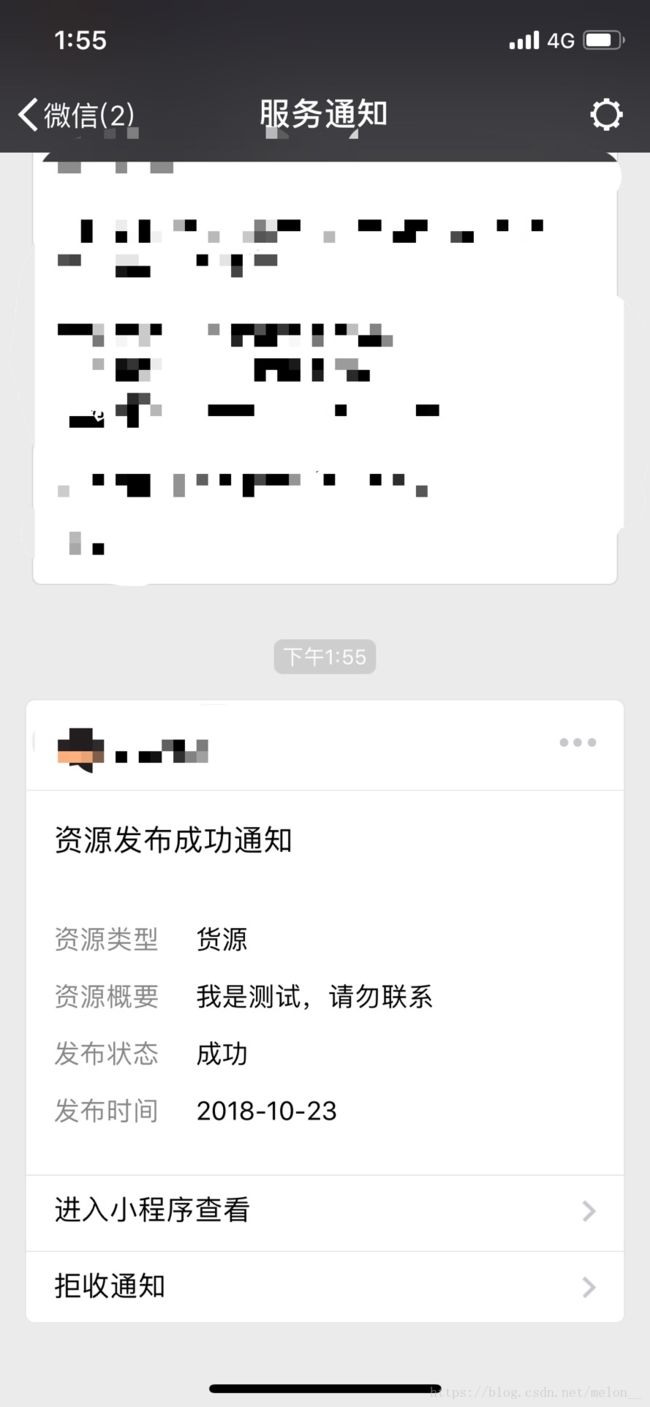
微信程序模板消息:在用户服务通知里以微信消息的方式推送给用户。 最后效果如下:
第一步:进入微信公众平台,添加模板消息

可以在模板库中选择已有的模板消息

点击选用后,进入模板消息配置页面,对于选用的模板,可以配置提交的关键词种类和顺序,如本文示例,选择了资源类型、资源概要、发布状态及发布时间。不能修改模板消息的标题,如果需要不同的消息标题,需自行申请,申请通过后亦可使用。(我申请的没有审批通过···所以 我们就用已有模板往下看看)

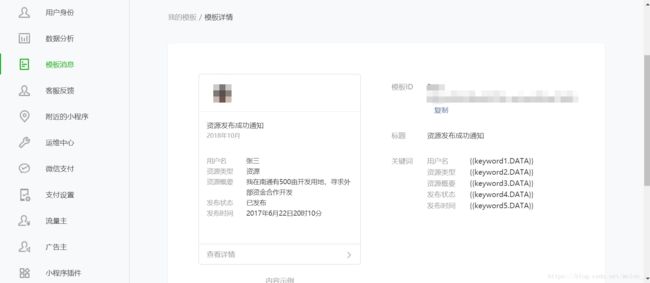
配置成功后,在“我的模板”tab页即可查看到已申请的模板,点击详情页,可查看模板的模板ID和关键词信息。
第二步:编写代码,发送消息
wxml:
提交表单,触发微信模板发送函数。注意:表单form里 需要添加 report-submit="true",在提交表单时,才能获取formId,formId在发送模板消息时能够用到。
js:
提交表单,执行submitForm函数,获得formId
submitForm(e) {
    util.showLoading();
    var that = this;
    var form = e.detail.value;
    formId = e.detail.formId;
    //...提交表单后,你其余的处理步骤
}
获取openId:
我的openId是通过后台获取之后返回给小程序:
js端:
// 获取用户信息
        wx.getSetting({
          success: res => {
            if (res.authSetting['scope.userInfo']) {
              // 已经授权,可以直接调用 getUserInfo 获取头像昵称,不会弹框
              wx.getUserInfo({
                success: res => {
                  // 可以将 res 发送给后台解码出 unionId
                  that.globalData.user = res
                  // that.getOpenId(that.globalData.user);
                  console.log("getOpenId");
                  console.log(res);
                  wx.login({
                    success: res => {
                      wx.request({
                        url: config.get_open_id,
                        method: "POST",
                        data: {
                          code: res.code,
                          encryptedData: res.encryptedData,
                          iv: res.iv
                        },
                        header: {
                          "content-type": "application/x-www-form-urlencoded;charset=utf-8",
                          //token: app.globalData.token
                        },
                        success: res => {
                          console.log(res)
                          if (res.data.success) {
                            that.globalData.openId = res.data.data.openId;
                            console.log(that.globalData.openId)
                          }
                        }
                      })
                    }
                  })
                }
              })
            }
          }
        })
后台:
与小程序交互接口:
@ResponseBody
	@RequestMapping(value = "/decodeUserInfo", method = RequestMethod.POST)
	public Result> decodeUserInfo(
			@RequestParam(required = true, value = "encryptedData") String encryptedData,
			@RequestParam(required = true, value = "iv") String iv,
			@RequestParam(required = true, value = "code") String code) {
		logger.info("decodeUserInfo");
		AES aes = new AES();
		Map map = new HashMap();
		try {
			// 登录凭证不能为空
			if (code == null || code.length() == 0) {
				map.put("status", 0);
				map.put("msg", "code 不能为空");
				return new Result>(false, map);
			}
			// ////////////// 1、向微信服务器 使用登录凭证 code 获取 session_key 和 openid
			// ////////////////
			// 请求参数
			String params = "appid=" + Config.wxspAppid + "&secret="
					+ Config.wxspSecret + "&js_code=" + code + "&grant_type="
					+ Config.grant_type;
			// 发送请求
			String sr = HttpRequest.sendGet(
					"https://api.weixin.qq.com/sns/jscode2session", params);
			// 解析相应内容(转换成json对象)
			JSONObject json = JSONObject.fromObject(sr);
			// 获取会话密钥(session_key)
			String session_key = json.get("session_key").toString();
			// 用户的唯一标识(openid)
			String openId = (String) json.get("openid");
			map.put("openId", openId);
			logger.info("openId", openId);
			return new Result>(true, map);
		} catch (Exception e) {
			e.printStackTrace();
		}
		map.put("status", 0);
		map.put("msg", "解密失败");
		return new Result>(false, map);
	}
AES解密:
package com.melon.haul.dto;

import java.security.AlgorithmParameters;
import java.security.InvalidAlgorithmParameterException;
import java.security.InvalidKeyException;
import java.security.Key;
import java.security.NoSuchAlgorithmException;
import java.security.NoSuchProviderException;
import java.security.Security;

import javax.crypto.BadPaddingException;
import javax.crypto.Cipher;
import javax.crypto.IllegalBlockSizeException;
import javax.crypto.NoSuchPaddingException;
import javax.crypto.spec.IvParameterSpec;
import javax.crypto.spec.SecretKeySpec;
import org.bouncycastle.jce.provider.BouncyCastleProvider;

public class AES {
	public static boolean initialized = false;

	/**
	 * AES解密
	 * @param content 密文
	 * @return
	 * @throws InvalidAlgorithmParameterException
	 * @throws NoSuchProviderException
	 */
	public byte[] decrypt(byte[] content, byte[] keyByte, byte[] ivByte) throws InvalidAlgorithmParameterException {
		initialize();
		try {
			Cipher cipher = Cipher.getInstance("AES/CBC/PKCS7Padding");
            SecretKeySpec spec = new SecretKeySpec(keyByte, "AES");
            AlgorithmParameters parameters = AlgorithmParameters.getInstance("AES");
            parameters.init(new IvParameterSpec(ivByte));
            cipher.init(Cipher.DECRYPT_MODE, spec, parameters);// 初始化
            byte[] resultByte = cipher.doFinal(content);
            if (null != resultByte && resultByte.length > 0) {
                return resultByte;
            }
            return null;
		} catch (NoSuchAlgorithmException e) {
			e.printStackTrace();
		} catch (NoSuchPaddingException e) {
			e.printStackTrace();
		} catch (InvalidKeyException e) {
			e.printStackTrace();
		} catch (IllegalBlockSizeException e) {
			e.printStackTrace();
		} catch (BadPaddingException e) {
			e.printStackTrace();
		} catch (Exception e) {
			// TODO Auto-generated catch block
			e.printStackTrace();
		}
		return null;
	}

	public static void initialize(){
        if (initialized) return;
        Security.addProvider(new BouncyCastleProvider());
        initialized = true;
    }
	//生成iv
    public static AlgorithmParameters generateIV(byte[] iv) throws Exception{
        AlgorithmParameters params = AlgorithmParameters.getInstance("AES");
        params.init(new IvParameterSpec(iv));
        return params;
    }
}
获取accessToken
获取accessToken接口:
'https://api.weixin.qq.com/cgi-bin/token?grant_type=client_credential&appid='+你的appid
获取accessToken
 wx.request({
      url: 'https://api.weixin.qq.com/cgi-bin/token?grant_type=client_credential&appid=你的appid',
      method: 'POST',
      success: function (res) {
        accessToken = res.data.access_token;
      },
      fail: function(err) {
        console.log("get err")
      }
    })
构造模板消息发送data
var data = {
      "touser": 获取的openid,
      "template_id": 你的模板id,
      "page": 点开模板消息跳转的小程序页面,
      "form_id": 提交表单时获取的formId,
//这里的data 构造时的key 就是模板详情页中的关键词,value就是你想要发送的消息
      "data": {
        "keyword1": {
          "value": app.globalData.user.username
        },
        "keyword2": {
          "value": sourceType
        },
        "keyword3": {
          "value": detail
        },
        "keyword4": {
          "value": status
        },
        "keyword5": {
          "value":myDate
        }
      },
//这里就照着写就可以了···
      "emphasis_keyword": "keyword1.DATA"
    }
发送模板消息:
发送模板消息的url:
`https://api.weixin.qq.com/cgi-bin/message/wxopen/template/send?access_token=`
即下文的config.sendTemplate
 wx.request({
          url: config.sendTemplate + accessToken,
          data: data,
          method: 'POST',
          success: function (res) {
            console.log("push msg");
            console.log(res);
          },
          fail: function (err) { // fail
            console.log("push err")
            console.log(err);
          }
        });
至此,你已经能够成功发送属于你的模板消息啦!