安装
- 安装,打开终端项目目录下运行,安卓
jpush-react-nativejpush-react-native包,并自动添加依赖
npm install jpush-react-native --save
npm install jcore-react-native --save
react-native link
- 自动配置
npm run configureJPush
//module name 指的是你 Android 项目中的模块名字(对 iOS 没有影响,不填写的话默认值为 app,会影响到查找 AndroidManifest 问题,
//如果没找到 AndroidManifest,则需要手动修改,参考下面的 AndroidManifest 配置相关说明)
//举个例子:
npm run configureJPush d4ee2375846bc30fa51334f5 app
iOS
- 手动配置检查
- 在 iOS 工程中如果找不到头文件可能要在
TARGETS-> BUILD SETTINGS -> Search Paths -> Header Search Paths添加如下如路径
$(SRCROOT)/../node_modules/jpush-react-native/ios/RCTJPushModule/RCTJPushModule
- 打开 iOS 工程,在 link 之后,RCTJPushModule.xcodeproj 工程会自动添加到 Libraries 目录里面
- 在 iOS 工程 target 的
Build Phases->Link Binary with Libraries中加入如下库
libz.tbd
CoreTelephony.framework
Security.framework
CFNetwork.framework
CoreFoundation.framework
SystemConfiguration.framework
Foundation.framework
UIKit.framework
UserNotifications.framework
libresolv.tbd
- 添加原生代码
- 在 AppDelegate.h 文件中 导入头文件
#import
#ifdef NSFoundationVersionNumber_iOS_9_x_Max
#import
#endif
- 在 AppDelegate.h 文件中 填写如下代码,这里的的 appkey、channel、和 isProduction 填写自己的
static NSString *appKey = @"";     //填写appkey
static NSString *channel = @"";    //填写channel   一般为nil
static BOOL isProduction = false;  //填写isProdurion  平时测试时为false ,生产时填写true
- 在AppDelegate.m 的didFinishLaunchingWithOptions 方法里面添加如下代码
-(BOOL)application:(UIApplication *)application didFinishLaunchingWithOptions:(NSDictionary *)launchOptions
{
    if ([[UIDevice currentDevice].systemVersion floatValue] >= 10.0) {
 #ifdef NSFoundationVersionNumber_iOS_9_x_Max
    JPUSHRegisterEntity * entity = [[JPUSHRegisterEntity alloc] init];
     entity.types = UNAuthorizationOptionAlert|UNAuthorizationOptionBadge|UNAuthorizationOptionSound;
     [JPUSHService registerForRemoteNotificationConfig:entity delegate:self];
#endif
} else if ([[UIDevice currentDevice].systemVersion floatValue] >= 8.0) {
    [JPUSHService registerForRemoteNotificationTypes:(UIUserNotificationTypeBadge |
                                                      UIUserNotificationTypeSound |
                                                      UIUserNotificationTypeAlert)
                                          categories:nil];
  } else {
    [JPUSHService registerForRemoteNotificationTypes:(UIRemoteNotificationTypeBadge |
                                                      UIRemoteNotificationTypeSound |
                                                      UIRemoteNotificationTypeAlert)
                                          categories:nil];
  }
  [JPUSHService setupWithOption:launchOptions appKey:appKey
                        channel:channel apsForProduction:isProduction];
}
- 在AppDelegate.m 的
didRegisterForRemoteNotificationsWithDeviceToken方法中添加[JPUSHService registerDeviceToken:deviceToken];如下所示
-(void)application:(UIApplication *)application
didRegisterForRemoteNotificationsWithDeviceToken:(NSData *)deviceToken {
  [JPUSHService registerDeviceToken:deviceToken];
}
- 为了在收到推送点击进入应用能够获取该条推送内容需要在
AppDelegate.m didReceiveRemoteNotification方法里面添加[[NSNotificationCenter defaultCenter] postNotificationName:kJPFDidReceiveRemoteNotification object:userInfo]方法,注意:这里需要在两个方法里面加一个是iOS7以前的一个是iOS7即以后的,如果AppDelegate.m 没有这个两个方法则直接复制这两个方法,在 iOS10 的设备则可以使用JPush 提供的两个方法;如下所示
-(void)application:(UIApplication *)application didReceiveRemoteNotification:(NSDictionary *)userInfo {
  // 取得 APNs 标准信息内容
  [[NSNotificationCenter defaultCenter] postNotificationName:kJPFDidReceiveRemoteNotification object:userInfo];
}
//iOS 7 Remote Notification
-(void)application:(UIApplication *)application didReceiveRemoteNotification:  (NSDictionary *)userInfo fetchCompletionHandler:(void (^)   (UIBackgroundFetchResult))completionHandler {
  [[NSNotificationCenter defaultCenter] postNotificationName:kJPFDidReceiveRemoteNotification object:userInfo];
}
// iOS 10 Support
-(void)jpushNotificationCenter:(UNUserNotificationCenter *)center willPresentNotification:(UNNotification *)notification withCompletionHandler:(void (^)(NSInteger))completionHandler {
  // Required
  NSDictionary * userInfo = notification.request.content.userInfo;
  if([notification.request.trigger isKindOfClass:[UNPushNotificationTrigger class]]) {
    [JPUSHService handleRemoteNotification:userInfo];
    [[NSNotificationCenter defaultCenter] postNotificationName:kJPFDidReceiveRemoteNotification object:userInfo];
  }
  completionHandler(UNNotificationPresentationOptionAlert); // 需要执行这个方法,选择是否提醒用户,有Badge、Sound、Alert三种类型可以选择设置
}
// iOS 10 Support
-(void)jpushNotificationCenter:(UNUserNotificationCenter *)center didReceiveNotificationResponse:(UNNotificationResponse *)response withCompletionHandler:(void (^)())completionHandler {
  // Required
  NSDictionary * userInfo = response.notification.request.content.userInfo;
  if([response.notification.request.trigger isKindOfClass:[UNPushNotificationTrigger class]]) {
    [JPUSHService handleRemoteNotification:userInfo];
    [[NSNotificationCenter defaultCenter] postNotificationName:kJPFOpenNotification object:userInfo];
  }
  completionHandler();  // 系统要求执行这个方法
}
- react-native 中的使用
- 收到推送
this.JPushReceiveNotification = NativeAppEventEmitter.addListener( 'ReceiveNotification',(message) => {
console.log('收到推送的消息'+message)
});
- 点击推送
this.JPushReceiveNotification = NativeAppEventEmitter.addListener( 'OpenNotification',(message) => {
console.log('收到推送的消息'+message)
});
- 常见问题
- 收不到推送
- 确保是在真机上测试,而不是在模拟器
- 能够获取 deviceToken 但是收不到推送, 如果是使用 xcode 8,检查 (Project -> Target -> Capabilities ) Push Notification 选项是否已经点开,如果没有需要点开
- 检查证书配置,以及激光后台上传的p12证书
- 收到一条推送,有多个ReceiveNotification
- 保存当前消息的messageID,再次接收到的消息时进行比较,如果相同则直接return
- 点击推送唤起应用的时候 OpenNotification 不调用
- 升级 jpush-react-native 到最新版本(旧版本还没做缓存处理,新版本已修复)
- 通知在前台展示问题
- iOS 10 开始允许通知在前台展示这个地方在 Native 代码中控制
// iOS 10 Support
-(void)jpushNotificationCenter:(UNUserNotificationCenter *)center willPresentNotification:(UNNotification *)notification withCompletionHandler:(void (^)(NSInteger))completionHandler {
  // Required
  NSDictionary * userInfo = notification.request.content.userInfo;
  if([notification.request.trigger isKindOfClass:[UNPushNotificationTrigger class]]) {
    [JPUSHService handleRemoteNotification:userInfo];
    [[NSNotificationCenter defaultCenter] postNotificationName:kJPFDidReceiveRemoteNotification object:userInfo];
  }
completionHandler(UNNotificationPresentationOptionAlert);  // 需要执行这个方法,选择是否提醒用户,有Badge、Sound、Alert三种类型可以选择设置
}
- iOS 10 之前是系统控制,应用在前台推送不展示
- 找不到头文件 RCTJPushModule.h
- 在 iOS 工程中如果找不到头文件可能要在 TARGETS-> BUILD SETTINGS -> Search Paths -> Header Search Paths 添加如下如路径
$(SRCROOT)/../node_modules/jpush-react-native/ios/RCTJPushModule/RCTJPushModule
- 在 iphone 5 的模拟器编译不通过
- JPush SDK 在 3.0.0 及以后版本不再支持 i386 的模拟器了血药在 iphone 5s 以上版本中测试
安卓
- 检查配置
app/build.gradle
android {
    ...
    defaultConfig {
        applicationId "com.pushdemo" // 此处改成你在极光官网上申请应用时填写的包名
        ...
        manifestPlaceholders = [
                JPUSH_APPKEY: "d4ee2375846bc30fa51334f5",   //在此替换你的APPKey
                APP_CHANNEL: "developer-default"        //应用渠道号
        ]
    }
}
dependencies {
    ...
    compile project(':jpush-react-native')
    compile project(':jcore-react-native')
    ...
}
settings.gradle
include ':app', ':jpush-react-native', ':jcore-react-native'
project(':jpush-react-native').projectDir = new File(rootProject.projectDir, '../node_modules/jpush-react-native/android')
project(':jcore-react-native').projectDir = new File(rootProject.projectDir, '../node_modules/jcore-react-native/android')
- 添加原生代码
-
app/src.../MainApplication.javaMainApplication.java文件,加入JPushPackage
private boolean SHUTDOWN_TOAST = false;
    private boolean SHUTDOWN_LOG = false;

    private final ReactNativeHost mReactNativeHost = new ReactNativeHost(this) {

        @Override
        protected boolean getUseDeveloperSupport() {
            return BuildConfig.DEBUG;
        }
        @Override
        protected List getPackages() {
            return Arrays.asList(
                    new MainReactPackage(),
                    //加入 JPushPackage
                    new JPushPackage(SHUTDOWN_TOAST, SHUTDOWN_LOG)
            );
        }
    };
-
app/src.../MainActivity.javaMainActivity中加入一些初始化代码即可:
public class MainActivity extends ReactActivity {
    ...
    @Override
    protected void onCreate(Bundle savedInstanceState) {
        super.onCreate(savedInstanceState);
        JPushInterface.init(this);
    }

    @Override
    protected void onPause() {
        super.onPause();
        JPushInterface.onPause(this);
    }

    @Override
    protected void onResume() {
        super.onResume();
        JPushInterface.onResume(this);
    }
}
- react-native 中的使用
- 收到推送
...
import JPushModule from 'jpush-react-native';
...
export default class PushActivity extends React.Component {
    componentDidMount() {
        JPushModule.addReceiveNotificationListener((map) => {
            console.log("alertContent: " + map.alertContent);
            console.log("extras: " + map.extras);
            // var extra = JSON.parse(map.extras);
            // console.log(extra.key + ": " + extra.value);
        });
}
- 点击推送
componentDidMount() {
    JPushModule.addReceiveOpenNotificationListener((map) => {
            console.log("Opening notification!");
            console.log("map.extra: " + map.key);
        });
}
- 清除通知
componentWillUnmount() {
        JPushModule.removeReceiveCustomMsgListener();
        JPushModule.removeReceiveNotificationListener();
    }
- 常见问题
- 集成极光推送后遇到两次点击物理返回建退出程序,再次进入物理返回键监听失效,网上有种说法是源码的bug,是错误的。是因为我们在组件卸载的时候调用了
NativeAppEventEmitter.removeAllListeners();
DeviceEventEmitter.removeAllListeners();导致的,所以清楚通知的时候改成如下写法就可以解决
- 集成极光推送后遇到两次点击物理返回建退出程序,再次进入物理返回键监听失效,网上有种说法是源码的bug,是错误的。是因为我们在组件卸载的时候调用了
componentWillUnmount() {
        JPushModule.removeReceiveCustomMsgListener();
        JPushModule.removeReceiveNotificationListener();
        if(Platform.OS === 'ios'){
            NativeAppEventEmitter.removeAllListeners(); //移除所有通知事件监听
            DeviceEventEmitter.removeAllListeners();
        }

    }
- 在安卓上,toast打印日志,需要我们手动注释掉源码中
/node_modules/jpush-react-native/android/src/main/java/cn/jpush/reactnativejpush/JPushModule.java的打印Log打印 -
程序退到后台的时候(并没有杀死)点击通知消息并没有跳转到指定页面,而是重新启动了程序。
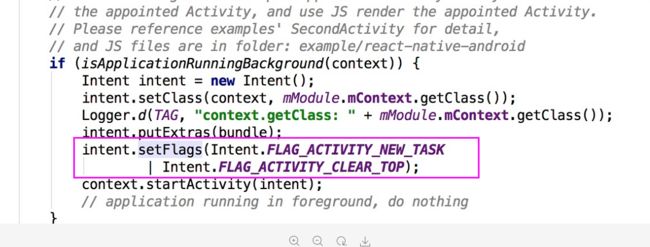 WechatIMG143.png
 -
JPushModule.java中这段代码是 点击通知栏的推送消息,如果程序在后台运行中,杀死程序,启动一个新的页面。这需要删掉Intent.FLAG_ACTIVITY_CLEAR_TOP,就可以直接唤起程序进行跳转
JS方法
/**
     * Android only
     * 初始化JPush 必须先初始化才能执行其他操作
     */
    static initPush() {
        JPushModule.initPush();
    }

    /**
     * Android
     * 关闭推送
     */
    static stopPush() {
        JPushModule.stopPush();
    }

    /**
     * Android
     * 重新接受推送
     */
    static resumePush() {
        JPushModule.resumePush();
    }

    /**
     * Android
     * 清除所有推送
     */
    static clearAllNotifications() {
        JPushModule.clearAllNotifications();
    }

    /**
     * Android
     * 清除指定的推送消息
     */
    static clearNotificationById(id) {
        JPushModule.clearNotificationById(id);
    }

    /**
     * Android
     */
    static getInfo(cb) {
        JPushModule.getInfo((map) => {
            cb(map);
        });
    }

    /**
     * 通用
     *设置标签
     */
    static setTags(tag, success, fail) {
        JPushModule.setTags(tag, (resultCode) => {

            if (resultCode === 0) {
                console.log('success');
                success();
            } else {
                console.log('fail');
                fail();
            }
        });
    }
    /**
     * 通用
     * 设置别名
     */
    static setAlias(alias, success, fail) {
        JPushModule.setAlias(alias, (resultCode) => {
            if (resultCode === 0) {
                success();
            } else {
                fail();
            }
        });
    }

    /**
     * Android
     */
    static setStyleBasic() {
        JPushModule.setStyleBasic();
    }

    /**
     * Android
     */
    static setStyleCustom() {
        JPushModule.setStyleCustom();
    }

    /**
     * Android
     * 添加自定义消息监听
     */
    static addReceiveCustomMsgListener(cb) {
        listeners[cb] = DeviceEventEmitter.addListener(receiveCustomMsgEvent,
            (message) => {
                cb(message);
            });
    }

    /**
     * Android
     * 清除自定义消息监听
     */
    static removeReceiveCustomMsgListener(cb) {
        if (!listeners[cb]) {
            return;
        }
        listeners[cb].remove();
        listeners[cb] = null;
    }

    /**
     * Android
     * 添加收到消息监听
     */
    static addReceiveNotificationListener(cb) {
        listeners[cb] = DeviceEventEmitter.addListener(receiveNotificationEvent,
            (map) => {
                cb(map);
            });
    }

    /**
     * Android
     * 移除收到消息监听
     */
    static removeReceiveNotificationListener(cb) {
        if (!listeners[cb]) {
            return;
        }
        listeners[cb].remove();
        listeners[cb] = null;
    }

    /**
     * Android
     * 添加点击消息时的监听
     */
    static addReceiveOpenNotificationListener(cb) {
        listeners[cb] = DeviceEventEmitter.addListener(openNotificationEvent,
            (message) => {
                cb(message);
            });
    }

    /**
     * Android
     * 移除点击时消息监听
     */
    static removeReceiveOpenNotificationListener(cb) {
        if (!listeners[cb]) {
            return;
        }
        listeners[cb].remove();
        listeners[cb] = null;
    }

    /**
     * Android
     * If device register succeed, the server will return registrationId
     */
    static addGetRegistrationIdListener(cb) {
        listeners[cb] = DeviceEventEmitter.addListener(getRegistrationIdEvent,
            (registrationId) => {
                cb(registrationId);
            });
    }

    static removeGetRegistrationIdListener(cb) {
        if (!listeners[cb]) {
            return;
        }
        listeners[cb].remove();
        listeners[cb] = null;
    }

    /**
     * iOS,  Android
     */
    static getRegistrationID(cb) {
        JPushModule.getRegistrationID((id) => {
            cb(id);
        });
    }

    /**
     * iOS
     */
    static setupPush() {
        JPushModule.setupPush();
    }

    /**
     * iOS
     * 获取appkey的回调
     */
    static getAppkeyWithcallback(cb) {
        JPushModule.getAppkeyWithcallback((appkey) => {
            cb(appkey);
        });
    }


    /**
     * iOS
     */
    static setLocalNotification(date, textContain, badge, alertAction, notificationKey, userInfo, soundName) {
        JPushModule.setLocalNotification(date, textContain, badge, alertAction, notificationKey, userInfo, soundName);
    }

    /**
     * iOS
     * 设置角标消息个数
     */
    static setBadge(badge, cb) {
        JPushModule.setBadge(badge, (value) => {
            cb(value);
        });
    }