Spring学习01:控制反转(IOC)与依赖注入(DI)
Spring学习01:控制反转[IOC]与依赖注入[DI]
- 程序的耦合和解耦
- 解耦实例1: JDBC驱动注册
- 解耦实例2: UI层,Service层,Dao层的调用
- 解决耦合的思路: 工厂模式解耦
- 使用springIOC解决程序耦合
- 简单实例
- 使用XML配置文件实现IOC
- bean标签
- bean的作用范围和生命周期
- 实例化 Bean 的三种方式
- 依赖注入
- 依赖注入的概念
- 依赖注入的方法
- 使用构造函数注入
- 使用set方法注入(更常用)
- 注入集合字段
- 使用注解实现IOC
- 常用注解
- 用于创建对象的注解
- 用于注入数据的注解
- 用于改变作用范围的注解
- 和生命周期相关的注解
- spring的半注解配置和纯注解配置
- 半注解配置
- 纯注解配置
- 纯注解配置下的注解
- 实例: 使用纯注解配置实现数据库CRUD
程序的耦合和解耦
耦合: 程序间的依赖关系.在开发中,应该做到解决编译期依赖,即编译期不依赖,运行时才依赖.- 解耦的思路: 使用反射来创建对象,而避免使用new关键字,并通过读取配置文件来获取要创建的对象全限定类名.
下面以两个例子来说明如何解耦.
解耦实例1: JDBC驱动注册
JDBC操作中注册驱动时,我们不使用DriverManager的register方法,而采用Class.forName("驱动类全类名")的方式.
public static void main(String[] args) throws SQLException, ClassNotFoundException {
	//注册驱动的两种方式
	// 1. 创建驱动类的实例
	//DriverManager.registerDriver(new com.mysql.jdbc.Driver());
	// 2. 通过反射加载驱动类
	Class.forName("com.mysql.jdbc.Driver");		// 实际开发中此类名从properties文件中读取

	//...后续操作
}
查看com.mysql.jdbc.Driver类的源码如下,在类加载和初始化时,会执行static代码块中的部分,也就是说加载类的时候就自动注册驱动了.
public class Driver extends NonRegisteringDriver implements java.sql.Driver {

	static {
	    try {
	        java.sql.DriverManager.registerDriver(new Driver());	// 类初始化时执行注册动作
	    } catch (SQLException E) {
	        throw new RuntimeException("Can't register driver!");
	    }
	}

    public Driver() throws SQLException {
    // Required for Class.forName().newInstance()
    }
}
即使驱动类不存在,在编译时也不会报错,解决了编译器依赖.
解耦实例2: UI层,Service层,Dao层的调用
在Web项目中,UI层,Service层,Dao层之间有着前后调用的关系.
public class MyServiceImpl implements IMyService {

    private IMyDao myDao = new MyDaoImpl();	// 业务层要调用持久层的接口和实现类

    public void myService(){
        myDao.serviceProcess();
    }
}
业务层依赖持久层的接口和实现类,若编译时不存在没有持久层实现类,则编译将不能通过,这构成了编译期依赖
解决耦合的思路: 工厂模式解耦
在实际开发中可以把三层的对象的全类名都使用配置文件保存起来,当启动服务器应用加载的时候,创建这些对象的实例并保存在容器中. 在获取对象时,不使用new的方式,而是直接从容器中获取,这就是工厂设计模式.
使用springIOC解决程序耦合
简单实例
-
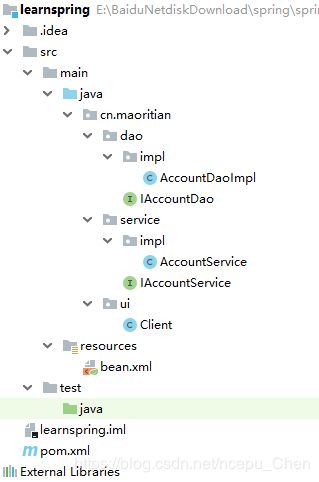
准备工作: 创建MAVEN项目,并准备三层接口类和实现类
创建maven项目,配置其pom.xml如下:<project xmlns="http://maven.apache.org/POM/4.0.0" xmlns:xsi="http://www.w3.org/2001/XMLSchema-instance" xsi:schemaLocation="http://maven.apache.org/POM/4.0.0 http://maven.apache.org/xsd/maven-4.0.0.xsd"> <modelVersion>4.0.0modelVersion> <groupId>cn.maoritiangroupId> <artifactId>learnspringartifactId> <version>1.0-SNAPSHOTversion> <dependencies> <dependency> <groupId>org.springframeworkgroupId> <artifactId>spring-contextartifactId> <version>5.0.2.RELEASEversion> dependency> dependencies> project> -
配置
bean: 在类的根路径下的resource目录下创建bean.xml文件,把对象的创建交给spring来管理.
每个class属性为该类的全类名,id属性为该类的id,在spring配置中,通过id获取类的对象.<beans xmlns="http://www.springframework.org/schema/beans" xmlns:xsi="http://www.w3.org/2001/XMLSchema-instance" xsi:schemaLocation="http://www.springframework.org/schema/beans http://www.springframework.org/schema/beans/spring-beans.xsd"> <bean id="accountService" class="com.itheima.service.impl.AccountServiceImpl">bean> <bean id="accountDao" class="com.itheima.dao.impl.AccountDaoImpl">bean> beans> -
在表现层文件
Client.java中通过容器创建对象.通过核心容器的getBean()方法获取具体对象.public class Client { public static void main(String[] args) { // 获取核心容器对象 ApplicationContext ac = new ClassPathXmlApplicationContext("bean.xml"); // 根据id获取Bean对象 IAccountService as = (IAccountService)ac.getBean("accountService"); // 执行as的具体方法 // ... } }我们常用的
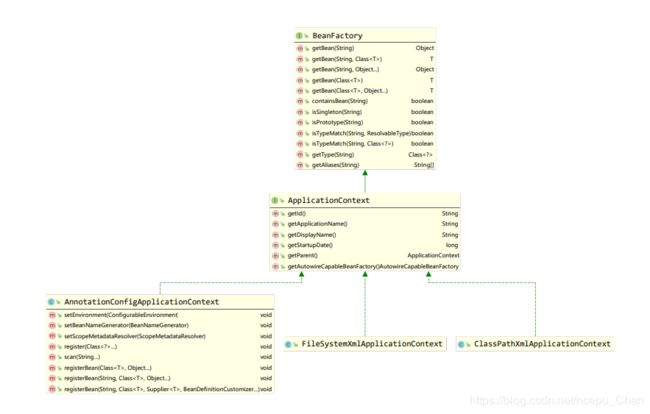
容器有三种:ClassPathXmlApplicationContext,FileSystemXmlApplicationContext,AnnotationConfigApplicationContext.ClassPathXmlApplicationContext: 它是从类的根路径下加载配置文件FileSystemXmlApplicationContext: 它是从磁盘路径上加载配置文件AnnotationConfigApplicationContext: 读取注解创建容器
使用XML配置文件实现IOC
使用配置文件实现IOC,要将托管给spring的类写进bean.xml配置文件中.
bean标签
- 作用: 配置托管给spring的对象,默认情况下调用类的无参构造函数,若果没有无参构造函数则不能创建成功
- 属性:
id: 指定对象在容器中的标识,将其作为参数传入getBean()方法可以获取获取对应对象.class: 指定类的全类名,默认情况下调用无参构造函数scope: 指定对象的作用范围,可选值如下singleton: 单例对象,默认值prototype: 多例对象request: 将对象存入到web项目的request域中session: 将对象存入到web项目的session域中global session: 将对象存入到web项目集群的session域中,若不存在集群,则global session相当于session
init-method:指定类中的初始化方法名称,在对象创建成功之后执行destroy-method:指定类中销毁方法名称,对prototype多例对象没有作用,因为多利对象的销毁时机不受容器控制
bean的作用范围和生命周期
- 单例对象:
scope="singleton"- 作用范围: 每个应用只有一个该对象的实例,它的作用范围就是整个应用
- 生命周期: 单例对象的创建与销毁 和 容器的创建与销毁时机一致
- 对象出生: 当应用加载,创建容器时,对象就被创建
- 对象活着: 只要容器存在,对象一直活着
- 对象死亡: 当应用卸载,销毁容器时,对象就被销毁
- 多例对象:
scope="prototype"- 作用范围: 每次访问对象时,都会重新创建对象实例.
- 生命周期: 多例对象的创建与销毁时机不受容器控制
- 对象出生: 当使用对象时,创建新的对象实例
- 对象活着: 只要对象在使用中,就一直活着
- 对象死亡: 当对象长时间不用时,被 java 的垃圾回收器回收了
实例化 Bean 的三种方式
-
使用默认无参构造函数创建对象: 默认情况下会根据默认无参构造函数来创建类对象,若Bean类中没有默认无参构造函数,将会创建失败.
<bean id="accountService" class="cn.maoritian.service.impl.AccountServiceImpl">bean> -
使用静态工厂的方法创建对象:
创建静态工厂如下:
// 静态工厂,其静态方法用于创建对象
public class StaticFactory {
	public static IAccountService createAccountService(){
		return new AccountServiceImpl();
	}
}
使用
StaticFactory类中的静态方法createAccountService创建对象,涉及到id属性: 指定对象在容器中的标识,用于从容器中获取对象class属性: 指定静态工厂的全类名factory-method属性: 指定生产对象的静态方法
<bean id="accountService"
	class="cn.maoritian.factory.StaticFactory"
	factory-method="createAccountService">bean>
其实,类的构造函数也是静态方法,因此
默认无参构造函数也可以看作一种静态工厂方法 -
使用实例工厂的方法创建对象
创建实例工厂如下:
public class InstanceFactory {
	public IAccountService createAccountService(){
		return new AccountServiceImpl();
	}
}
先创建实例工厂对象
instanceFactory,通过调用其createAccountService()方法创建对象,涉及到factory-bean属性: 指定实例工厂的idfactory-method属性: 指定实例工厂中生产对象的方法
<bean id="instancFactory" class="cn.maoritian.factory.InstanceFactory">bean>
<bean id="accountService"
	factory-bean="instancFactory"
	factory-method="createAccountService">bean>
依赖注入
依赖注入的概念
依赖注入(Dependency Injection)是spring框架核心ioc的具体实现.
通过控制反转,我们把创建对象托管给了spring,但是代码中不可能消除所有依赖,例如:业务层仍然会调用持久层的方法,因此业务层类中应包含持久化层的实现类对象.
我们等待框架通过配置的方式将持久层对象传入业务层,而不是直接在代码中new某个具体的持久化层实现类,这种方式称为依赖注入.
依赖注入的方法
因为我们是通过反射的方式来创建属性对象的,而不是使用new关键字,因此我们要指定创建出对象各字段的取值.
使用构造函数注入
通过类默认的构造函数来给创建类的字段赋值,相当于调用类的构造方法.
涉及的标签:
- 寻找要赋值给的字段
index: 指定参数在构造函数参数列表的索引位置type: 指定参数在构造函数中的数据类型name: 指定参数在构造函数中的变量名,最常用的属性
- 指定赋给字段的值
value: 给基本数据类型和String类型赋值ref: 给其它Bean类型的字段赋值,ref属性的值应为配置文件中配置的Bean的id
public class AccountServiceImpl implements IAccountService {

    //如果是经常变化的数据,并不适用于注入的方式
    private String name;
    private Integer age;
    private Date birthday;

    public AccountServiceImpl(String name, Integer age, Date birthday) {
        this.name = name;
        this.age = age;
        this.birthday = birthday;
    }

    public void saveAccount() {
		System.out.println(name+","+age+","+birthday);
    }
}
<bean id="now" class="java.util.Date" scope="prototype">bean>

<bean id="accountService" class="cn.maoritian.service.impl.AccountServiceImpl">
	<constructor-arg name="name" value="myname">constructor-arg>
	<constructor-arg name="age" value="18">constructor-arg>

	<constructor-arg name="birthday" ref="now">constructor-arg>
bean>
使用set方法注入(更常用)
在类中提供需要注入成员属性的set方法,创建对象只调用要赋值属性的set方法.
涉及的标签:
- 指定要调用set方法赋值的成员字段
name:要调用set方法赋值的成员字段
- 指定赋给字段的值
value: 给基本数据类型和String类型赋值ref: 给其它Bean类型的字段赋值,ref属性的值应为配置文件中配置的Bean的id
public class AccountServiceImpl implements IAccountService {

	private String name;
	private Integer age;
	private Date birthday;

	public void setName(String name) {
		this.name = name;
	}
	public void setAge(Integer age) {
		this.age = age;
	}
	public void setBirthday(Date birthday) {
		this.birthday = birthday;
	}

	@Override
	public void saveAccount() {
		System.out.println(name+","+age+","+birthday);
	}
}
<bean id="now" class="java.util.Date" scope="prototype">bean>

<bean id="accountService" class="cn.maoritian.service.impl.AccountServiceImpl">
	<property name="name" value="myname">property>
	<property name="age" value="21">property>

	<property name="birthday" ref="now">property>
bean>
注入集合字段
集合字段及其对应的标签按照集合的结构分为两类: 相同结构的集合标签之间可以互相替换.
-
只有键的结构:
- 数组字段:
- List字段:
- Set字段:
其中
- 数组字段:
-
键值对的结构:
- Map字段:
标签表示集合,key属性表示键,value属性表示值. - Properties字段:
key属性表示键,标签内的内容表示值.
其中
, - Map字段:
下面使用set方法注入各种集合字段
public class AccountServiceImpl implements IAccountService {
	// 集合字段
	private String[] myArray;
	private List<String> myList;
	private Set<String> mySet;
	private Map<String,String> myMap;
	private Properties myProps;

	// 集合字段的set方法
	public void setMyStrs(String[] myArray) {
		this.myArray = myArray;
	}
	public void setMyList(List<String> myList) {
		this.myList = myList;
	}
	public void setMySet(Set<String> mySet) {
		this.mySet = mySet;
	}
	public void setMyMap(Map<String, String> myMap) {
		this.myMap = myMap;
	}
	public void setMyProps(Properties myProps) {
		this.myProps = myProps;
	}

	@Override
	public void saveAccount() {
		System.out.println(Arrays.toString(myArray));
		System.out.println(myList);
		System.out.println(mySet);
		System.out.println(myMap);
		System.out.println(myProps);
	}
}
<bean id="accountService" class="cn.maoritian.service.impl.AccountServiceImpl3">
	<property name="myStrs">
		<array>
			<value>value1value>
			<value>value2value>
			<value>value3value>
		array>
	property>

	<property name="myList">
		<list>
			<value>value1value>
			<value>value2value>
			<value>value3value>
		list>
	property>

	<property name="mySet">
		<set>
			<value>value1value>
			<value>value2value>
			<value>value3value>
		set>
	property>

	<property name="myMap">
		<map>
			<entry key="key1" value="value1">entry>
			<entry key="key2">
				<value>value2value>
			entry>

		map>
	property>

	<property name="myProps">
		<props>
			<prop key="key1">value1prop>
			<prop key="key2">value2prop>
		props>
	property>
bean>
使用注解实现IOC
使用注解实现IOC,要将注解写在类的定义中
常用注解
用于创建对象的注解
这些注解的作用相当于bean.xml中的
@Component: 把当前类对象存入spring容器中,其属性如下:value: 用于指定当前类的id. 不写时默认值是当前类名,且首字母改小写
@Controller: 将当前表现层对象存入spring容器中@Service: 将当前业务层对象存入spring容器中@Repository: 将当前持久层对象存入spring容器中
@Controller,@Service,@Repository注解的作用和属性与@Component是一模一样的,可以相互替代,它们的作用是使三层对象的分别更加清晰.
用于注入数据的注解
这些注解的作用相当于bean.xml中的
@Autowired: 自动按照成员变量类型注入.- 注入过程
- 当spring容器中有且只有一个对象的类型与要注入的类型相同时,注入该对象.
- 当spring容器中有多个对象类型与要注入的类型相同时,使用要注入的变量名作为bean的
id,在spring 容器查找,找到则注入该对象.找不到则报错.
- 出现位置: 既可以在变量上,也可以在方法上
- 细节: 使用注解注入时,set方法可以省略
- 注入过程
@Qualifier: 在自动按照类型注入的基础之上,再按照bean的id注入.- 出现位置: 既可以在变量上,也可以在方法上.注入变量时不能独立使用,必须和
@Autowire一起使用; 注入方法时可以独立使用. - 属性:
value: 指定bean的id
- 出现位置: 既可以在变量上,也可以在方法上.注入变量时不能独立使用,必须和
@Resource: 直接按照bean的id注入,它可以独立使用.独立使用时相当于同时使用@Autowired和@Qualifier两个注解.- 属性:
name: 指定bean的id
- 属性:
@Value: 注入基本数据类型和String类型数据- 属性:
value: 用于指定数据的值,可以使用el表达式(${表达式})
- 属性:
用于改变作用范围的注解
这些注解的作用相当于bean.xml中的scope属性.
@Scope: 指定bean的作用范围- 属性:
value: 用于指定作用范围的取值,"singleton","prototype","request","session","globalsession"
- 属性:
和生命周期相关的注解
这些注解的作用相当于bean.xml中的init-method和destroy-method属性
@PostConstruct: 用于指定初始化方法@PreDestroy: 用于指定销毁方法
spring的半注解配置和纯注解配置
spring的注解配置可以与xml配置并存,也可以只使用注解配置
半注解配置
在半注解配置下,spring容器仍然使用ClassPathXmlApplicationContext类从xml文件中读取IOC配置,同时在xml文件中告知spring创建容器时要扫描的包.
例如,使用半注解模式时,上述简单实例中的beans.xml内容如下:
<beans xmlns="http://www.springframework.org/schema/beans"
       xmlns:xsi="http://www.w3.org/2001/XMLSchema-instance"
       xmlns:context="http://www.springframework.org/schema/context"
       xsi:schemaLocation="http://www.springframework.org/schema/beans
        http://www.springframework.org/schema/beans/spring-beans.xsd
        http://www.springframework.org/schema/context
        http://www.springframework.org/schema/context/spring-context.xsd">


    <context:component-scan base-package="cn.maoritian">context:component-scan>
beans>
然后将spring注解加在类的定义中.
纯注解配置
在纯注解配置下,我们用配置类替代bean.xml,spring容器使用AnnotationApplicationContext类从spring配置类中读取IOC配置
纯注解配置下的注解
@Configuration: 用于指定当前类是一个spring配置类,当创建容器时会从该类上加载注解.获取容器时需要使用AnnotationApplicationContext(有@Configuration注解的类.class).@ComponentScan: 指定spring在初始化容器时要扫描的包,作用和bean.xml文件中basePackages: 用于指定要扫描的包,是value属性的别名
@Bean: 该注解只能写在方法上,表明使用此方法创建一个对象,并放入spring容器,其属性如下:name: 指定此方法创建出的bean对象的id- 细节: 使用注解配置方法时,如果方法有参数,Spring框架会到容器中查找有没有可用的bean对象,查找的方式与
@Autowired注解时一样的.
@PropertySource: 用于加载properties配置文件中的配置.例如配置数据源时,可以把连接数据库的信息写到properties配置文件中,就可以使用此注解指定properties配置文件的位置,其属性如下:value: 用于指定properties文件位置.如果是在类路径下,需要写上"classpath:"
@Import: 用于导入其他配置类.当我们使用@Import注解之后,有@Import注解的类就是父配置类,而导入的都是子配置类. 其属性如下:value: 用于指定其他配置类的字节码
实例: 使用纯注解配置实现数据库CRUD
-
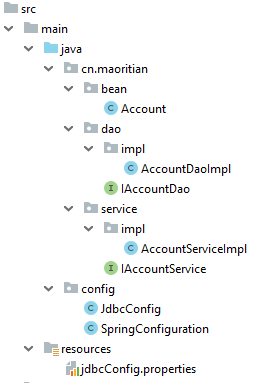
项目结构: 其中包
cn.maoritian存放业务代码,包config存放配置类. dao层选用DBUtils和c3p0.

-
包
cn.maoritian存放业务代码,其中dao层实现类和service层实现类的代码如下:dao层实现类:
@Repository("accountDao")
public class AccountDaoImpl implements IAccountDao {

    @Autowired	// 自动从spring容器中寻找QueryRunner类型对象注入给runner成员变量
    private QueryRunner runner;		// DBUtil对象,用来执行SQL语句

    public List<Account> findAllAccount() {
		// 功能实现...
    }

    public void saveAccount(Account account) {
        // 功能实现...
    }

    public void deleteAccount(Integer accountId) {
        // 功能实现...
    }
}
service层实现类:
@Service("accountService") public class AccountServiceImpl implements IAccountService{ @Autowired // 自动从spring容器中寻找IAccountDao类型对象注入给accountDao成员变量 private IAccountDao accountDao; // dao层对象,用来执行数据持久化操作 public List<Account> findAllAccount() { // 功能实现... } public void saveAccount(Account account) { // 功能实现... } public void deleteAccount(Integer accountId) { // 功能实现... } } -
包
config存放配置类,其中配置类代码如下:其中
SpringConf类为主配置类,内容如下:@Configuration // 说明此类为配置类 @ComponentScan("cn.maoritian") // 指定初始化容器时要扫描的包 @Import(JdbcConfig.class) // 引入JDBC配置类 public class SpringConfiguration { }其中
JDBCConfig类为JDBC配置类,内容如下:@Configuration // 说明此类为配置类 @PropertySource("classpath:jdbc.properties") // 指定配置文件的路径,关键字classpath表示类路径 public class JdbcConfig { @Value("${jdbc.driver}") // 为driver成员属性注入值,使用el表达式 private String driver; @Value("${jdbc.url}") // 为url成员属性注入值,使用el表达式 private String url; @Value("${jdbc.username}") // 为usernamer成员属性注入值,使用el表达式 private String username; @Value("${jdbc.password}") // 为password成员属性注入值,使用el表达式 private String password; // 创建DBUtils对象 @Bean(name="runner") // 此将函数返回的bean对象存入spring容器中,其id为runner @Scope("prototype") // 说明此bean对象的作用范围为多例模式,以便于多线程访问 public QueryRunner createQueryRunner(@Qualifier("ds") DataSource dataSource){ // 为函数参数datasource注入id为ds的bean对象 return new QueryRunner(dataSource); } // 创建数据库连接池对象 @Bean(name="ds") // 此将函数返回的bean对象存入spring容器中,其id为ds public DataSource createDataSource(){ try { ComboPooledDataSource ds = new ComboPooledDataSource(); ds.setDriverClass(driver); ds.setJdbcUrl(url); ds.setUser(username); ds.setPassword(password); return ds; }catch (Exception e){ throw new RuntimeException(e); } } }

