在项目中经常遇到一些数据的修改,很多时候业务方需要一个修改日志记录,这里我们计划用mssql数据库来存放日志记录,用EF来操作,记录日志可以用mvc的ActionFilterAttribute 来完成也可以用AOP来完成。以前在asp.net的AOP用的是IMessageSink这里我们计划用Castle.DynamicProxy来完成。
准备工作:
创建数据库表:
CREATE TABLE [dbo].[logs](
    [Id] [int] IDENTITY(1,1) NOT NULL,
    [Title] [nvarchar](50) NULL,
    [Content] [nvarchar](max) NULL,
    [CreateTime] [datetime] NULL,
 CONSTRAINT [PK_logs] PRIMARY KEY CLUSTERED
(
    [Id] ASC
)WITH (PAD_INDEX = OFF, STATISTICS_NORECOMPUTE = OFF, IGNORE_DUP_KEY = OFF, ALLOW_ROW_LOCKS = ON, ALLOW_PAGE_LOCKS = ON) ON [PRIMARY]
) ON [PRIMARY] TEXTIMAGE_ON [PRIMARY]
这里的Title是根据业务划分的,Content是修改后的内容,实际生产应该还要加上修改人。这里都简化了(个人并不推荐用EF来迁移数据)
创建 Asp.netCore项目
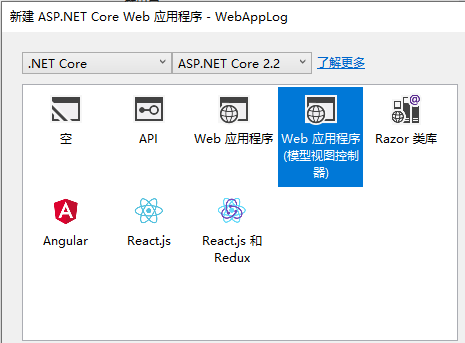
这里我们以asp.netcore2.2创建一个WebAppLog视图模型程序
在appsettings.json添加数据库连接串:
 "ConnectionStrings": {
    "SqlServerConnection": "Server=192.168.100.5;initial catalog=test;UID=sa;PWD=xxxx"
  }
在Models文件夹下新建Log.cs
namespace WebAppLog.Models
{
    public class Log
    {
        public int Id { set; get; }
        public string Title { set; get; }
        public string Content { set; get; }
        public DateTime CreateTime { set; get; }
    }
}
创建LogContext.cs文件:
namespace WebAppLog { using Microsoft.EntityFrameworkCore; using WebAppLog.Models; public class LogContext : DbContext { public LogContext(DbContextOptionsoptions) : base(options) { } public virtual DbSet Log { get; set; } protected override void OnModelCreating(ModelBuilder modelBuilder) { modelBuilder.Entity ().ToTable("logs"); } } }
修改HomeController.cs文件:
namespace WebAppLog.Controllers
{
    using Microsoft.AspNetCore.Mvc;
    using System.Linq;
    public class HomeController : Controller
    {
        private LogContext context;

        public HomeController(LogContext context)
        {
            this.context = context;

        }
        public IActionResult Index()
        {
            var data = context.Log.ToList();
            return View(data);
        }

    }
}
修改Home的Index.cshtml视图:
@{ var list = Model as List; } class="text-center">class="display-4">Welcome
"1"> @foreach (var item in list) {
Title @item.Title Content class="htmlcontent">@item.Content } CreateTime @item.CreateTime.ToString("yyyy-MM-dd HH:mm:ss")
在Startup.cs的ConfigureServices方法最后添加如下:
 string connection = Configuration["ConnectionStrings:SqlServerConnection"];
 services.AddDbContext(options => options.UseSqlServer(connection));
这时候我们的程序就可以运行了。
ActionFilterAttribute
这里我们首先用ActionFilterAttribute来实现日志记录,在ActionFilterAttribute里面需要用到LogContext,我这里用 filterContext.HttpContext.RequestServices.GetService(typeof(LogContext))来获取的。
新建LogAttribute.cs文件:在OnActionExecuting方法我们获取参数,在OnResultExecuted获取返回值并记录到数据库
namespace WebAppLog
{
    using Microsoft.AspNetCore.Mvc.Filters;
    using Newtonsoft.Json;
    using System;
    using WebAppLog.Models;
    public class LogAttribute : ActionFilterAttribute
    {
        public string Title { get; set; }

        public LogAttribute(string title)
        {
            Title = title;
        }
        private string _arguments = null;

        public override void OnActionExecuting(ActionExecutingContext filterContext)
        {
            _arguments = JsonConvert.SerializeObject(filterContext.ActionArguments);
            base.OnActionExecuting(filterContext);
        }

        public override void OnResultExecuted(ResultExecutedContext filterContext)
        {
            var context = filterContext.HttpContext.RequestServices.GetService(typeof(LogContext)) as LogContext;
            string result = JsonConvert.SerializeObject(filterContext.Result);
            var log = new Log
            {
                Title = Title,
                Content = $"{{\"arguments\":{_arguments},\"result\":{result}}}",
                CreateTime = DateTime.Now
            };
            context.Log.Add(log);
            context.SaveChanges();

            base.OnResultExecuted(filterContext);
        }
    }
}
在HomeController.cs中增加一个Action
 [Log("test")]
  public ActionResult Update(int id, string content)
   {
      return Ok();
   }
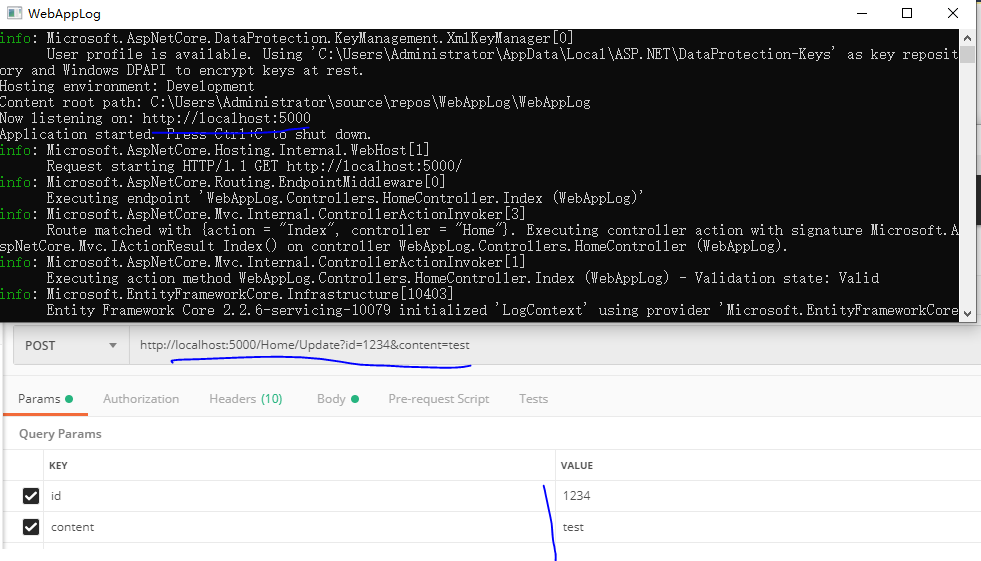
运行程序用postman发送一个请求:
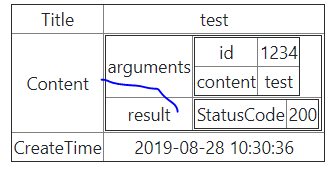
由于我们的日志是json格式,所以需要修改home的Index.cshtml让他以表格来显示
在table结束标签后追加一下js代码(目的就是让Content更加好看)
运行程序:
AOP
首先我们需要安装相应的nuget包
Autofac.Extensions.DependencyInjection
Autofac.Extras.DynamicProxy
首先我们创建一个LogInterceptor.cs文件来实现AOP,但是不是所有的方法都要记录日志,所以我们创建了一个UsageAttribute来标记是否记录日志:
namespace WebAppLog
{
    using Castle.DynamicProxy;
    using Microsoft.EntityFrameworkCore;
    using System;
    using System.Reflection;
    using WebAppLog.Models;
    public class LogInterceptor : IInterceptor
    {
        LogContext context;
        public LogInterceptor(string connstr)
        {
            var optionsBuilder = new DbContextOptionsBuilder();
            optionsBuilder.UseSqlServer(connstr);
            context = new LogContext(optionsBuilder.Options);
        }
        public void Intercept(IInvocation invocation)
        {
            //真正调用方法
            invocation.Proceed();
            var methodAttribute = (UsageAttribute)invocation.Method.GetCustomAttribute(typeof(UsageAttribute));
            if (methodAttribute != null)
            {
                var args = invocation.Arguments;
                var pars = invocation.Method.GetParameters();
                string json = "";
                for (int i = 0; i < args.Length; i++)
                {
                    string tmp = $"\"{pars[i].Name}\":\"{args[i].ToString()}\"";
                    json += tmp + ",";
                }
                string argument = "{" + json.TrimEnd(',') + "}";
                string result = invocation.ReturnValue.ToString();
                string title = methodAttribute.Description;
                var log = new Log
                {
                    Title = title,
                    Content = $"{{\"arguments\":{argument},\"result\":\"{result}\"}}",
                    CreateTime = DateTime.Now
                };
                context.Log.Add(log);
                context.SaveChanges();
            }
        }
    }

    [AttributeUsage(AttributeTargets.Method, AllowMultiple = false)]
    public sealed class UsageAttribute : Attribute
    {
        public string Description { set; get; }

        public UsageAttribute(string description)
        {
            Description = description;
        }
    }
}
要实现AOP 我们需要创建一个LogService.cs(还有对应的接口,这里必须要有接口不然aop搞不定)
namespace WebAppLog
{
    using Autofac.Extras.DynamicProxy;
    public interface ILogService
    {
        [Usage("update")]
        bool Update(int id, string content);
    }

    [Intercept(typeof(LogInterceptor))]
    public class LogService : ILogService
    {
        public bool Update(int id, string content)
        {
            return true;
        }
    }
}
修改HomeController.cs并增加相应的Action
       private LogContext context;
        public ILogService LogService { get; set; }

        public HomeController(LogContext context, ILogService logService)
        {
            this.context = context;
            LogService = logService;
        }
        public ActionResult Modify()
        {
            LogService.Update(123, "test");
            return Ok();
        }
现在修改Startup.cs文件,用Autofac的DI替换asp.netCore 默认的DI。把原先默认的ConfigureServices放注释,新增ConfigureServices方法如下:
public IServiceProvider ConfigureServices(IServiceCollection services) { services.Configure(options => { // This lambda determines whether user consent for non-essential cookies is needed for a given request. options.CheckConsentNeeded = context => true; options.MinimumSameSitePolicy = SameSiteMode.None; }); services.AddMvc().SetCompatibilityVersion(CompatibilityVersion.Version_2_2); string connection = Configuration["ConnectionStrings:SqlServerConnection"]; services.AddDbContext (options => options.UseSqlServer(connection)); ///上面的是原先ConfigureServices的类容,下面是增加的代码 var containerBuilder = new ContainerBuilder(); containerBuilder.Register(c => new LogInterceptor(connection)); containerBuilder.RegisterType ().As ().PropertiesAutowired().EnableInterfaceInterceptors(); containerBuilder.Populate(services); var container = containerBuilder.Build(); return new AutofacServiceProvider(container); }
然后运行程序,访问http://localhost:5000/home/modify
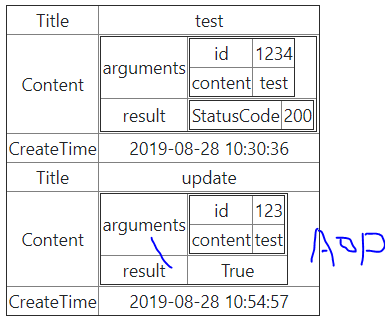
最后回到主页如下:
源码下载
参考:
Aspect Oriented Programming (AOP) in .NET Core and C# using AutoFac and DynamicProxy
Type Interceptors
.Net Core 学习之路-AutoFac的使用
asp.net EFcore配置链接sqlserver
ASP.NET Core 使用 AutoFac 注入 DbContext


