一、可查看连接iOS SDK 集成指南 - 极光文档
二、自己总结
1、设置指南(导入极光推送的证书)iOS 证书设置指南 - 极光文档
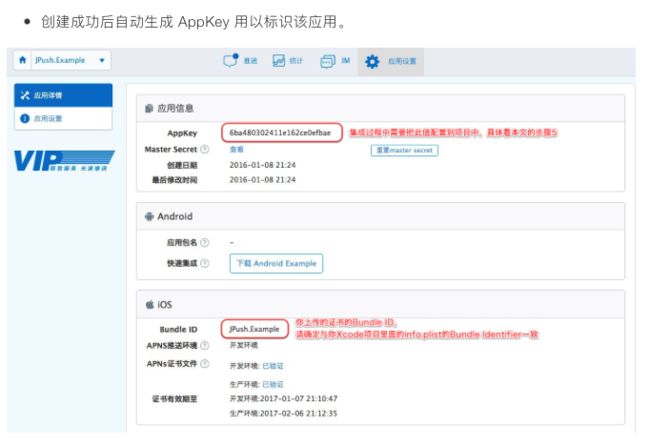
2、创建应用

3、配置工程
导入SDK
将SDK包解压,在Xcode中选择“Add files to 'Your project name'...”,将解压后的lib子文件夹(包含JPUSHService.h、jpush-ios-x.x.x.a)添加到你的工程目录中。
添加Framework
CFNetwork.framework
CoreFoundation.framework
CoreTelephony.framework
SystemConfiguration.framework
CoreGraphics.framework
Foundation.framework
UIKit.framework
Security.framework
Xcode7需要的是libz.tbd;Xcode7以下版本是libz.dylib
Adsupport.framework (获取IDFA需要;如果不使用IDFA,请不要添加)
UserNotifications.framework(Xcode8及以上)
4、Capabilities
如使用Xcode8及以上环境开发,请开启Application Target的Capabilities->Push Notifications选项,如图:

5、http协议

6、初始化代码
请将以下代码添加到
-(BOOL)application:(UIApplication *)application didFinishLaunchingWithOptions:(NSDictionary *)launchOptions
加入以下代码
NSString *advertisingId = [[[ASIdentifierManager sharedManager] advertisingIdentifier] UUIDString];
//Required
if ([[UIDevice currentDevice].systemVersion floatValue] >= 10.0) {
JPUSHRegisterEntity * entity = [[JPUSHRegisterEntity alloc] init];
entity.types = UNAuthorizationOptionAlert|UNAuthorizationOptionBadge|UNAuthorizationOptionSound;
[JPUSHService registerForRemoteNotificationConfig:entity delegate:self];
}
else if ([[UIDevice currentDevice].systemVersion floatValue] >= 8.0) {
//可以添加自定义categories
[JPUSHService registerForRemoteNotificationTypes:(UIUserNotificationTypeBadge |
UIUserNotificationTypeSound |
UIUserNotificationTypeAlert)
categories:nil];
}
else {
//categories 必须为nil
[JPUSHService registerForRemoteNotificationTypes:(UIRemoteNotificationTypeBadge |
UIRemoteNotificationTypeSound |
UIRemoteNotificationTypeAlert)
categories:nil];
}
//Required
// init Push(2.1.5版本的SDK新增的注册方法,改成可上报IDFA,如果没有使用IDFA直接传nil )
// 如需继续使用pushConfig.plist文件声明appKey等配置内容,请依旧使用[JPUSHService setupWithOption:launchOptions]方式初始化。
[JPUSHService setupWithOption:launchOptions appKey:appKey
channel:channel
apsForProduction:isProduction
advertisingIdentifier:advertisingId];
7、注册APNs成功并上报DeviceToken
请在AppDelegate.m实现该回调方法并添加回调方法中的代码
加入这个方法
- (void)application:(UIApplication *)application
didRegisterForRemoteNotificationsWithDeviceToken:(NSData *)deviceToken {
/// Required - 注册 DeviceToken
[JPUSHService registerDeviceToken:deviceToken];
}
8、实现注册APNs失败接口(可选)
- (void)application:(UIApplication *)application didFailToRegisterForRemoteNotificationsWithError:(NSError *)error {
//Optional
NSLog(@"did Fail To Register For Remote Notifications With Error: %@", error);
}
9、添加处理APNs通知回调方法
请在AppDelegate.m实现该回调方法并添加回调方法中的代码
加入以下代码
#pragma mark- JPUSHRegisterDelegate
// iOS 10 Support
- (void)jpushNotificationCenter:(UNUserNotificationCenter *)center willPresentNotification:(UNNotification *)notification withCompletionHandler:(void (^)(NSInteger))completionHandler {
// Required
NSDictionary * userInfo = notification.request.content.userInfo;
if([notification.request.trigger isKindOfClass:[UNPushNotificationTrigger class]]) {
[JPUSHService handleRemoteNotification:userInfo];
}
completionHandler(UNNotificationPresentationOptionAlert); // 需要执行这个方法,选择是否提醒用户,有Badge、Sound、Alert三种类型可以选择设置
}
// iOS 10 Support
- (void)jpushNotificationCenter:(UNUserNotificationCenter *)center didReceiveNotificationResponse:(UNNotificationResponse *)response withCompletionHandler:(void (^)())completionHandler {
// Required
NSDictionary * userInfo = response.notification.request.content.userInfo;
if([response.notification.request.trigger isKindOfClass:[UNPushNotificationTrigger class]]) {
[JPUSHService handleRemoteNotification:userInfo];
}
completionHandler(); // 系统要求执行这个方法
}
- (void)application:(UIApplication *)application didReceiveRemoteNotification:(NSDictionary *)userInfo fetchCompletionHandler:(void (^)(UIBackgroundFetchResult))completionHandler {
// Required, iOS 7 Support
[JPUSHService handleRemoteNotification:userInfo];
completionHandler(UIBackgroundFetchResultNewData);
}
- (void)application:(UIApplication *)application didReceiveRemoteNotification:(NSDictionary *)userInfo {
// Required,For systems with less than or equal to iOS6
[JPUSHService handleRemoteNotification:userInfo];
}
10、成功运行 例如:
2016-08-19 17:12:12.745823 219b28[1443:286814] | JPUSH | I - [JPUSHLogin]
----- login result -----
uid:5460310207
registrationID:171976fa8a8620a14a4
11、具体看文档。一步一步的执行