Spring Boot 2.0.2 整合 Redis 2.0.7
前言
之前做的项目的后端使用的Spring Boot + Mybatis + Shiro。后面根据需求需要添加Redis,以下内容是我在整合Redis时的重点的步骤以及遇到的坑。
1、POM文件添加依赖
    org.springframework.boot
    spring-boot-starter-data-redis
2、Spring配置文件
#Redis配置
spring.redis.database=5
spring.redis.host=127.0.0.1
spring.redis.port=6379
# Redis服务器连接密码(默认为空)
spring.redis.password=
#lettuce专有配置
#连接池最大连接数,负数表示不限制
spring.redis.lettuce.pool.max-active=8
#连接池最大空闲连接数,负数表示不限制
spring.redis.lettuce.pool.max-idle=8
#等待可用连接的最大时间,负数不限制
spring.redis.lettuce.pool.max-wait=-1ms
#连接池最小空闲连接数
spring.redis.lettuce.pool.min-idle=0
#超时时间
spring.redis.lettuce.shutdown-timeout=100ms
#jedis专有配置
#spring.redis.jedis.pool.max-active=8
#spring.redis.jedis.pool.max-idle=8
#spring.redis.jedis.pool.max-wait=-1ms
#spring.redis.jedis.pool.min-idle=0
#spring.redis.jedis.shutdown-timeout=100ms
添加@EnableCaching注解
@SpringBootApplication
@EnableCaching
public class GreenspaceApplication {
	public static void main(String[] args) {
		SpringApplication.run(GreenspaceApplication.class, args);
	}
}
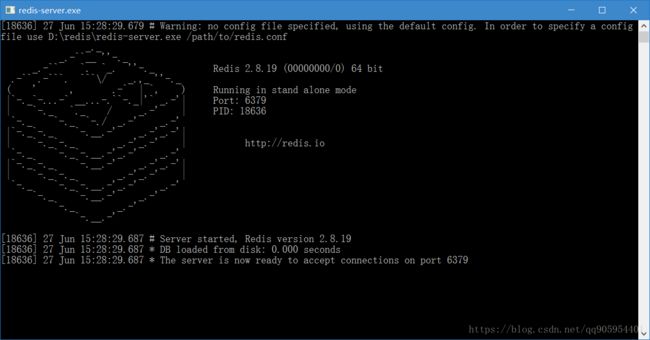
3、启动redis-server.exe
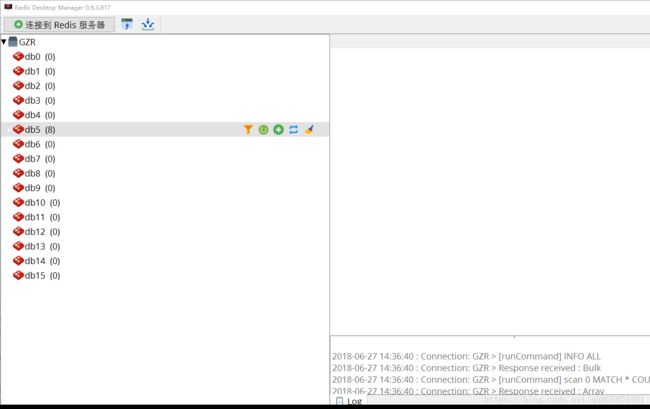
这个从百度下载,建议配合可视化工具Redis Desktop Manager使用。
4、测试
这时就已经可以简单使用了。
使用之前需要AutoWired StringRedisTemplate和RedisTemplate,前者是存储
package com.greenspace;

import org.junit.Test;
import org.junit.runner.RunWith;
import org.springframework.beans.factory.annotation.Autowired;
import org.springframework.boot.test.context.SpringBootTest;
import org.springframework.data.redis.core.RedisTemplate;
import org.springframework.data.redis.core.StringRedisTemplate;
import org.springframework.test.context.junit4.SpringRunner;

import java.util.Optional;

@RunWith(SpringRunner.class)
@SpringBootTest
public class RedisTest {

    @Autowired
    private StringRedisTemplate stringRedisTemplate;
    @Autowired
    private RedisTemplate redisTemplate;

    @Test
    public void testR() {
        stringRedisTemplate.opsForValue().set("love", "qiqi");
        redisTemplate.opsForValue().set("like", "qiqi");
        System.out.println(stringRedisTemplate.opsForValue().get("love"));
        System.out.println(redisTemplate.opsForValue().get("like"));

    }
}
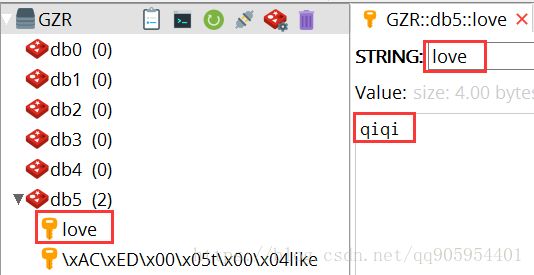
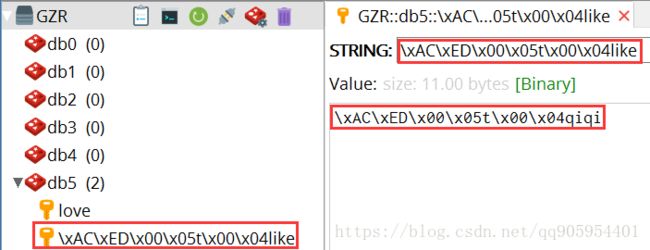
然后可以在Redis Desktop Manager中查看存入的值。
这个是StringRedisTemplate
另一个是RedisTemplate
可以看到StringRedisTemplate的键值对是正常的格式,而RedisTemplate出现乱码,虽然出现乱码,但并不影响值的读取。当数据量足够大、数据模型足够复杂时,乱码很影响我们在这里识别数据,我们在后面对这个问题经行处理。
5、RedisTemplate序列化、缓存管理器和自定义的缓存key的生成策略
RedisTemplate序列化主要解决上面提到的乱码问题。
缓存管理器配置当Redis使用注解时的配置。
自定义的缓存key的生成策略也贴上,目的是自动生成缓存的key,注释掉了,我没有使用。
新建一个配置类如下:
package com.greenspace.configuration;

import com.fasterxml.jackson.annotation.JsonAutoDetect;
import com.fasterxml.jackson.annotation.PropertyAccessor;
import com.fasterxml.jackson.databind.ObjectMapper;
import org.springframework.beans.factory.annotation.Autowired;
import org.springframework.cache.annotation.CachingConfigurerSupport;
import org.springframework.context.annotation.Bean;
import org.springframework.context.annotation.Configuration;


import org.springframework.data.redis.cache.RedisCacheConfiguration;
import org.springframework.data.redis.cache.RedisCacheManager;
import org.springframework.data.redis.connection.lettuce.LettuceConnectionFactory;
import org.springframework.data.redis.core.RedisTemplate;
import org.springframework.data.redis.serializer.*;

import java.time.Duration;
import java.util.HashMap;
import java.util.Map;

@Configuration
public class GRedisConfig extends CachingConfigurerSupport {

    @Autowired
    private LettuceConnectionFactory lettuceConnectionFactory;

    //自定义的缓存key的生成策略
//    @Bean
//    public KeyGenerator keyGenerator() {
//        return new KeyGenerator(){
//            @Override
//            public Object generate(Object target, Method method, Object... params) {
//                StringBuffer sb = new StringBuffer();
//                sb.append(target.getClass().getName());
//                sb.append('.');
//                sb.append(method.getName());
//                for(Object obj:params){
//                    sb.append(obj.toString());
//                }
//                return sb.toString();
//            }
//        };
//    }

    //自定义缓存配置
    private RedisCacheConfiguration getRedisCacheConfiguration(Duration duration) {
        //获取默认配置
        RedisCacheConfiguration defaultCacheConfiguration = RedisCacheConfiguration.defaultCacheConfig();
        GenericJackson2JsonRedisSerializer genericJackson2JsonRedisSerializer = new GenericJackson2JsonRedisSerializer();
        return defaultCacheConfiguration
                .serializeValuesWith(RedisSerializationContext.SerializationPair.fromSerializer(genericJackson2JsonRedisSerializer))
                .entryTtl(duration);
    }

    //缓存管理器
    @Bean
    public RedisCacheManager cacheManager(LettuceConnectionFactory lettuceConnectionFactory) {
        Map initialCacheConfigurations = new HashMap<>();
        //获取默认配置
        RedisCacheConfiguration defaultCacheConfiguration = getRedisCacheConfiguration(Duration.ZERO);
        //当redis注解value为“10min”时候,采用下面这个配置
        initialCacheConfigurations.put("10min", getRedisCacheConfiguration(Duration.ofMinutes(10L)));
        initialCacheConfigurations.put("1h", getRedisCacheConfiguration(Duration.ofHours(1L)));
        initialCacheConfigurations.put("6h", getRedisCacheConfiguration(Duration.ofHours(6L)));
        RedisCacheManager redisCacheManager = RedisCacheManager.builder(lettuceConnectionFactory)
                .cacheDefaults(defaultCacheConfiguration)
                .withInitialCacheConfigurations(initialCacheConfigurations)
                .transactionAware()
                .build();
        return redisCacheManager;
    }

    //设置RedisTemplate序列化
    @Bean
    public RedisTemplate redisTemplate(LettuceConnectionFactory lettuceConnectionFactory ) {
        Jackson2JsonRedisSerializer jackson2JsonRedisSerializer = new Jackson2JsonRedisSerializer(Object.class);
        ObjectMapper om = new ObjectMapper();
        om.setVisibility(PropertyAccessor.ALL, JsonAutoDetect.Visibility.ANY);
        om.enableDefaultTyping(ObjectMapper.DefaultTyping.NON_FINAL);
        jackson2JsonRedisSerializer.setObjectMapper(om);
        RedisTemplate redisTemplate = new RedisTemplate();
        redisTemplate.setConnectionFactory(lettuceConnectionFactory);
        RedisSerializer stringSerializer = new StringRedisSerializer();
        redisTemplate.setKeySerializer(stringSerializer);//key序列化
        redisTemplate.setValueSerializer(jackson2JsonRedisSerializer);//value序列化
        redisTemplate.setHashKeySerializer(stringSerializer);//Hash key序列化
        redisTemplate.setHashValueSerializer(jackson2JsonRedisSerializer);//Hash value序列化
        redisTemplate.afterPropertiesSet();
        return redisTemplate;
    }
}
然后我们再测试一下redisTemplate,发现序列化为我们想要的JSON形式,乱码消失。
在上面的配置中,我们配置了缓存管理器。给缓存管理器使用了我们自定义的默认配置,这个配置使用了GenericJackson2JsonRedisSerializer这个序列化方式,目的是当我们在某个类或者方法注解时,Redis将根据我们的配置存、取缓存。
另外,除了默认配置,我们通过initialCacheConfigurations这个Map可以添加自己的自定义配置,我设置了3个自定义配置,目的是通过表示value值的不同设置不同的缓存过期时间,这个可以根据自己的情况配置。
6、注解的使用
6.1@Cacheable
@Cacheable在Spring Boot一般标注在service层的实现类的方法上,如下图所示
    @Cacheable(value = "6h",key = "'authUser::'+ #userName + '_loveq_'")
    @Transactional(rollbackFor=Exception.class,readOnly=true)
    @Override
    public Optional getUserByUserName(String userName) {
        return Optional.ofNullable(authUserMapper.selectByUserName(userName));
    }
@Cacheable注解,一般常用两个属性value和key,key可以使用Spring EL表达式。
当代码从controller层或者其他的service层调用该方法时(注意:在同一类中调用带有redis注解的方法时,将不会触发缓存),redis会检测缓存中是否有相对应的缓存,如果有,数据会从缓存取,否则会进入方法体中读取数据。并且return后面跟的数据就是要缓存的数据。
redis会根据value和key的不同来判断是否是同一缓存,如果带有参数可以在key中指定。
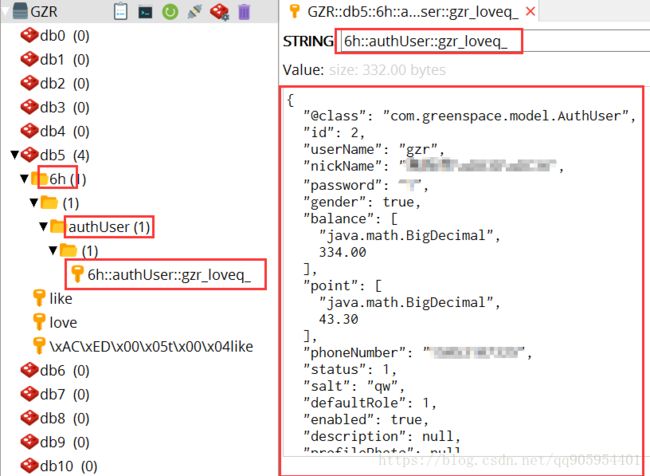
上面的方法如果缓存成功,通过Redis Desktop Manager查看如下图所示
6.2@CachePut
@CachePut用于修改缓存的数据,使用方法与@Cacheable相似,如下图所示
    @CachePut(value = "cabinetStatus", key = "'cabinetStatus'")
    @Transactional(rollbackFor=Exception.class,readOnly=true)
    @Override
    public List updCabStatus() {
        return cabinetMapper.selectCabStatus();
} 当代码运行到这个方法时,立即将方法return的数据根据value和key缓存,用于缓存的更新(注意:在同一类中调用带有redis注解的方法时,将不会触发缓存)。
6.3@CacheEvict
@CacheEvict用于缓存的删除,使用方法与上面两种相似,如下图所示
    @CacheEvict(value = "cabinetStatus", key = "'cabinetStatus'")
    @Transactional(rollbackFor=Exception.class,readOnly=true)
    @Override
    public void delCabStatus() {
}当代码运行到这个方法时,根据value和key删除相对应的缓存,用于缓存的删除(注意:在同一类中调用带有redis注解的方法时,将不会触发缓存)。
另外还可以通过配置allEntries 的属性删除value值相同的所有缓存,如下图所示
    @CacheEvict(value = "fuzzySearchBook", allEntries = true)
    @Override
    public void fuzzySearchBook() {
    }
7、问题总结
7.1在同一类中调用带有redis注解的方法时,将不会触发缓存。
7.2使用默认序列化时候,即JdkSerializationRedisSerializer,要在model对象implements Serializable。
7.3使用默认序列化,可能出现异常,比如xxx.xx.A cann't cast to xxx.xx.A。在pom文件删除spring-boot-devtools模块,问题解决。
7.4如果项目整合shiro,并且采用org.crazycake的shiro-redis插件,依赖注入顺序应该先是cache,然后才应该是shiro,实际上恰恰相反,导致shiro注入的Bean使用redis无效,解决方法在shiro的realm中的@AutoWired下面加@Lazy。
7.5自定义序列化,使用FastJsonRedisSerializer和Jackson2JsonRedisSerializer这两个序列化实现类时,出现问题,序列化成功,但是反序列化自定义类时报错,而使用GenericJackson2JsonRedisSerializer没有该问题。
