Spring+SpringMVC+Mybatis简单易懂实例整合
前言:有比这个更简单易懂的例子?发出来我吃掉,哈哈~~~
我也是这个初学者,如有歧义,请各路大神多担待,指出错误,以免误人子弟,文档开头整理下情绪,下面我们开始正题。
一,为了读者更能理解,我们从顺序讲解该例子
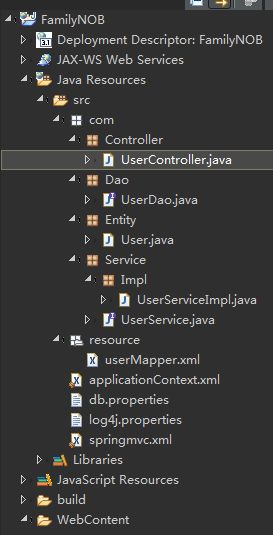
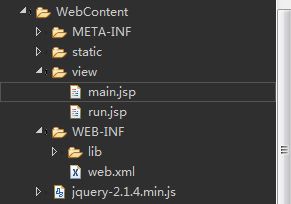
1.先看我整个目录菜单吧:
2.做java 的都知道第一部是新建项目,导入jar包(非maven项目),这一点也是很重要的,因为我一个版本不对,我弄了半天才弄好。我用的是spring3.20,mybatis-3.2.5,别忘了还有mybatis-spring-1.2.0 这个包,到时我会吧项目放到Github上。
3.把改建的目录包全部建好,下面我们开始jsp,新建一个main.jsp,代码如下,用的是ajax post访问。
<%@ page language="java" contentType="text/html; charset=utf-8" pageEncoding="utf-8"%>
<%@page import="java.util.*"%>
<%
String path = request.getContextPath().replace("/", "");
String basePath = request.getScheme() + "://" + request.getServerName() + ":" + request.getServerPort()
+ "/" + path;
%>
<%
Random random = new Random();
int rannum = (int) (random.nextDouble() * (99999 - 10000 + 1)) + 10000;
%>
Insert title here
4.编写web.xml
      contextConfigLocation
      classpath:applicationContext.xml


      org.springframework.web.context.ContextLoaderListener


		springmvc
		org.springframework.web.servlet.DispatcherServlet

			contextConfigLocation
			classpath:springmvc.xml

		1


		springmvc
		/


    default
    *.js
5.根据web.xml可见,我们第一部访问的是applicationContext.xml 这个配置文件,新建applicationContext.xml,特别提醒:里面有几个引用到了包目录和xml文件的地方。
6.配置文件可以看出有一段:
jdbc.url=jdbc\:oracle\:thin\:@localhost\:8080\:orcl
jdbc.username=admin
jdbc.password=pass123
7.下面开始加载springMVC文件
8.mybatis关键点:userMapper.xml 文件,相当于代替了老式写法的Dao接口的实现,
9.好了,到这里配置已经完成 了,下面开始编写java文件。为了不报错,我们从dao层写到controlle层,
首先是实体类:User.java
package com.Entity;

public class User {
    private Integer id;

    private String userName;

    private String password;

    private Integer age;

    public Integer getId() {
        return id;
    }

    public void setId(Integer id) {
        this.id = id;
    }

    public String getUserName() {
        return userName;
    }

    public void setUserName(String userName) {
        this.userName = userName == null ? null : userName.trim();
    }

    public String getPassword() {
        return password;
    }

    public void setPassword(String password) {
        this.password = password == null ? null : password.trim();
    }

    public Integer getAge() {
        return age;
    }

    public void setAge(Integer age) {
        this.age = age;
    }

    @Override
    public String toString() {
        return "User [id=" + id + ", userName=" + userName + ", password="
                + password + ", age=" + age + "]";
    }


}
10.Dao类:UserDao.java
package com.Dao;

import java.util.List;

import com.Entity.User;


public interface UserDao {
		public List getUser(Integer id);

}
11.Service类:UserService.java
package com.Service;

import java.util.List;

import com.Entity.User;

public interface UserService {
		public List getUserService(int id);
}
12.Service实现类:UserServiceImpl.java
package com.Service.Impl;

import java.util.List;

import org.springframework.beans.factory.annotation.Autowired;
import org.springframework.stereotype.Service;

import com.Dao.UserDao;
import com.Entity.User;
import com.Service.UserService;
@Service
public class UserServiceImpl implements UserService{
	@Autowired
	private UserDao userdao;
	@Override
	public List getUserService(int id) {
		List username = userdao.getUser(id);
		return username;
	}

}
13.Controlle类:UserController.java
package com.Controller;

import java.util.List;

import org.springframework.beans.factory.annotation.Autowired;
import org.springframework.stereotype.Controller;
import org.springframework.web.bind.annotation.RequestMapping;
import org.springframework.web.bind.annotation.RequestMethod;
import org.springframework.web.bind.annotation.ResponseBody;

import com.Entity.User;
import com.Service.UserService;

@Controller
@RequestMapping("/queryUser")
public class UserController{

	@Autowired
	private UserService userService;

	@ResponseBody
	@RequestMapping(value="/user",method = RequestMethod.POST)
	public List QueryUser(int id){
		List username = userService.getUserService(id);
		System.out.println(username);
		return username;
	}
}
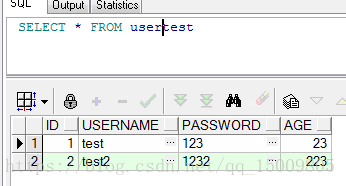
14.创建数据库表,我用的是oracle: SELECT * FROM usertest
create table USERTEST
(
  id       NUMBER,
  username VARCHAR2(20),
  password VARCHAR2(20),
  age      NUMBER
)
查询出来的结果,自己插入的值:
15.访问地址http://localhost:8080/FamilyNOB/view/main.jsp如果现实如下,恭喜你,成功了!
二,OJBK ,到这里基本上写完了,写博客真累,预览了一下,感觉和别人写的还差得多,说的容易,写着难。但希望能帮助
到初学者吧,


