通过Swagger快速生成接口文档
1.添加依赖:
在pom中添加swagger的依赖,这里使用的swagger版本为2.7.0,springboot相应版本为2.0.3,jdk1.8
示例如下:
<swagger.version>2.7.0swagger.version>

		<dependency>
			<groupId>io.springfoxgroupId>
			<artifactId>springfox-swagger2artifactId>
			<version>${swagger.version}version>
		dependency>
		<dependency>
			<groupId>io.springfoxgroupId>
			<artifactId>springfox-swagger-uiartifactId>
			<version>${swagger.version}version>
		dependency>
2.注入Bean:
示例如下:
import io.swagger.annotations.ApiOperation;
import org.springframework.context.annotation.Bean;
import org.springframework.context.annotation.Configuration;
import org.springframework.web.servlet.config.annotation.ResourceHandlerRegistry;
import org.springframework.web.servlet.config.annotation.WebMvcConfigurer;
import springfox.documentation.builders.ApiInfoBuilder;
import springfox.documentation.builders.PathSelectors;
import springfox.documentation.builders.RequestHandlerSelectors;
import springfox.documentation.service.ApiInfo;
import springfox.documentation.service.ApiKey;
import springfox.documentation.spi.DocumentationType;
import springfox.documentation.spring.web.plugins.Docket;
import springfox.documentation.swagger2.annotations.EnableSwagger2;

import java.util.List;

import static com.google.common.collect.Lists.newArrayList;

@Configuration
@EnableSwagger2
public class SwaggerConfig implements WebMvcConfigurer {

	@Override
	public void addResourceHandlers(ResourceHandlerRegistry registry) {
		registry.addResourceHandler("swagger-ui.html").addResourceLocations("classpath:/META-INF/resources/");
		registry.addResourceHandler("/webjars/**").addResourceLocations("classpath:/META-INF/resources/webjars/");
		registry.addResourceHandler("/swagger/**").addResourceLocations("classpath:/static/swagger/");
	}

	@Bean
	public Docket createRestApi() {
		return new Docket(DocumentationType.SWAGGER_2).apiInfo(apiInfo()).select()
				// 加了ApiOperation注解的类,才生成接口文档
				.apis(RequestHandlerSelectors.withMethodAnnotation(ApiOperation.class))
				// 包下的类,才生成接口文档
				// .apis(RequestHandlerSelectors.basePackage("cn.sd.controller"))
				.paths(PathSelectors.any()).build().securitySchemes(security());
	}

	private ApiInfo apiInfo() {
		return new ApiInfoBuilder().title("敢达抽奖接口文档").description("敢达抽奖接口文档").version("2.1").build();
	}

	private List<ApiKey> security() {
		return newArrayList(new ApiKey("token", "token", "header"));
	}

}
3.使用:
之前在config里设置扫描的规则,所以在controller层方法上方添加对应信息即可自动生成文档
示例1(正常获取参数):
	/**
	 * 列表
	 */
	@RequestMapping("/drawRecordList")
	@ApiOperation(value = "查看个人抽奖记录", tags = "抽奖管理", httpMethod = "GET")
	public R getDrawRecordList(@RequestParam(required = true) String openId) {
		return R.ok().put("drawRecordList", drawRecordService.getDrawRecordList(openId));
	}
示例2(通过map获取参数):
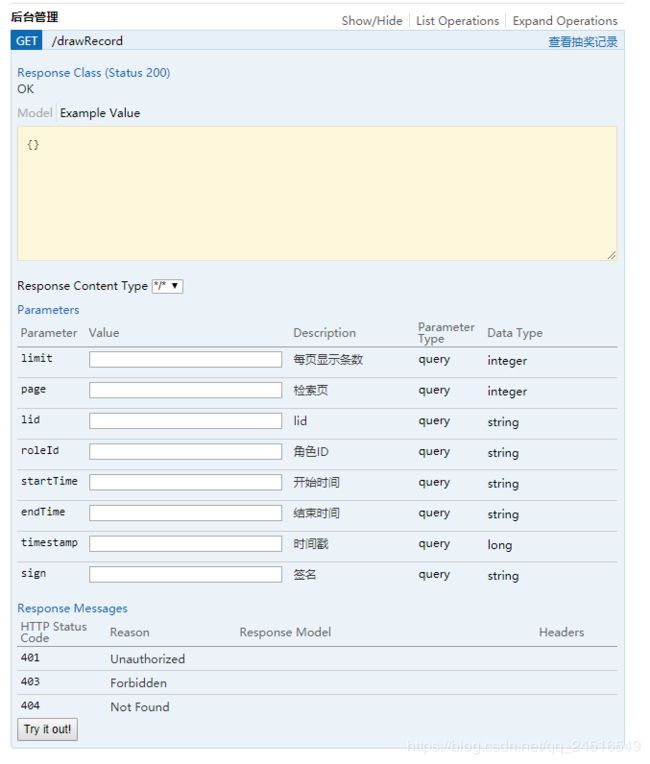
	@ApiOperation(value = "查看抽奖记录", tags = "后台管理", httpMethod = "GET")
	@GetMapping("/drawRecord")
	@ApiImplicitParams({ @ApiImplicitParam(name = "limit", value = "每页显示条数", paramType = "query", dataType = "Int"),
			@ApiImplicitParam(name = "page", value = "检索页", paramType = "query", dataType = "Int"),
			@ApiImplicitParam(name = "lid", value = "lid", paramType = "query", dataType = "String"),
			@ApiImplicitParam(name = "roleId", value = "角色ID", paramType = "query", dataType = "String"),
			@ApiImplicitParam(name = "startTime", value = "开始时间", paramType = "query", dataType = "String"),
			@ApiImplicitParam(name = "endTime", value = "结束时间", paramType = "query", dataType = "String"),
			@ApiImplicitParam(name = "timestamp", value = "时间戳", paramType = "query", dataType = "Long"),
			@ApiImplicitParam(name = "sign", value = "签名", paramType = "query", dataType = "String") })
	R drawRecord(@ApiParam(hidden = true) @RequestParam Map<String, Object> params) {
		adminService.check(Long.valueOf((String) params.get("timestamp")), (String) params.get("sign"));
		PageUtils page = adminService.getDrawRecord(params);
		return new R().put("page", page);
	}
4.生成的接口文档地址:
示例如下:
http://localhost:8082/sds_admin/swagger-ui.html
项目启动的地址/swagger-ui.html即可
5.注解属性值含义:
@ApiOperation:
value:该接口名称
tags:接口所属类别
httpMethod:接口被调用的方法
@ApiImplicitParam
name 传入参数名
value 该参数代表含义
paramType 该参数传输方式
dataType 该参数数据类型
@ApiParam
hidden是否在swagger里隐藏该参数
6.生成示例及调用
示例1:

示例2:
7.如何在swagger里传输herad
在config中我们添加了如下配置,
    private List<ApiKey> security() {
        return newArrayList(
            new ApiKey("token", "token", "header")
        );
    }
其含义是可以设置swagger在发送请求是在header中传输参数名为token的参数,该参数释义即为token,示例如下:

在右上角点击Authorize,在弹出窗口内输入token对应的value值,再点击Authorize即可在接下来的请求中都携带该header值
注意,刷新页面后需要重新设置token值。