(十六)Python爬虫基础库:requests
使用urllib有许多麻烦的地方,我们可以选择requests库模拟浏览器发送请求。首先我们需要额外安装requests库,使用命令:pip3 install requests。高度赞扬requests。
GET
urllib.request.urlopen()方法实际上就是发送GET请求,在requests中对应的方法就是get()。
import requests

resp = requests.get("https://python.org")
print(type(resp))
print(resp.text)

我们会发现get()方法返回值为
 '_content', 'status_code', 'headers', 'url', 'history',
 'encoding', 'reason', 'cookies', 'elapsed', 'request'
同时注意Cookies的类型是RequestCookieJar。使用request.get(0方法也可以添加请求头信息,方法和urllib.request.urlopen()方法一样。
POST
发送POST请求时我们需要传递data数据,一般是dict数据,在urllib中我们需要使用parse模块的urlencode()方法转化dict数据。使用requests我们之间调用post()方法,传递data数据即可。
import requests

data = {"name":"Tom","age":22}
r = requests.post("https://httpbin.org/post",data=data)
print(r.json())#如果返回数据是json串,使用json()可以将其转换为字典类型。
![]()
我们可以通过返回的HTTP状态码判断请求是否成功,比如返回200就说明成功了,返回404说明网页没找到。requests提供了一个内置的状态码查询对象requests.codes。requests.codes.ok表示的状态码为200,requests.codes.not_found表示的状态码为404。
 # 信息状态码.
 100: ('continue',),
 101: ('switching_protocols',),
 102: ('processing',),
 103: ('checkpoint',),
 122: ('uri_too_long', 'request_uri_too_long'),
 #成功状态码
 200: ('ok', 'okay', 'all_ok', 'all_okay', 'all_good', '\\o/', '✓'),
 201: ('created',),
 202: ('accepted',),
 203: ('non_authoritative_info', 'non_authoritative_information'),
 204: ('no_content',),
 205: ('reset_content', 'reset'),
 206: ('partial_content', 'partial'),
 207: ('multi_status', 'multiple_status', 'multi_stati', 'multiple_stati'),
 208: ('already_reported',),
 226: ('im_used',),

 # 重定向状态码.
 300: ('multiple_choices',),
 301: ('moved_permanently', 'moved', '\\o-'),
 302: ('found',),
 303: ('see_other', 'other'),
 304: ('not_modified',),
 305: ('use_proxy',),
 306: ('switch_proxy',),
 307: ('temporary_redirect', 'temporary_moved', 'temporary'),
 308: ('permanent_redirect',
       'resume_incomplete', 'resume',),  # These 2 to be removed in 3.0

 # 客户端错误状态码.
 400: ('bad_request', 'bad'),
 401: ('unauthorized',),
 402: ('payment_required', 'payment'),
 403: ('forbidden',),
 404: ('not_found', '-o-'),
 405: ('method_not_allowed', 'not_allowed'),
 406: ('not_acceptable',),
 407: ('proxy_authentication_required', 'proxy_auth', 'proxy_authentication'),
 408: ('request_timeout', 'timeout'),
 409: ('conflict',),
 410: ('gone',),
 411: ('length_required',),
 412: ('precondition_failed', 'precondition'),
 413: ('request_entity_too_large',),
 414: ('request_uri_too_large',),
 415: ('unsupported_media_type', 'unsupported_media', 'media_type'),
 416: ('requested_range_not_satisfiable', 'requested_range', 'range_not_satisfiable'),
 417: ('expectation_failed',),
 418: ('im_a_teapot', 'teapot', 'i_am_a_teapot'),
 421: ('misdirected_request',),
 422: ('unprocessable_entity', 'unprocessable'),
 423: ('locked',),
 424: ('failed_dependency', 'dependency'),
 425: ('unordered_collection', 'unordered'),
 426: ('upgrade_required', 'upgrade'),
 428: ('precondition_required', 'precondition'),
 429: ('too_many_requests', 'too_many'),
 431: ('header_fields_too_large', 'fields_too_large'),
 444: ('no_response', 'none'),
 449: ('retry_with', 'retry'),
 450: ('blocked_by_windows_parental_controls', 'parental_controls'),
 451: ('unavailable_for_legal_reasons', 'legal_reasons'),
 499: ('client_closed_request',),

 # 服务端错误状态码.
 500: ('internal_server_error', 'server_error', '/o\\', '✗'),
 501: ('not_implemented',),
 502: ('bad_gateway',),
 503: ('service_unavailable', 'unavailable'),
 504: ('gateway_timeout',),
 505: ('http_version_not_supported', 'http_version'),
 506: ('variant_also_negotiates',),
 507: ('insufficient_storage',),
 509: ('bandwidth_limit_exceeded', 'bandwidth'),
 510: ('not_extended',),
 511: ('network_authentication_required', 'network_auth', 'network_authentication'),
高级用法
文件上传
使用requests可以提交数据,同时我们也可以提交文件。import requests
files = {'file':open('cookies.txt','r')}
r = requests.post("https://httpbin.org/post",files=files)
print(r.text)
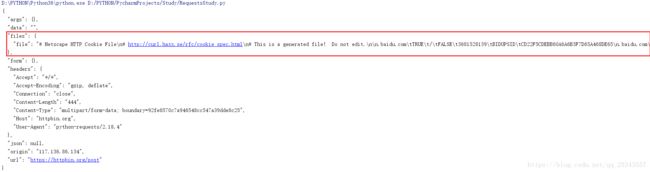
form字段为空,说明文件上传会使用files字段来标识。
Cookie
使用urllib获取cookie的方式繁琐,可以去回顾一下。下面使用requests:import requests
r = requests.get("https://www.zhihu.com")
cookies = r.cookies#获取cookie,一句话搞定
print(cookies)
for key,value in cookies.items():
print(key+'='+value)
![]()
如果你想在请求时加上cookie信息直接在请求头将cookie添加上就行了。同时requests的方法也可以单独设置cookies。首先我们创建一个RequestCookieJar的实例。然后将得到的cookie信息分割为KV形式。再利用set()方法将KV设置创建好的cookie实例。最后将实例作为cookies参数传递即可。这方法麻烦死了。
会话保持
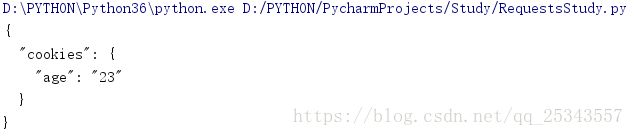
import requests

requests.get("https://httpbin.org/cookies/set/age/23")#设置cookie信息为age=23
r = requests.get("https://httpbin.org/cookies")#获取cookie
print(r.text)

第一次请求设置了cookie信息,第二次请求去获取cookie,但是没有获取到。这是因为两次请求不是在同一个Session(会话)中。
使用requests我们可以创建一个Session对象,利用它维持一个会话。
import requests

s = requests.Session()#创建Session对象
s.get("https://httpbin.org/cookies/set/age/23")
r = s.get("https://httpbin.org/cookies")
print(r.text)
可以看见由于在同一个会话中成功获取到了刚刚设置的信息。session常用做登录后的后续操作。
代理
和urllib中设置代理相比,requests只需要设置proxies参数即可。import requests
proxyIp = {'http':'219.141.153.41:80','https':'118.190.145.138:9001'}
requests.get('https://www.baidu.com',proxies=proxyIp)
验证

import requests
from requests.auth import HTTPBasicAuth
import logging

logging.captureWarnings(True)#捕获日志警告
r = requests.get('https://desktop-05hc07a:8443/svn/Test/',auth=HTTPBasicAuth('hcp','zu3.141592653/+-'),verify=False)#verify=False表示不进行证书
print(r.status_code)
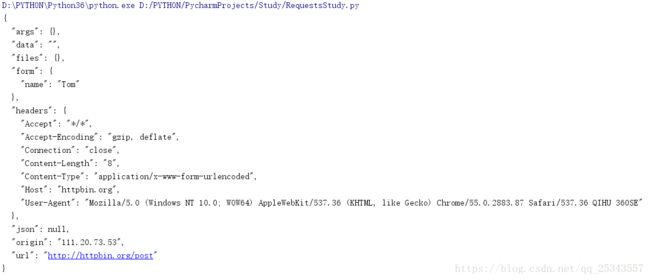
Prepared Request
在urllib中我们介绍了Request对象,请求信息可以封装在一个Request对象中。在requests中这个数据结构叫Prepared Request。from requests import Request,Session
url = "http://httpbin.org/post"
data = {'name':'Tom'}
headers = {'User-Agent':'Mozilla/5.0 (Windows NT 10.0; WOW64) AppleWebKit/537.36 (KHTML, like Gecko) Chrome/55.0.2883.87 Safari/537.36 QIHU 360SE'}
s = Session()
req = Request('POST',url=url,data=data,headers=headers)#首先构造Request对象
prepared = s.prepare_request(req)#转换为Prepared Request对象
r = s.send(prepared)
print(r.text)
后面我们可以将请求都封装为一个Request对象从而形成一个Request队列。