springcloud - 统一配置中心(Spring Cloud Bus)
为什么需要统一配置中心
1、不方便维护(开发各自修改配置文件,容易发生冲突)
2、配置内容的安全与权限(针对线上配置)
3、更新配置项目需要重启
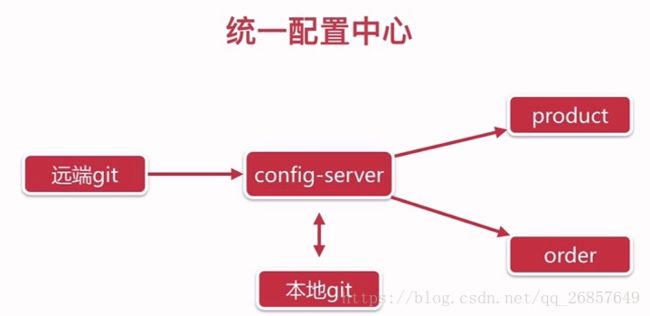
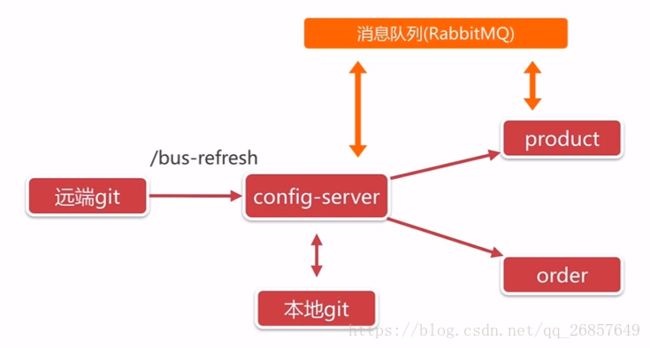
配置中心单独用一个服务,配置方便管理放在git上面,从远端git拉下来然后在本地git存一份,加入远端git访问不了,就会从本地git拉一份。
Config Server端:
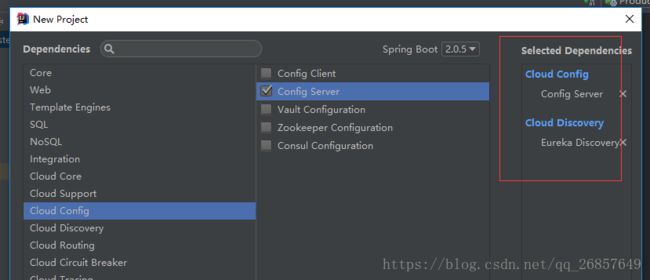
1、创建工程服务,命名为config。
在启动类上加注解:@EnableConfigServer
application.properties
spring.application.name=config

eureka.client.service-url.defaultZone=http://localhost:8761/eureka

server.port=8082

spring.cloud.config.server.git.uri=https://gitee.com/pangkaiguang/config-repo
[email protected]
spring.cloud.config.server.git.password=pang373253127
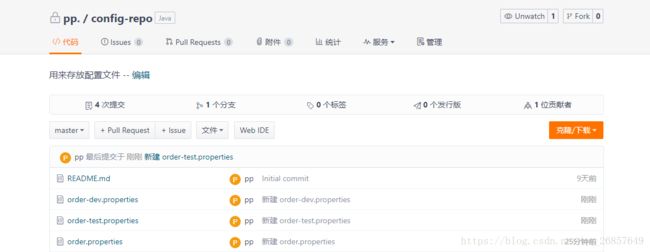
在git上面创建仓库文件和3个测试文件:
order-dev.properties
#配置应用端口
server.port=8081

#配置应用名称
spring.application.name=order

#注册到注册中心
eureka.client.service-url.defaultZone=http://127.0.0.1:8761/eureka

#配置数据库
spring.datasource.driver-class-name=com.mysql.jdbc.Driver
spring.datasource.username=root
spring.datasource.password=root
spring.datasource.url=jdbc:mysql://127.0.0.1:3306/ordersystem?characterEncoding=utf-8&uesSSL=false

#配置JPS显示SQL
spring.jpa.show-sql=true

env=dev
order-test.properties
#配置应用端口
server.port=8081

#配置应用名称
spring.application.name=order

#注册到注册中心
eureka.client.service-url.defaultZone=http://127.0.0.1:8761/eureka

#配置数据库
spring.datasource.driver-class-name=com.mysql.jdbc.Driver
spring.datasource.username=root
spring.datasource.password=root
spring.datasource.url=jdbc:mysql://127.0.0.1:3306/ordersystem?characterEncoding=utf-8&uesSSL=false

#配置JPS显示SQL
spring.jpa.show-sql=true

env=test
order.properties
#配置应用端口
server.port=8081

#配置应用名称
spring.application.name=order

#注册到注册中心
eureka.client.service-url.defaultZone=http://127.0.0.1:8761/eureka

#配置数据库
spring.datasource.driver-class-name=com.mysql.jdbc.Driver
spring.datasource.username=root
spring.datasource.password=root
spring.datasource.url=jdbc:mysql://127.0.0.1:3306/ordersystem?characterEncoding=utf-8&uesSSL=false

#配置JPS显示SQL
spring.jpa.show-sql=true
测试访问地址:会看到对应的文件名里面的内容
http://localhost:8082/order-a.properties
http://localhost:8082/order-test.properties
http://localhost:8082/order-dev.properties
后缀properties是可以换别的控制展示格式yml、json等等。
order-a.properties命名格式:/{label}/{name} - {profiles}.properties ,name:服务没,profiles:环境,label:分支。
从远端拉下来后本地git默认存放的地址可以看控制台:
也可以自定义配置本地git配置文件存放路径:spring.cloud.config.server.git.basedir=/xxxx/xxxx/
Config Client端:以order系统为例子:
1、添加依赖:
	org.springframework.cloud
	spring-cloud-config-client
2、添加配置:
spring.application.name=order
#config
spring.cloud.config.discovery.enabled=true
#service-id为配置中心名字
spring.cloud.config.discovery.service-id=CONFIG
#环境名字,后缀。
spring.cloud.config.profile=dev

#注册到注册中心(这个要写在这里不能写在git上面,因为要先找到注册中心,才能找到配置中心
#如果注册中心配置了端口而不是默认的,会找不到
eureka.client.service-url.defaultZone=http://127.0.0.1:8761/eureka
3、更改配置文件application.properties为bootstrap.properties,这里有个先后顺序问题,改了bootstrap会优先加载,不然会报数据库连接错误。
4、编写测试类:
@RestController
@RequestMapping("/env")
public class EnvController {
    @Value("${env}")
    private String env;


    @RequestMapping("/getEnv")
    public String getEnv(){
        return env;
    }
}
5、启动,访问http://localhost:8081/env/getEnv 查看访问结果
配置中心高可用:
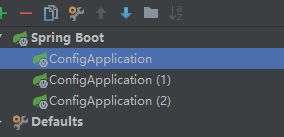
1、用不同端口启动多个应用。
2、不断重启order应用观察控制台会看到每次都会连接不同的config端口。
注意事项:
先看git上order-test.properties和 order.properties两个文件内容
order-test.properties:
#配置应用端口
server.port=8081

#配置数据库
spring.datasource.driver-class-name=com.mysql.jdbc.Driver
spring.datasource.username=root
spring.datasource.password=root
spring.datasource.url=jdbc:mysql://127.0.0.1:3306/ordersystem?characterEncoding=utf-8&uesSSL=false

#配置JPS显示SQL
spring.jpa.show-sql=true

env=test
order.properties:
#配置应用端口
server.port=8081

eureka.client.service-url.defaultZone=http://127.0.0.1:8761/eureka

#配置数据库
spring.datasource.driver-class-name=com.mysql.jdbc.Driver
spring.datasource.username=root
spring.datasource.password=root
spring.datasource.url=jdbc:mysql://127.0.0.1:3306/ordersystem?characterEncoding=utf-8&uesSSL=false

#配置JPS显示SQL
spring.jpa.show-sql=true
order.properties文件比order-test.properties文件多一个配置:eureka.client.service-url.defaultZone
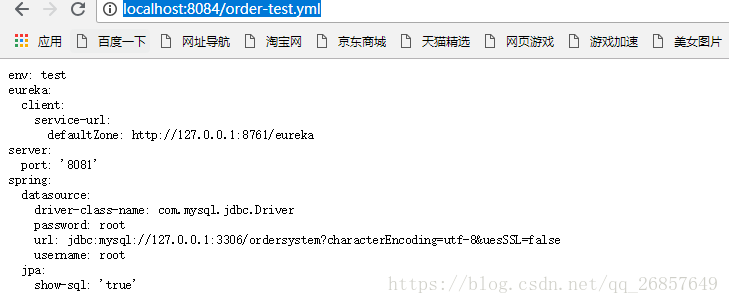
启动config应用,访问test文件地址http://localhost:8084/order-test.yml 却能看到eureka.client.service-url.defaultZone这个配置
原因:
可以看下控制台的启动信息:
无论读取哪个配置文件,order.properties 都是会被读取的。所以这个文件可以用来放一些所有环境通用的配置。
Spring Cloud Bus自动更新配置
当远端git配置信息变更的时候,远端git就会调用/bus-refresh这个接口(利用webhooks),把更新的信息发送到rabbtMQ。
1、安装rabbitMQ,启动,测试访问http://localhost:15672
2、config、order应用添加依赖
	org.springframework.cloud
	spring-cloud-starter-bus-amqp
3、config添加配置信息,暴露接口
management.endpoints.web.exposure.include=*4、修改order应用EnvController类添加注释@RefreshScope
@RestController
@RequestMapping("/env")
@RefreshScope
public class EnvController {
    @Value("${env}")
    private String env;

    @RequestMapping("/getEnv")
    public String getEnv(){
        return env;
    }
}
启动order应用看控制台信息:
修改远端git配置文件order-dev.properties的env属性,然后用post方法请求http://localhost:8084/actuator/bus-refresh,再访问http://localhost:8084/order-dev.yml 看看配置文件是否有变更。
或者在应用中像下面这样使用前缀的方式:
在order-dev.properties配置文件中添加配置信息:
girl.name=pang
girl.age=18
在order应用添加配置类:
@Data
@Component
@ConfigurationProperties("girl")
@RefreshScope
public class GrilCofig(){
    private String name;
    private Integer age;
}
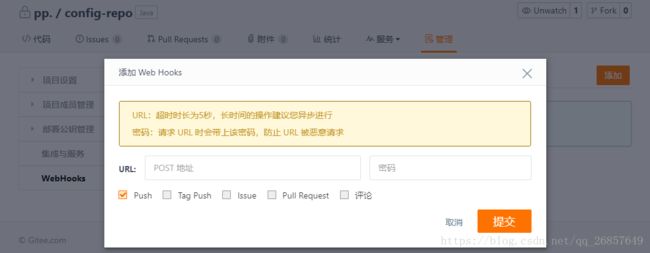
实现修改配置文件应用自动更新利用webhooks:
这里URL不能用localhost,要用外网穿透。https://natapp.cn这里有免费的,使用教程自行百度
添加后可以启动应用测试了
spring cloud用的是Finchley版本才可以发消息到MQ,现在貌似不支持开源中国的webhooks格式,支持github,公司一般是用Gitlab
