Attention系列一之seq2seq传统Attention小结
正如标题所言,本文总结了一下传统的Attention,以及介绍了在seq2seq模型中使用attention方法的不同方式。
摘要
-
首先seq2seq分为encoder和decoder两个模块,encoder和decoder可以使用LSTM、GRU等RNN结构,这也是之前transformer没出来之前常用的经典方法。(主要选取了tensorflow官方教程和pytorch教程的例子作对比来详细介绍一下。)
-
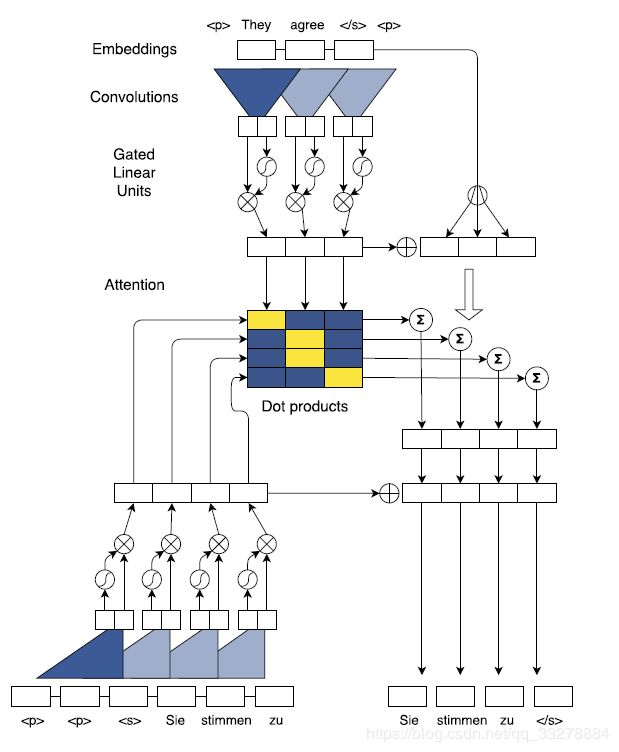
也可以在encoder和decoder使用CNN来替代RNN,主要使用了gated linear units(GRU)结构,之后详细介绍,参考论文 Convolutional Sequence to Sequence Learning
-
当然还有最近很火的transformer,它摒弃了传统的RNN、CNN等结构,使用了self-attention和Multi-Head Attention结构,下一篇文章详细介绍。Attention is all your need
声明: 有些地方理解的不够深刻或许写的不太对,希望大家都带有自己的理解去看文章,最后有哪里写的不对的欢迎大家批评指正。
The Seq2Seq Mode (不加attention)
在介绍attention之前,先看一下不加attention的网络结构,可以看但每次decoder的不同位置都是使用encoder最后一层的隐状态输出C。所以不能更好的体现对于当前decoder的单词不同的encoder单词的影响程度。
使用Attention机制是为了解决几个问题,第一个就是当处理的句子文本过长时,模型性能下降,因为毕竟RNN信息传递过程中会有损失,对于句子起初位置的字或词经过RNN后传递到的信息较少,第二个就是attention对句子中每个字或词赋予不同的权重,可以使模型更好的关注句子中每个词带来的信息重要性。实验证明在长文本中使用Attention机制,效果会明显优于不适用attention的效果。
最后来放一下pytorch的实现代码:
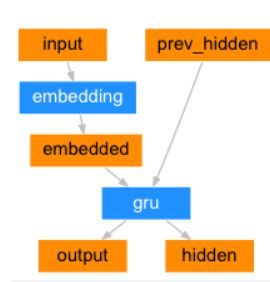
encoder
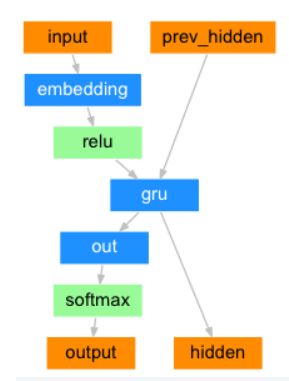
decoder
可以看到只用到了encoder的最后一个unit的hidden.
class EncoderRNN(nn.Module):
def __init__(self, input_size, hidden_size):
super(EncoderRNN, self).__init__()
self.hidden_size = hidden_size
self.embedding = nn.Embedding(input_size, hidden_size)
self.gru = nn.GRU(hidden_size, hidden_size)
def forward(self, input, hidden):
embedded = self.embedding(input).view(1, 1, -1)
output = embedded
output, hidden = self.gru(output, hidden)
return output, hidden
def initHidden(self):
return torch.zeros(1, 1, self.hidden_size, device=device)
class DecoderRNN(nn.Module):
def __init__(self, hidden_size, output_size):
super(DecoderRNN, self).__init__()
self.hidden_size = hidden_size
self.embedding = nn.Embedding(output_size, hidden_size)
self.gru = nn.GRU(hidden_size, hidden_size)
self.out = nn.Linear(hidden_size, output_size)
self.softmax = nn.LogSoftmax(dim=1)
def forward(self, input, hidden):
output = self.embedding(input).view(1, 1, -1)
output = F.relu(output)
output, hidden = self.gru(output, hidden)
output = self.softmax(self.out(output[0]))
return output, hidden
def initHidden(self):
return torch.zeros(1, 1, self.hidden_size, device=device)
Attention Mechanism分类
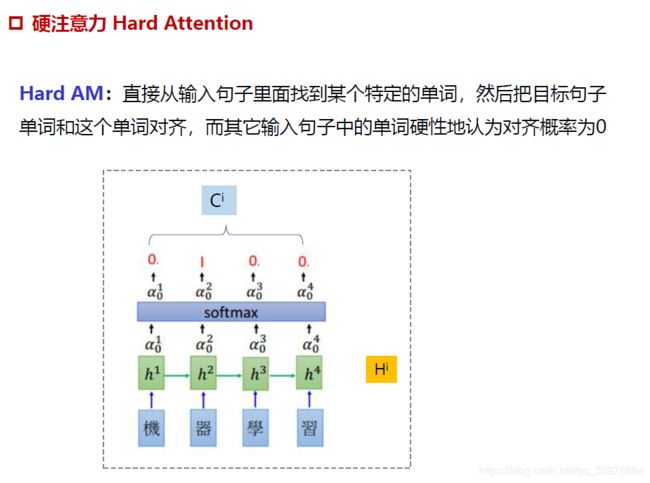
soft Attention 、Hard Attention
Soft Attention是参数化的(Parameterization),因此可导,可以被嵌入到模型中去,直接训练。梯度可以经过Attention Mechanism模块,反向传播到模型其他部分。
相反,Hard Attention是一个随机的过程。Hard Attention不会选择整个encoder的输出做为其输入,Hard Attention会依概率Si来采样输入端的隐状态一部分来进行计算,而不是整个encoder的隐状态。为了实现梯度的反向传播,需要采用蒙特卡洛采样的方法来估计模块的梯度。
两种Attention Mechanism都有各自的优势,但目前更多的研究和应用还是更倾向于使用Soft Attention,因为其可以直接求导,进行梯度反向传播。
Global Attention 和 Local Attention
Global Attention
decoder每次计算都使用encoder端所有的词。Global Attention Model是Soft Attention Model
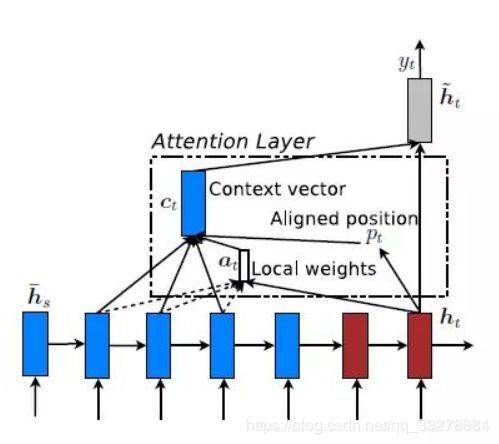
Local Attention
Global Attention有一个明显的缺点就是,每一次,encoder端的所有hidden state都要参与计算,这样做计算开销会比较大,特别是当encoder的句子偏长,比如,一段话或者一篇文章,效率偏低。因此,为了提高效率,Local Attention应运而生。而且有的词只跟它所在的上下文有关,并非所有问题都需要长程的、全局的依赖的,也有很多问题只依赖于局部结构。
self-attention
放在下一篇文章结合transformer讲解。
seq2seq Attention之RNN
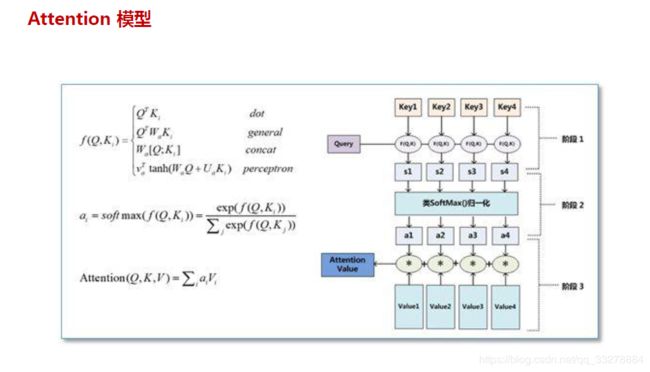
再来看一下一般Attention的几种打分方式。如下图,一般是对输入的句子K使用函数f(Q,K)来计算attention_weight。可以看到常用的计算方法包括乘法和加法,乘法相对来说在模型中更快,乘法也是一般模型中常用的。
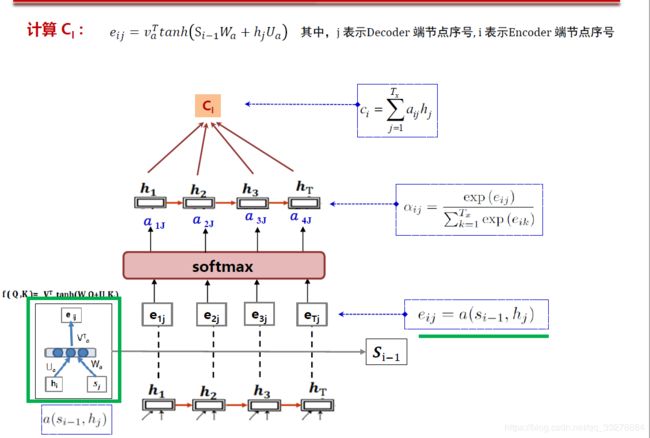
先来看一下整体网络结构,首先计算eij,然后过一个softmax,得到了attention_weights $\alpha$ ,然后再将其与输入过embedding和lstm后的h相乘,便得到了Ci。之后再将Ci 和 decoder的当前输入,和Si-1的隐状态concat。
先来看tensorflow官网给的机器翻译&&attention的例子的计算方式
https://github.com/tensorflow/tensorflow/blob/r1.13/tensorflow/contrib/eager/python/examples/nmt_with_attention/nmt_with_attention.ipynb
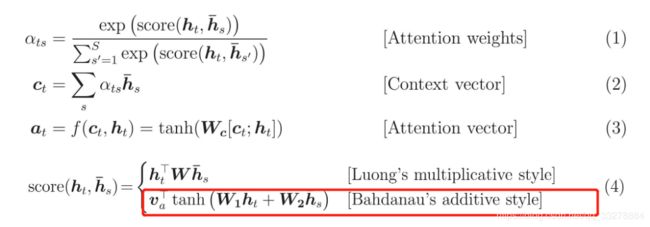
这里使用了下图红框里的计算打分方式。
下面放两张更加详细的图方便理解。可以看到其中的Si-1就是前一个unit经过RNN的隐状态值,然后hj是encode的output。大家可以自己看图配代码理解起来更清晰。
代码如下:注释很清楚,而且每一个变量的维度都有写, 理解起来很方便。
class Encoder(tf.keras.Model):
    def __init__(self, vocab_size, embedding_dim, enc_units, batch_sz):
        super(Encoder, self).__init__()
        self.batch_sz = batch_sz
        self.enc_units = enc_units
        self.embedding = tf.keras.layers.Embedding(vocab_size, embedding_dim)
        self.gru = gru(self.enc_units)

    def call(self, x, hidden):
        x = self.embedding(x)
        output, state = self.gru(x, initial_state = hidden)
        return output, state

    def initialize_hidden_state(self):
        return tf.zeros((self.batch_sz, self.enc_units))

class Decoder(tf.keras.Model):
    def __init__(self, vocab_size, embedding_dim, dec_units, batch_sz):
        super(Decoder, self).__init__()
        self.batch_sz = batch_sz
        self.dec_units = dec_units
        self.embedding = tf.keras.layers.Embedding(vocab_size, embedding_dim)
        self.gru = gru(self.dec_units)
        self.fc = tf.keras.layers.Dense(vocab_size)

        # used for attention
        self.W1 = tf.keras.layers.Dense(self.dec_units)
        self.W2 = tf.keras.layers.Dense(self.dec_units)
        self.V = tf.keras.layers.Dense(1)

    def call(self, x, hidden, enc_output):
        # enc_output shape == (batch_size, max_length, hidden_size)

        # hidden shape == (batch_size, hidden size)
        # hidden_with_time_axis shape == (batch_size, 1, hidden size)
        # we are doing this to perform addition to calculate the score
        hidden_with_time_axis = tf.expand_dims(hidden, 1)

        # score shape == (batch_size, max_length, 1)
        # we get 1 at the last axis because we are applying tanh(FC(EO) + FC(H)) to self.V   打分方式 使用了前一个的隐状态,以及使用到了encoder的输出。
        score = self.V(tf.nn.tanh(self.W1(enc_output) + self.W2(hidden_with_time_axis)))

        # attention_weights shape == (batch_size, max_length, 1)
        attention_weights = tf.nn.softmax(score, axis=1)

        # context_vector shape after sum == (batch_size, hidden_size)
        # 在这里得到了attention_weighs后,将其与encoder的outPut相乘,返回的维度为(batch_size, hidden_size)。
        context_vector = attention_weights * enc_output
        context_vector = tf.reduce_sum(context_vector, axis=1)

        # x shape after passing through embedding == (batch_size, 1, embedding_dim)
        x = self.embedding(x)

        # x shape after concatenation == (batch_size, 1, embedding_dim + hidden_size)
        # 在与当前的decoder的输入拼接,之后过gru,全连接。
        x = tf.concat([tf.expand_dims(context_vector, 1), x], axis=-1)

        # passing the concatenated vector to the GRU
        output, state = self.gru(x)

        # output shape == (batch_size * 1, hidden_size)
        output = tf.reshape(output, (-1, output.shape[2]))

        # output shape == (batch_size * 1, vocab)
        x = self.fc(output)

        return x, state, attention_weights

    def initialize_hidden_state(self):
        return tf.zeros((self.batch_sz, self.dec_units))
pytorch官网的机器翻译&&attention的例子的计算方式。
先放链接 大家可以直接去看官网https://pytorch.org/tutorials/intermediate/seq2seq_translation_tutorial.html
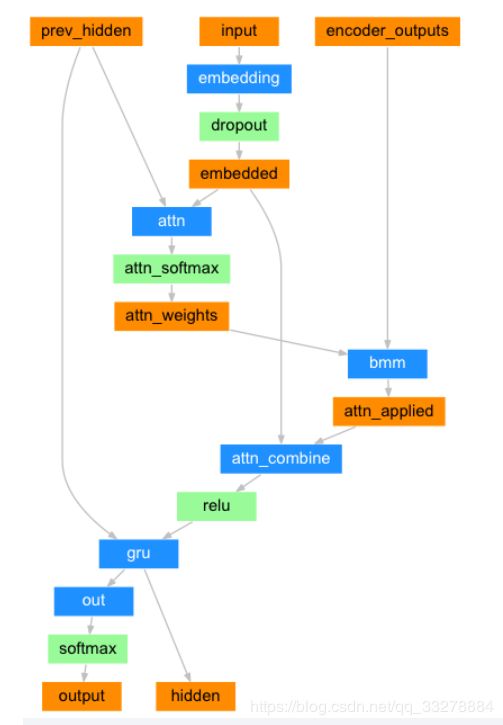
先放一个网络结构图。
可以看到网络架构还是比较清楚的,先说一下这个和tensorflow版本的计算方法还是有一些不一样的。
具体不一样在于。pytorch版本的是乘型attention,tensorflow版本的是加型attention。
pytorch这里直接将decoder当前的输入x与上一个unit隐状态prev_hidden拼接起来✖W得到score,之后将score过softmax得到attenion_weights.
粗糙的手写了一下两个各自的计算方式,轻喷233。可以直接看代码理解..
具体代码如下:
class AttnDecoderRNN(nn.Module):
def __init__(self, hidden_size, output_size, dropout_p=0.1, max_length=MAX_LENGTH):
super(AttnDecoderRNN, self).__init__()
self.hidden_size = hidden_size
self.output_size = output_size
self.dropout_p = dropout_p
self.max_length = max_length
self.embedding = nn.Embedding(self.output_size, self.hidden_size)
self.attn = nn.Linear(self.hidden_size * 2, self.max_length)
self.attn_combine = nn.Linear(self.hidden_size * 2, self.hidden_size)
self.dropout = nn.Dropout(self.dropout_p)
self.gru = nn.GRU(self.hidden_size, self.hidden_size)
self.out = nn.Linear(self.hidden_size, self.output_size)
def forward(self, input, hidden, encoder_outputs):
embedded = self.embedding(input).view(1, 1, -1)
embedded = self.dropout(embedded)
attn_weights = F.softmax(
self.attn(torch.cat((embedded[0], hidden[0]), 1)), dim=1)
attn_applied = torch.bmm(attn_weights.unsqueeze(0),
encoder_outputs.unsqueeze(0))
output = torch.cat((embedded[0], attn_applied[0]), 1)
output = self.attn_combine(output).unsqueeze(0)
output = F.relu(output)
output, hidden = self.gru(output, hidden)
output = F.log_softmax(self.out(output[0]), dim=1)
return output, hidden, attn_weights
def initHidden(self):
return torch.zeros(1, 1, self.hidden_size, device=device)具体哪种计算方法好,这个还需要进一步做实验来进行对比。不过乘性的肯定比较快。
seq2seq之CNN
2017年,FaceBook 人工智能实验室的Jonas Gehring等人在论文《Convolutional Sequence to Sequence Learning》提出了完全基于CNN来构建Seq2Seq模型。
RNN的链式结构,能够很好地应用于处理序列信息。但是,RNN也存在着劣势:一个是由于RNN运行时是将序列的信息逐个处理,不能实现并行操作,导致运行速度慢;另一个是传统的RNN并不能很好地处理句子中的结构化信息,或者说更复杂的关系信息。相比之下,CNN的优势就凸显出来。文章提到用CNN做seq-seq这种翻译任务有3个好处:
-
通过卷积的叠加可以精确地控制上下文的长度,因为卷积之间的叠加可以通过公式直接计算出感受野是多少,从而知道上下文的长度,RNN虽然理论上有长时记忆的功能,但是在实际的训练过程中,间隔较远的时候,很难学到这种词与词之间的联系。使用多层CNN来获取句子中词与词之间的依赖关系
-
卷积可以进行并行计算,而RNN模型是时序的,只有前一帧得出结果才能进行后续的计算。
-
对于输入的一个单词而言,输入CNN网络,所经过的卷积核和非线性计算数量都是固定的,不过对于输入RNN的单词而言,第一个单词要经过n次unit的计算和非线性,但是最后一个单词只经过1次,文章说固定对输入所施加的非线性计算会有助于训练。
这篇文章提出了使用CNN来构建seq2seq,还提出了一个gated linear units(GLU)CNN机制.
注意这里的两个Conv1D形式一样(比如卷积核数、窗口大小都一样),但权值是不共享的,也就是说参数翻倍了,其中一个用sigmoid函数激活,另外一个不加激活函数,然后将它们逐位相乘。因为sigmoid函数的值域是(0,1)(0,1),所以直觉上来看,就是给Conv1D的每个输出都加了一个“阀门”来控制流量。这就是GCNN的结构了,或者可以将这种结构看成一个激活函数,称为GLU(Gated Linear Unit)。
这篇文章还提出了Multi-step Attention。
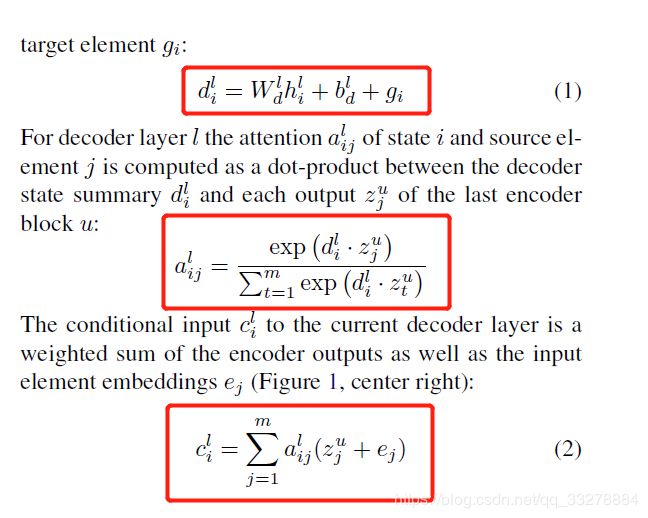
如下公式,其中d是计算每个decoder经过卷积后得到的,z是encoder的output。这里采用dot(d,z)来得到score,之后经过softmax得到attention_weights。
最终得到cici和hihi相加组成新的hihi。如此,在每一个卷积层都会进行 attention 的操作,得到的结果输入到下一层卷积层,这就是多跳注意机制multi-hop attention。这样做的好处是使得模型在得到下一个注意时,能够考虑到之前的已经注意过的词。这里推荐大家直接去看原论文。
因为本文主要是介绍一下attention的,所以先不对这篇论文进行详细讲解。 这篇论文也会在之后的文章后写一篇论文笔记来更新。
总结
想了解更多attention的使用方式,还可以看一下https://zhuanlan.zhihu.com/p/31547842这篇文章,还给出了其他的attention的使用方式,比如Hierarchical Attention,Attention over Attention,Multi-dimensional Attention,Memory-based Attention想详细了解这些attention的工作原理的话推荐大家去看原始论文比较好。 下面放出了相关的论文链接。
https://www.aclweb.org/anthology/N16-1174
https://arxiv.org/pdf/1607.04423.pdf%E6%9F%A5%E7%9C%8B%E3%80%82AoA
https://www.sciencedirect.com/science/article/pii/S0165178114008555
最后希望自己渣渣的文笔能够帮助大家更好的理解Attention,哪里有问题欢迎大家来交流。对大家有帮助的话欢迎大家点赞呦~
之后会再带来一篇Attention系列二,讲解一下transformer中的self-attention。
参考
https://papers.nips.cc/paper/7181-attention-is-all-you-need.pdf
https://arxiv.org/pdf/1705.03122
https://zhuanlan.zhihu.com/p/31547842
https://github.com/tensorflow/tensorflow/blob/r1.13/tensorflow/contrib/eager/python/examples/nmt_with_attention/nmt_with_attention.ipynb
https://pytorch.org/tutorials/intermediate/seq2seq_translation_tutorial.html
https://www.cnblogs.com/huangyc/p/10152296.html
中科院信息工程研究所胡玥老师上课的课件

