开源中国中MybatisePlus 代码自动生成——初体验通过代码生成构建SSM项目
开源中国中有很多优秀的开源项目可以供我们学习。
本次分享的是一个基于Mybatise 代码自动生成工具,只需要之前设计数据库,然后使用自动生成代码的工具类,可以将entity,mapper,service,Controller层自动生成。并且实现基础的功能,增删查改,以及分页等效果。
先分享一下网站 Mybatise-Plus。可以自行过去学习。本节主要讲基于 这个工具构建SSM 项目,并创建一个简单的接口
首先设计数据库:
很简单的一个表
基于Maven
pom.xml
工具类主要依赖
com.baomidou
mybatis-plus
${mybaitsplus.version}
下面是完整的pom.xml (包括Spring,jdbc,json,log 等)
  4.0.0
  com.nyist
  WebSockUseMybatisePlus
  war
  0.0.1-SNAPSHOT
  WebSockUseMybatisePlus Maven Webapp
  http://maven.apache.org

		UTF-8
		5.0.0.RELEASE
		4.12
		1.1.0
		1.2.8
		2.1.9
		5.1.38
		1.2.17
		1.7.19
		1.8.8
		1.3.1
		1.2


			junit
			junit
			${junit.version}
			test


			org.springframework
			spring-core
			${spring.version}
			jar
			compile


			org.springframework
			spring-context
			${spring.version}
			jar
			compile


			org.springframework
			spring-context-support
			${spring.version}
			jar
			compile


			org.springframework
			spring-tx
			${spring.version}
			jar
			compile


			org.springframework
			spring-aop
			${spring.version}
			jar
			compile


			org.springframework
			spring-beans
			${spring.version}
			jar
			compile


			org.springframework
			spring-jdbc
			${spring.version}
			jar
			compile


			org.springframework
			spring-web
			${spring.version}
			jar
			compile


			org.springframework
			spring-webmvc
			${spring.version}
			jar
			compile


			org.aspectj
			aspectjweaver
			${aspectjweaver.version}


		    javax.servlet
		    javax.servlet-api
		    3.1.0
		    provided


			commons-fileupload
			commons-fileupload
			${fileupload.version}


			javax.servlet
			jstl
			${jstl.version}


			com.baomidou
			mybatis-plus
			${mybaitsplus.version}


			mysql
			mysql-connector-java
			${mysql.version}


			com.alibaba
			druid
			${druid.version}


			com.alibaba
			fastjson
			${fastjson.version}


			log4j
			log4j
			${log4j.version}


			org.slf4j
			slf4j-api
			${slf4j.version}


			org.slf4j
			slf4j-log4j12
			${slf4j.version}


			org.springframework
			spring-test
			${spring.version}


		WebSockUseMybatisePlus


				org.apache.maven.plugins
				maven-compiler-plugin

					1.7
					1.7
工具类:
/**
 *
 * 代码生成器演示
 *
 */
public class MySqlGenerator {

    /**
     *
     * MySQL 生成演示
     *
     */
    public static void main(String[] args) {
        AutoGenerator autoGenerator = new AutoGenerator();
        System.out.println("开始执行==");
        //全局配置
        GlobalConfig globalConfig = new GlobalConfig();
        globalConfig.setOutputDir("G:\\StudyWorkSpace\\WebSocketUseMybatisePlus\\WebSockUseMybatisePlus\\src\\main\\java");//自己的项目路径
        globalConfig.setFileOverride(true);
        globalConfig.setActiveRecord(true);
        globalConfig.setEnableCache(false);// XML 二级缓存
        globalConfig.setBaseResultMap(true);// XML ResultMap
        globalConfig.setBaseColumnList(false);// XML columList
        globalConfig.setAuthor("geYang");
        //生成文件名:
        globalConfig.setXmlName("%sMapper");
        globalConfig.setMapperName("%sMapper");
        globalConfig.setServiceName("%sService");
        globalConfig.setServiceImplName("%sImpl");
        globalConfig.setControllerName("%sController");

        autoGenerator.setGlobalConfig(globalConfig);

        // 数据源配置
        DataSourceConfig dataSourceConfig = new DataSourceConfig();
        dataSourceConfig.setDbType(DbType.MYSQL);
        dataSourceConfig.setTypeConvert(new MySqlTypeConvert(){
            // 自定义数据库表字段类型转换【可选】
            @Override
            public DbColumnType processTypeConvert(String fieldType) {
                return super.processTypeConvert(fieldType);
            }
        });
        dataSourceConfig.setDriverName("com.mysql.jdbc.Driver");
        dataSourceConfig.setUsername("root");
        dataSourceConfig.setPassword("");
        dataSourceConfig.setUrl("jdbc:mysql://127.0.0.1:3306/test?characterEncoding=utf8");
        autoGenerator.setDataSource(dataSourceConfig);

        // 策略配置
        StrategyConfig strategyConfig = new StrategyConfig();
//        strategyConfig.setCapitalMode(true);    // 全局大写命名 ORACLE 注意
        strategyConfig.setTablePrefix(new String[] { "yj_", "gy_", "d_", "t", "h_"});// 此处可以修改为您的表前缀
        strategyConfig.setNaming(NamingStrategy.underline_to_camel);
        strategyConfig.setInclude(new String[] { "gy_user" }); // 需要生成的表
        // strategy.setExclude(new String[]{"test"}); // 排除生成的表
        // 自定义实体父类
        // strategy.setSuperEntityClass("com.baomidou.demo.TestEntity");
        // 自定义实体,公共字段
        // strategy.setSuperEntityColumns(new String[] { "test_id", "age" });
        // 自定义 mapper 父类
        // strategy.setSuperMapperClass("com.baomidou.demo.TestMapper");
        // 自定义 service 父类
        // strategy.setSuperServiceClass("com.baomidou.demo.TestService");
        // 自定义 service 实现类父类
        // strategy.setSuperServiceImplClass("com.baomidou.demo.TestServiceImpl");
        // 自定义 controller 父类
        // strategy.setSuperControllerClass("com.baomidou.demo.TestController");
        // 【实体】是否生成字段常量(默认 false)
        // public static final String ID = "test_id";
        // strategy.setEntityColumnConstant(true);
        // 【实体】是否为构建者模型(默认 false)
        // public User setName(String name) {this.name = name; return this;}
        // strategy.setEntityBuliderModel(true);
        autoGenerator.setStrategy(strategyConfig);

        // 包配置
        PackageConfig packageConfig = new PackageConfig();
        packageConfig.setParent("com.demo");
        packageConfig.setController("controller");
        packageConfig.setXml("mybatis.mapper");
        autoGenerator.setPackageInfo(packageConfig);

        // 注入自定义配置,可以在 VM 中使用 cfg.abc 【可无】
        InjectionConfig injectionConfig = new InjectionConfig() {
            @Override
            public void initMap() {
                Map map = new HashMap();
                map.put("abc", this.getConfig().getGlobalConfig().getAuthor() + "-mp");
                this.setMap(map);
            }
        };

        // 自定义 xxList.jsp 生成
        //List focList = new ArrayList();
        /*focList.add(new FileOutConfig("/template/list.jsp.vm") {
            @Override
            public String outputFile(TableInfo tableInfo) {
                // 自定义输入文件名称
                return "D://my_" + tableInfo.getEntityName() + ".jsp";
            }
        });
        cfg.setFileOutConfigList(focList);*/
        autoGenerator.setCfg(injectionConfig);


    // 调整 xml 生成目录演示
         /*focList.add(new FileOutConfig("/templates/mapper.xml.vm") {
            @Override
            public String outputFile(TableInfo tableInfo) {
                return "/develop/code/xml/" + tableInfo.getEntityName() + ".xml";
            }
        });
        cfg.setFileOutConfigList(focList);*/
       // mpg.setCfg(cfg);

        // 关闭默认 xml 生成,调整生成 至 根目录
//        TemplateConfig tc = new TemplateConfig();
//        tc.setXml(null);
//        mpg.setTemplate(tc);

        // 自定义模板配置,可以 copy 源码 mybatis-plus/src/main/resources/template 下面内容修改,
        // 放置自己项目的 src/main/resources/template 目录下, 默认名称一下可以不配置,也可以自定义模板名称
        // TemplateConfig tc = new TemplateConfig();
        // tc.setController("...");
        // tc.setEntity("...");
        // tc.setMapper("...");
        // tc.setXml("...");
        // tc.setService("...");
        // tc.setServiceImpl("...");
    // 如上任何一个模块如果设置 空 OR Null 将不生成该模块。
        // mpg.setTemplate(tc);

        // 执行生成
        autoGenerator.execute();

        // 打印注入设置【可无】
        System.err.println(autoGenerator.getCfg().getMap().get("abc"));
    }

}  (这里在自动生成代码后,还会有一个(com.nyist.Mapper)包,这里我已经将包中的配置文件移到resource中,所以看不到了。

下面进行SSM环境搭建
这里我的配置文件路径如图
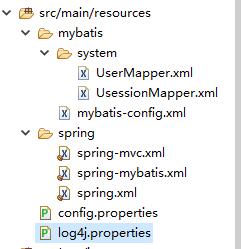
其中Mapper 文件是从之前自动生成的一过来的。当然可以在生成的时候指定路径
mybatis-config.xml
Spring-mvc.xml
                        text/html;charset=UTF-8
                        application/json;charset=UTF-8


                        DisableCircularReferenceDetect

                        WriteMapNullValue

                        WriteNullNumberAsZero

                        WriteNullStringAsEmpty

                        WriteNullListAsEmpty

                        WriteNullBooleanAsFalse
spring-mybaties.xml
spring.xml
config.properties (配置了数据库信息)
validationQuery=SELECT 1
jdbc_url=jdbc:mysql://127.0.0.1:3306/websockdemo?useUnicode=true&characterEncoding=UTF-8&tinyInt1isBit=false
jdbc_username=root
jdbc_password=123456
最后在web.xml中配置拦截器等
  Archetype Created Web Application


        contextConfigLocation
        classpath:spring/spring.xml


        encodingFilter
        org.springframework.web.filter.CharacterEncodingFilter

            encoding
            UTF-8


        encodingFilter
        /*


        Spring监听器
        org.springframework.web.context.ContextLoaderListener


        org.springframework.web.util.IntrospectorCleanupListener


        SpringMVC
        org.springframework.web.servlet.DispatcherServlet

            SpringMVC
            contextConfigLocation
            classpath:spring/spring-mvc.xml

        1


        SpringMVC
        /


        15
开发一个接口(判断登录)
package com.nyist.controller;


import org.springframework.web.bind.annotation.RequestMapping;
import org.springframework.web.bind.annotation.RequestMethod;
import org.springframework.web.bind.annotation.RequestParam;
import org.springframework.web.bind.annotation.ResponseBody;
import org.springframework.web.servlet.HttpServletBean;

import com.nyist.entity.User;
import com.nyist.service.UserService;

import java.util.HashMap;
import java.util.List;
import java.util.Map;

import javax.servlet.http.HttpServletResponse;

import org.springframework.beans.factory.annotation.Autowired;
import org.springframework.http.HttpMethod;
import org.springframework.stereotype.Controller;

/**
 *
 *  前端控制器
 *
 *
 * @author Mike.Zhang
 * @since 2018-06-12
 */
@Controller
@RequestMapping("/user")
public class UserController {
	@Autowired UserService service;
	private Map map = new HashMap();

	@RequestMapping(value="/judgeLogin",method=RequestMethod.POST)
	@ResponseBody
	public Map judgeUser(@RequestParam("username")String uname,@RequestParam("password")String pass,HttpServletResponse response){
		response.addHeader("Access-Control-Allow-Origin","*");
		List list = service.selectList(null);
		int i =0 ;
		for (User user : list) {
			if(uname.equals(user.getUname())&&pass.equals(user.getPassword())) {
				map.put("code", 1);
				map.put("userid", user.getId());
				map.put("msg", "success");
				i = 1;
				break;
			} else {
				continue;
			}
		}
		if(i == 0) {
			map.put("code", 0);
			map.put("userid", null);
			map.put("msg", "fail");
		}
		return map;
	}
}
至此可以继续开发其他接口了