卷积神经网络+TextCNN文本分类
卷积神经网络
- 1. 卷积
- 1.1 卷积的定义
- 1.2 卷积的运算
- 1.3 卷积神经网络
- 参考链接:
- 2. 反卷积(转置卷积)
- 参考链接
- 3. 池化 pooling
- 参考链接
- 4. TextCNN 的原理
- 5. TextCNN 实现文本分类
- 5.1 导入数据并分词
- 5.2 word2vec向量化
- 5.3 TextCNN
- 卷积运算的定义、动机(稀疏权重、参数共享、等变表示)。一维卷积运算和二维卷积运算。
- 反卷积(tf.nn.conv2d_transpose)
- 池化运算的定义、种类(最大池化、平均池化等)、动机。
- Text-CNN的原理。
- 利用Text-CNN模型来进行文本分类。
1. 卷积
1.1 卷积的定义
我们称 ( f ∗ g ) ( x ) (f*g)(x) (f∗g)(x)为 f , g f,g f,g的卷积,其连续的定义为:
S ( x ) = ( f ∗ g ) ( x ) = ∫ f ( τ ) g ( x − τ ) d τ S(x)=(f*g)(x)=\int f(\tau)g(x- \tau)d\tau S(x)=(f∗g)(x)=∫f(τ)g(x−τ)dτ
其离散定义为:
S ( x ) = ( f ∗ g ) ( x ) = ∑ f ( τ ) g ( x − τ ) d τ S(x)=(f*g)(x)=\sum f(\tau)g(x- \tau)d\tau S(x)=(f∗g)(x)=∑f(τ)g(x−τ)dτ
将其放在图像里分析, f ( x ) f(x) f(x) 可以理解为原始像素点(source pixel),所有的原始像素点叠加起来,就是原始图了。 g ( x ) g(x) g(x)可以称为作用点,所有作用点合起来我们称为卷积核(Convolution kernel)。 S ( x ) S(x) S(x) 为feature map。
下面给出一维卷积和二维卷积的定义:
- ** 一维卷积**
S ( x ) = ( f ∗ g ) ( x ) = ∑ f ( τ ) g ( x − τ ) S(x)=(f*g)(x)=\sum f(\tau)g(x-\tau) S(x)=(f∗g)(x)=∑f(τ)g(x−τ)
这里 f , g f,g f,g是离散序列,若是连续序列,将累加变成积分即可 - ** 二维卷积**
S ( i , j ) = ( I ∗ K ) ( i , j ) = ∑ m ∑ n I ( m , n ) K ( i − m , j − n ) S(i,j)=(I*K)(i,j)=\sum_m \sum_nI(m,n) K(i-m,j-n) S(i,j)=(I∗K)(i,j)=m∑n∑I(m,n)K(i−m,j−n)
卷积满足交换律,故有
S ( i , j ) = ( I ∗ K ) ( i , j ) = ∑ m ∑ n I ( i − m , j − n ) K ( m , n ) S(i,j)=(I*K)(i,j)=\sum_m \sum_nI(i-m,j-n) K(m,n) S(i,j)=(I∗K)(i,j)=m∑n∑I(i−m,j−n)K(m,n)
这里 I , K I,K I,K是离散序列,若是连续序列,将累加变成积分即可
对一维卷积的运算不再做过多介绍,下面侧重介绍二维卷积的运算
1.2 卷积的运算
下面我们举个简单的例子来看看,卷积的运算:
求解过程:
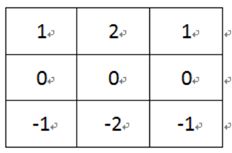
- 将卷积核g旋转180°,即
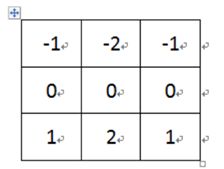
- 将卷积核 g g g的中心对准 f f f的第一个元素,然后 g g g和 f f f重叠的元素相乘, g g g中不与 f f f重叠的地方x用0代替,再将相乘后h对应的元素相加,得到结果矩阵中Y的第一个元素。
所以结果矩阵中的第一个元素是:
Y 11 = − 1 ∗ 0 + − 2 ∗ 0 + − 1 ∗ 0 + 0 ∗ 0 + 0 ∗ 1 + 0 ∗ 2 + 1 ∗ 0 + 2 ∗ 5 + 1 ∗ 6 = 16 Y11 = -1 * 0 + -2 * 0 + -1 * 0 + 0 * 0 + 0 * 1 + 0 * 2 + 1 * 0 + 2 * 5 + 1 * 6 = 16 Y11=−1∗0+−2∗0+−1∗0+0∗0+0∗1+0∗2+1∗0+2∗5+1∗6=16
- f f f中的每一个元素都用这样的方法来计算,得到的卷积结果矩阵为:
上图来理解以下二维卷积:
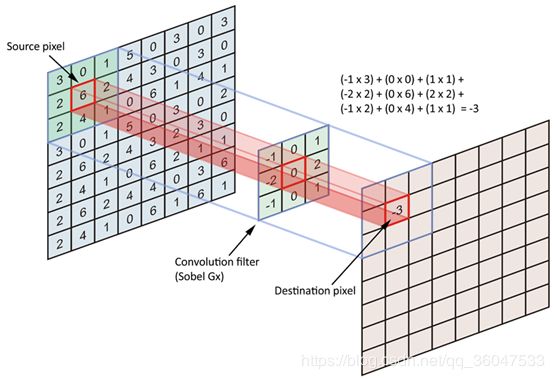
还不理解的同学可以去看看以下链接里面的第一个动图:
https://blog.csdn.net/glory_lee/article/details/77899465
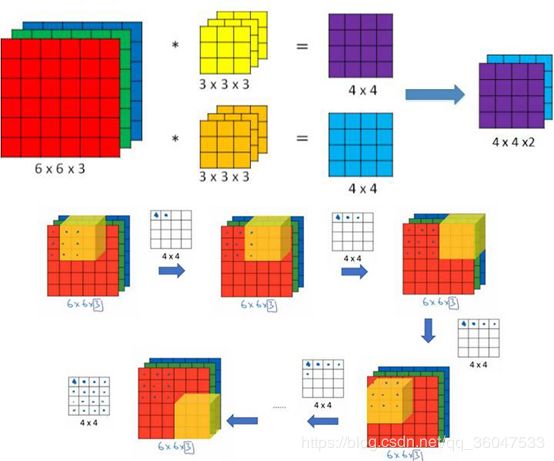
当输入为多维图像(或者多通道特征图)时,多通道卷积如下图所示,图中输入图像尺寸为 6 × 6 6×6 6×6,通道数为3,卷积核有2个,每个尺寸为 3 × 3 3×3 3×3,通道数为3(与输入图像通道数一致),卷积时,仍是以滑动窗口的形式,从左至右,从上至下,3个通道的对应位置相乘求和,输出结果为2张 4 × 4 4×4 4×4的特征图。一般地,当输入为 m × n × c m×n×c m×n×c时,每个卷积核为 k × k × c k×k×c k×k×c,即每个卷积核的通道数应与输入的通道数相同(因为多通道需同时卷积),输出的特征图数量与卷积核数量一致,这里不再赘述。
1.3 卷积神经网络
我们先获取一个感性认识,下图是一个卷积神经网络的示意图:
如上图所示,一个卷积神经网络由若干卷积层、Pooling层、全连接层组成。你可以构建各种不同的卷积神经网络,它的常用架构模式为:
INPUT -> [[CONV]*N -> POOL?]*M -> [FC]*K
也就是N个卷积层叠加,然后(可选)叠加一个Pooling层,重复这个结构M次,最后叠加K个全连接层。
对于上图展示的卷积神经网络:
INPUT -> CONV-> POOL -> CONV -> POOL -> FC -> FC
按照上述模式可以表示为:
INPUT ->[[CONV]*1 -> POOL]*2 -> [FC]*2
也就是:N=1, M=2, K=2。
三维的层结构
从上图我们可以发现卷积神经网络的层结构和全连接神经网络的层结构有很大不同。全连接神经网络每层的神经元是按照一维排列的,也就是排成一条线的样子;而卷积神经网络每层的神经元是按照三维排列的,也就是排成一个长方体的样子,有宽度、高度和深度。
对于上图展示的神经网络,我们看到输入层的宽度和高度对应于输入图像的宽度和高度,而它的深度为1。接着,第一个卷积层对这幅图像进行了卷积操作(后面我们会讲如何计算卷积),得到了三个Feature Map。这里的"3"可能是让很多初学者迷惑的地方,实际上,就是这个卷积层包含三个Filter,也就是三套参数,每个Filter都可以把原始输入图像卷积得到一个Feature Map,三个Filter就可以得到三个Feature Map。至于一个卷积层可以有多少个Filter,那是可以自由设定的。也就是说,卷积层的Filter个数也是一个超参数。我们可以把Feature Map可以看做是通过卷积变换提取到的图像特征,三个Filter就对原始图像提取出三组不同的特征,也就是得到了三个Feature Map,也称做三个通道(channel)。
继续观察上图,在第一个卷积层之后,Pooling层对三个Feature Map做了下采样(后面我们会讲如何计算下采样),得到了三个更小的Feature Map。接着,是第二个卷积层,它有5个Filter。每个Fitler都把前面下采样之后的3个Feature Map卷积在一起,得到一个新的Feature Map。这样,5个Filter就得到了5个Feature Map。接着,是第二个Pooling,继续对5个Feature Map进行下采样,得到了5个更小的Feature Map。
上图所示网络的最后两层是全连接层。第一个全连接层的每个神经元,和上一层5个Feature Map中的每个神经元相连,第二个全连接层(也就是输出层)的每个神经元,则和第一个全连接层的每个神经元相连,这样得到了整个网络的输出。
参考链接:
https://blog.csdn.net/glory_lee/article/details/77899465
https://zhuanlan.zhihu.com/p/57575810
https://zhuanlan.zhihu.com/p/30994790
https://www.cnblogs.com/P3nguin/p/7777239.html
https://blog.csdn.net/rainbow0210/article/details/53750537
https://www.cnblogs.com/shine-lee/p/9932226.html
2. 反卷积(转置卷积)
转置卷积在文献中也被称为去卷积或 fractionally strided convolution。
我们一直都可以使用直接的卷积实现转置卷积。对于下图的例子,我们在一个 2×2 的输入(周围加了 2×2 的单位步长的零填充)上应用一个 3×3 核的转置卷积。上采样输出的大小是 4×4。
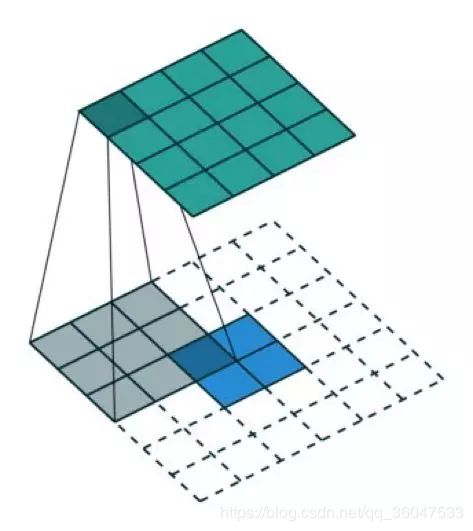
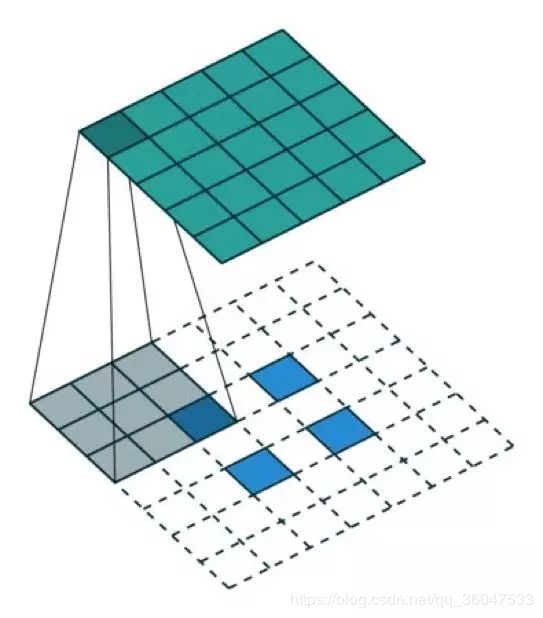
有趣的是,通过应用各种填充和步长,我们可以将同样的 2×2 输入图像映射到不同的图像尺寸。下面,转置卷积被用在了同一张 2×2 输入上(输入之间插入了一个零,并且周围加了 2×2 的单位步长的零填充),所得输出的大小是 5×5。
观察上述例子中的转置卷积能帮助我们构建起一些直观认识。但为了泛化其应用,了解其可以如何通过计算机的矩阵乘法实现是有益的。从这一点上我们也可以看到为何「转置卷积」才是合适的名称。在卷积中,我们定义 C 为卷积核,Large 为输入图像,Small 为输出图像。经过卷积(矩阵乘法)后,我们将大图像下采样为小图像。这种矩阵乘法的卷积的实现遵照:C x Large = Small。下面的例子展示了这种运算的工作方式。它将输入平展为 16×1 的矩阵,并将卷积核转换为一个稀疏矩阵(4×16)。然后,在稀疏矩阵和平展的输入之间使用矩阵乘法。之后,再将所得到的矩阵(4×1)转换为 2×2 的输出。

现在,如果我们在等式的两边都乘上矩阵的转置 CT,并借助「一个矩阵与其转置矩阵的乘法得到一个单位矩阵」这一性质,那么我们就能得到公式 CT x Small = Large,如下图所示。

这里可以看到,我们执行了从小图像到大图像的上采样。这正是我们想要实现的目标。现在。你就知道「转置卷积」这个名字的由来了。
以上内容来自链接:
https://blog.csdn.net/qq_38906523/article/details/80520950
参考链接
https://blog.csdn.net/qq_38906523/article/details/80520950
https://blog.csdn.net/qq_38906523/article/details/80520950
3. 池化 pooling
Pooling层主要的作用是下采样,通过去掉Feature Map中不重要的样本,进一步减少参数数量。Pooling的方法很多,最常用的是Max Pooling。Max Pooling实际上就是在nn的样本中取最大值,作为采样后的样本值。下图是22 max pooling:

除了Max Pooing之外,常用的还有Mean Pooling——取各样本的平均值。
对于深度为D的Feature Map,各层独立做Pooling,因此Pooling后的深度仍然为D。
参考链接
https://www.cnblogs.com/baiting/p/6101981.html
4. TextCNN 的原理
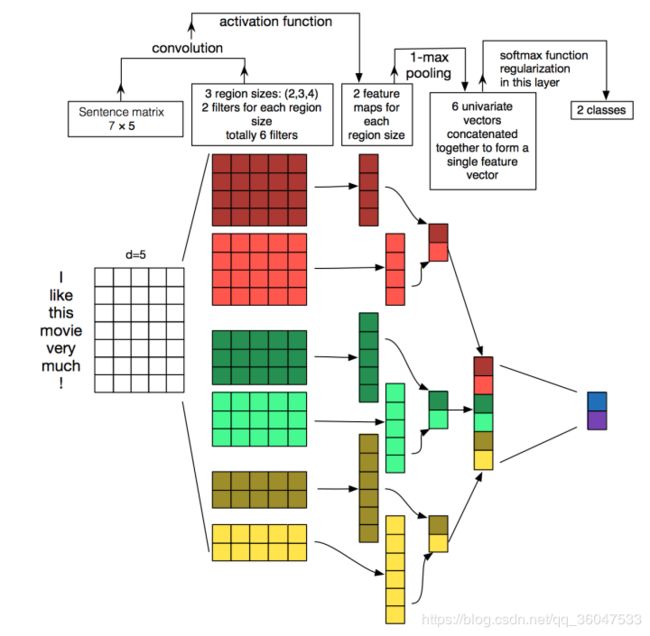
TextCNN详细过程:第一层是图中最左边的7乘5的句子矩阵,每行是词向量,维度=5,这个可以类比为图像中的原始像素点了。然后经过有 filter_size=(2,3,4) 的一维卷积层,每个filter_size 有两个输出 channel。第三层是一个1-max pooling层,这样不同长度句子经过pooling层之后都能变成定长的表示了,最后接一层全连接的 softmax 层,输出每个类别的概率。
5. TextCNN 实现文本分类
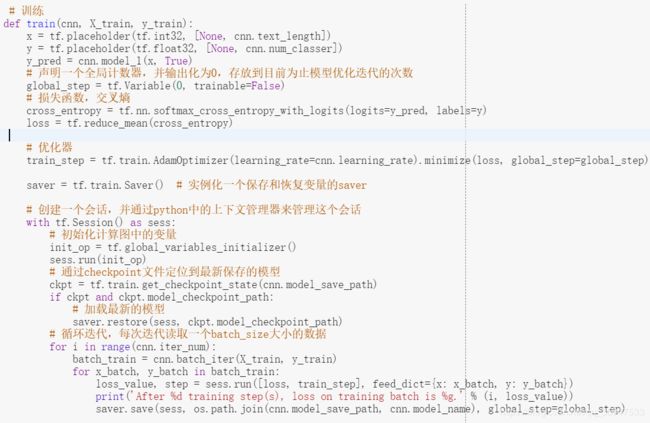
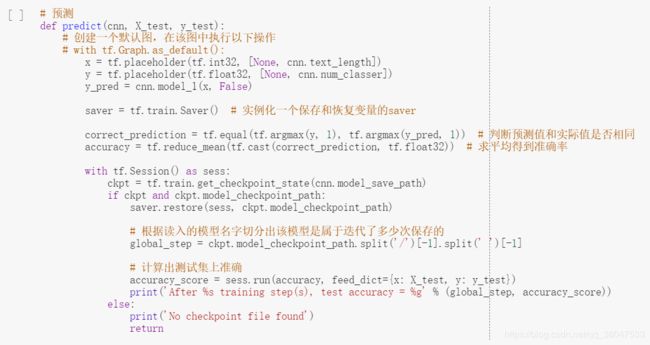
基于THUCNews数据集 ,用TextCNN 实现文本多分类问题
5.1 导入数据并分词
5.2 word2vec向量化
from gensim.models.word2vec import Word2Vec
from gensim.corpora.dictionary import Dictionary
from gensim.models.word2vec import Word2Vec
from gensim.corpora.dictionary import Dictionary
import random
from keras.preprocessing import sequence
import multiprocessing

# set parameters:
cpu_count = multiprocessing.cpu_count() # 4
vocab_dim = 100
n_iterations = 1  # ideally more..
n_exposures = 10 # 所有频数超过10的词语
window_size = 4
maxlen = 200
def create_dictionaries(model=None,content=None):
if (content is not None) and (model is not None):
        gensim_dict = Dictionary()
        gensim_dict.doc2bow(model.wv.vocab.keys(), allow_update=True)
        #  freqxiao10->0 所以k+1
        w2indx = {v: k+1 for k, v in gensim_dict.items()}#所有频数超过10的词语的索引,(k->v)=>(v->k)
        w2vec = {word: model[word] for word in w2indx.keys()}#所有频数超过10的词语的词向量, (word->model(word))
	def parse_dataset(combined): # 闭包-->临时使用
            '''
            Words become integers
            '''
            data=[]
            for sentence in combined:
                new_txt = []
                for word in sentence:
                    try:
                        new_txt.append(w2indx[word])
                    except:
                        new_txt.append(0) # freqxiao10->0
                data.append(new_txt)
            return data # word=>index
        content=parse_dataset(content)
        content= sequence.pad_sequences(content, maxlen=maxlen)#每个句子所含词语对应的索引,所以句子中含有频数小于10的词语,索引为0
        return w2indx, w2vec,content
    else:
        print ("No data provided...")
def shuffle_content(content):
    random.shuffle(content)
    return content
 #创建词语字典,并返回每个词语的索引,词向量,以及每个句子所对应的词语索引
def word2vec_train(content):
    model = Word2Vec(size=vocab_dim,
                     min_count=n_exposures,
                     window=window_size,
                     workers=cpu_count,
                     iter=n_iterations)
    model.build_vocab(content) # input: list
#    model.train(combined)
    model.train(content, epochs=20, total_examples=model.corpus_count)
    model.save('Word2vec_model.pkl')
    index_dict, word_vectors,content = create_dictionaries(model=model,content=content)
    return   index_dict, word_vectors, content

index_dict, word_vectors,content=word2vec_train(train_content)
5.3 TextCNN
import tensorflow as tf
import numpy as np
import pandas as pd
import os
from sklearn.model_selection import train_test_split
class TextCNN(object):
    def __init__(self):
        self.text_length = 200  # 文本长度
        self.num_classer = 10  # 类别数
        self.vocab_size = 5000  # 词汇表达小
        self. word_vec_dim = 64  # 词向量维度
        self.filter_width = 2  # 卷积核尺寸
        self.filter_width_list = [2, 3, 4]  # 卷积核尺寸列表
        self.num_filters = 5  # 卷积核数目
        self.dropout_prob = 0.5  # dropout概率
        self.learning_rate = 0.005  # 学习率
        self.iter_num = 10  # 迭代次数
        self.batch_size = 64  # 每轮迭代训练多少数据
        self.model_save_path = './model/'  # 模型保存路径
        self.model_name = 'textcnn_model'  # 模型的命名
        self.embedding = tf.get_variable('embedding', [self.vocab_size, self.word_vec_dim])
        self.fc1_size = 32  # 第一层全连接的神经元个数
        self.fc2_size = 64  # 第二层全连接的神经元个数
        self.fc3_size = 10  # 第三层全连接的神经元个数
        # 定义初始化网络权重函数
    def get_weight(self, shape, regularizer):
        w = tf.Variable(tf.truncated_normal(shape, stddev=0.1))
        tf.add_to_collection('losses', tf.contrib.layers.l2_regularizer(regularizer)(w))  # 为权重加入L2正则化
        return w
        # 定义初始化偏置项函数
    def get_bias(self, shape):
        b = tf.Variable(tf.ones(shape))
        return b
        # 生成批次数据
    def batch_iter(self, x, y):
        data_len = len(x)
        num_batch = int((data_len - 1) / self.batch_size) + 1
        indices = np.random.permutation(np.arange(data_len))  # 随机打乱一个数组
        x_shuffle = x[indices]  # 随机打乱数据
        y_shuffle = y[indices]  # 随机打乱数据
        for i in range(num_batch):
        start = i * self.batch_size
            end = min((i + 1) * self.batch_size, data_len)
            yield x_shuffle[start:end], y_shuffle[start:end]
    # 模型1,使用多种卷积核
    def model_1(self, x, is_train):
        # embedding层
        embedding_res = tf.nn.embedding_lookup(self.embedding, x)
        pool_list = []
        for filter_width in self.filter_width_list:
            # 卷积层
            conv_w = self.get_weight([filter_width, self.word_vec_dim, self.num_filters], 0.01)
            conv_b = self.get_bias([self.num_filters])
            conv = tf.nn.conv1d(embedding_res, conv_w, stride=1, padding='VALID')
            conv_res = tf.nn.relu(tf.nn.bias_add(conv, conv_b))
            # 最大池化层
            pool_list.append(tf.reduce_max(conv_res, reduction_indices=[1]))
        pool_res = tf.concat(pool_list, 1)
        # 第一个全连接层
        fc1_w = self.get_weight([self.num_filters * len(self.filter_width_list), self.fc1_size], 0.01)
        fc1_b = self.get_bias([self.fc1_size])
        fc1_res = tf.nn.relu(tf.matmul(pool_res, fc1_w) + fc1_b)
        if is_train:
            fc1_res = tf.nn.dropout(fc1_res, 0.5)
            # 第二个全连接层
        fc2_w = self.get_weight([self.fc1_size, self.fc2_size], 0.01)
        fc2_b = self.get_bias([self.fc2_size])
        fc2_res = tf.nn.relu(tf.matmul(fc1_res, fc2_w) + fc2_b)
        if is_train:
            fc2_res = tf.nn.dropout(fc2_res, 0.5)
            # 第三个全连接层
        fc3_w = self.get_weight([self.fc2_size, self.fc3_size], 0.01)
        fc3_b = self.get_bias([self.fc3_size])
        fc3_res = tf.matmul(fc2_res, fc3_w) + fc3_b
        return fc3_res

