一、环境准备
- Jenkins:
- 到官网下载jenkins.war包:http://jenkins-ci.org/
- 安装方法有两种:
- 把下载下来的jenkins.war包放到文件夹下,如C:\jenkins,然后打开命令行窗口并进到该目录下,执行java -jar jenkens.war命令,当提示:“Jenkins is fully up and running”时,表示启动成功,这时在浏览器窗口输入:http://localhost:8080/ 就可到jenkins的首页。
- 如果有tomcat,把jenkins.war包放在tomcat的webapps文件夹下,启动tomcat时会自动启动jenkins,这时通过http://localhost:8080/jenkins就 可以访问jenkins的首页了。
- ANT:
下载ant并配置ANT_HOME,官网:http://ant.apache.org/。
3、Junit:
下载junit.jar包,没用过的可参考:http://blog.csdn.net/lengyuhong/article/details/5815017
4、SVN:
1、用本地硬盘当SVN仓库:http://wenku.baidu.com/view/12b02f6a011ca300a6c39081.html
2、SVN服务器搭建和使用:http://www.cnblogs.com/xiaobaihome/tag/SVN/ (推荐用此种方法,后面有原因)
二、项目代码:
环境准备好了之后就可开始写代码、单元测试案例以及ANT用来构建的build.xml文件,这些内容在上一篇ANT task之Junit、JunitReport有讲过,这里不细讲:
1、Java代码:
package com.glen.he;

public class SimpleCalculation {
    public int Add(int a,int b){
        return (a+b);
    }

    public int Subtration(int a,int b){
        return(a-b);
    }

}
SimpleCalculation.java
2、单元测试代码:
package com.glen.he;
import com.glen.he.ComplexCalculation;
import static org.junit.Assert.*;
import org.junit.Test;
public class ComplexCalculationTest {
ComplexCalculation cc = new ComplexCalculation();
@Test
public void DivisionTest() {
int c = cc.Division(100, 5);
assertEquals(20, c);
}
@Test
public void MultiplyTest() {
int c = cc.Multiply(100, 5);
assertEquals(500, c);
}
}
ComplexCalculationTest.java
package com.glen.he;

import com.glen.he.SimpleCalculation;

import static org.junit.Assert.*;
import org.junit.Test;

public class SimpleCalculationTest {

    SimpleCalculation sc = new SimpleCalculation();

    @Test
    public void AddTest() {

        int c = sc.Add(3, 5);

        assertEquals(8, c);
    }

    @Test
    public void SubtrationTest() {

        int c = sc.Subtration(20, 5);

        assertEquals(15, c);
    }
}
SimpleCalculationTest.java
3、build.xml
xml version="1.0" encoding="UTF-8"?>
<project name="AntDemo" default="junit" basedir=".">


    <property name="src.path" value="src/java"/>

    <property name="test.path" value="src/test"/>

    <property name="build.path" value="build"/>

    <property name="dist.path" value="dist"/>

    <property name="lib.path" value="lib"/>

    <property name="report.path" value="report"/>


    <path id="compile.path">
        <fileset dir="${lib.path}">
            <include name="**/*.jar"/>
        fileset>

        <pathelement path="${build.path}"/>
    path>


    <target name="init">
        <mkdir dir="${build.path}"/>
        <mkdir dir="${report.path}"/>
        <mkdir dir="${dist.path}"/>
    target>


    <target name="clean" description="clean">
        <delete dir="${build.path}"/>
        <delete dir="${report.path}"/>
        <delete dir="${dist.path}"/>
    target>


    <target name="compile" depends="init">
        <javac srcdir="${src.path}" destdir="${build.path}"  classpathref="compile.path" includeantruntime="true"/>
        <javac srcdir="${test.path}" destdir="${build.path}"  classpathref="compile.path" includeantruntime="true"/>
    target>


    <target name="junit" depends="compile">
        <junit printsummary="true" fork="true">
             <formatter type="xml" usefile="true"/>

             <classpath refid="compile.path"/>

            <batchtest fork="on" todir="${report.path}" haltonfailure="no">
                <fileset dir="${build.path}">
                    <include name="**/*Test.class"/>
                fileset>
            batchtest>
         junit>
     target>

    <target name="junit-report" depends="junit">

        <junitreport todir="${report.path}">
            <fileset dir="${report.path}">
                <include name="TEST-*.xml" />
            fileset>

            <report format="frames" todir="${report.path}" />
        junitreport>
    target>

    <target name="make-jar" depends="compile" description="make jar file">
          <jar jarfile="${dist.path}/AntDemo.jar">
               <fileset dir="${build.path}">


                <exclude name="**/*Test.class"/>
               fileset>
          jar>
     target>

project>
build.xml
三、配置Jenkins:
PS:Jenkins可以通过master/slave来支持分布式的job运行,本文运行在master,即Jenkins所在的机器。
1、打开jenkins首页,新建一个job,输入Item名称,选择 构建一个自由风格的软件项目,点击"OK" 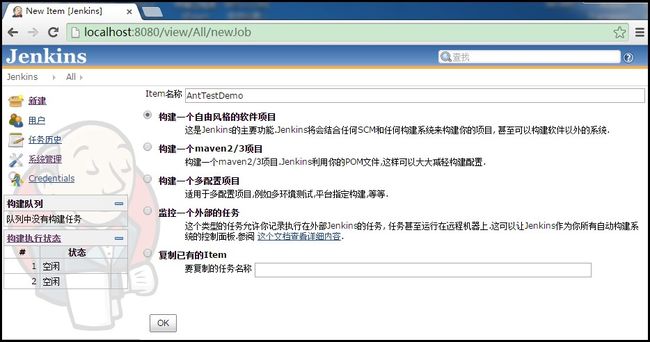
2、在 源码管理 那里,选择Subversion,在Repository URL后面,输入你的SVN地址。

PS:Repository URL使用本地磁盘当仓库这种方法后来我在其它机器上试验时,发现老是报错:svn: E180001: Unable to open an ra_local session to URL。一时没有找到解决办法,大家如果也碰到此问题,可以搭建SVN服务器来管理源代码,我试了,挺好使的。
3、在 构建 那里也可以有两种做法:
I、选择Execute Windows batch command,在输入框输入如下命令(这里我选择的是这个方法):
set path=C:\ANT_HOME\Apache-Ant-1.7.0\bin;path 把ant的安装目录添加到path
ant junit 执行junit task 
II、方法I比较麻烦,如果我们设置好了ANT_HOME,可以选择Invoke Ant,然后在targets里面指定我们build.xml里的task name。 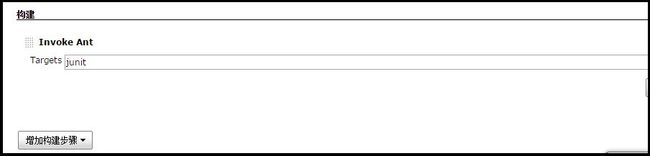
4、点击保存,然后选择立即构建,执行结果: 