三大框架之SpringMVC :一个小的登录注册项目的网页实现
今天学习了 SpringMVC ,最后做了一个小的项目,熟悉的登录注册
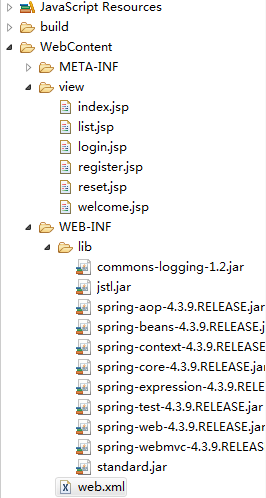
1.项目结构:
源代码传送门
2 . 导包介绍:
5 个 Spring 基础包 : beans, context, core, expression + commons 日志包
1 个 aop 包
2 个 web 包 :web webmvc
2个 html 的 jstl 包:jstl , standard ;
3. 项目结构说明:
1. User的model类

2. UserDao/UserDaoiml

3. UserService/UserServiceImpl

4. Util工具类

5. controller类

6. 3个配置文件: applicationContext.xml    spring-mvc.xml    web.xml
4. 三个配置文件的代码 :
@ applicationContext.xml
<beans xmlns="http://www.springframework.org/schema/beans"
    xmlns:xsi="http://www.w3.org/2001/XMLSchema-instance"
    xmlns:context="http://www.springframework.org/schema/context"
    xsi:schemaLocation="http://www.springframework.org/schema/beans
    http://www.springframework.org/schema/beans/spring-beans.xsd
    http://www.springframework.org/schema/context
    http://www.springframework.org/schema/context/spring-context.xsd">


    <context:component-scan base-package="com.zhiyou100"/>


beans>
@ spring-mvc.xml
<beans xmlns="http://www.springframework.org/schema/beans"
    xmlns:xsi="http://www.w3.org/2001/XMLSchema-instance" xmlns:context="http://www.springframework.org/schema/context"
    xmlns:mvc="http://www.springframework.org/schema/mvc"
    xsi:schemaLocation="http://www.springframework.org/schema/beans
    http://www.springframework.org/schema/beans/spring-beans.xsd
    http://www.springframework.org/schema/context
    http://www.springframework.org/schema/context/spring-context.xsd
    http://www.springframework.org/schema/mvc
    http://www.springframework.org/schema/mvc/spring-mvc.xsd">

    <context:component-scan base-package="com.zhiyou100.controller">context:component-scan>

    <mvc:annotation-driven />

    <bean
        class="org.springframework.web.servlet.view.InternalResourceViewResolver">
        <property name="prefix" value="/view/">property>
        <property name="suffix" value=".jsp">property>

    bean>

beans>
@ web.xml
<web-app xmlns:xsi="http://www.w3.org/2001/XMLSchema-instance" xmlns="http://xmlns.jcp.org/xml/ns/javaee" xsi:schemaLocation="http://xmlns.jcp.org/xml/ns/javaee http://xmlns.jcp.org/xml/ns/javaee/web-app_3_1.xsd" id="WebApp_ID" version="3.1">
  <display-name>SSTesst1_Studisplay-name>
  <welcome-file-list>
    <welcome-file>index.htmlwelcome-file>
    <welcome-file>index.htmwelcome-file>
    <welcome-file>index.jspwelcome-file>
    <welcome-file>default.htmlwelcome-file>
    <welcome-file>default.htmwelcome-file>
    <welcome-file>default.jspwelcome-file>
  welcome-file-list>

  <context-param>
    <param-name>contextConfigLocationparam-name>
    <param-value>classpath:applicationContext.xmlparam-value>
  context-param>

  <listener>
    <listener-class>org.springframework.web.context.ContextLoaderListenerlistener-class>
  listener>


  <servlet>
    <servlet-name>dispatcherServletservlet-name>
    <servlet-class>org.springframework.web.servlet.DispatcherServletservlet-class>
    <init-param>
      <param-name>contextConfigLocationparam-name>
      <param-value>classpath:spring-mvc.xmlparam-value>
    init-param>
  servlet>

  <servlet-mapping>
    <servlet-name>dispatcherServletservlet-name>
    <url-pattern>/url-pattern>
  servlet-mapping>
web-app>
5 . 关于配置的解析说明
-------------------------------------------
------------- spring ----------------------
-------------------------------------------
2. 在 src 下创建 spring 的配置文件
2.1 复制粘贴
version="1.0" encoding="UTF-8"?>
"http://www.springframework.org/schema/beans"
xmlns:xsi="http://www.w3.org/2001/XMLSchema-instance" xmlns:context="http://www.springframework.org/schema/context"
xsi:schemaLocation="http://www.springframework.org/schema/beans
http://www.springframework.org/schema/beans/spring-beans.xsd
http://www.springframework.org/schema/context
http://www.springframework.org/schema/context/spring-context.xsd">
2.2 "com.zhiyou100"/>
增加对注解的支持
3. 在 web.xml 中增加监听器读取 spring 的配置文件
3.1 增加监听器 listener 和 listener-class 两个标签
3.2 class 是 ContextLoaderListener 的全名 = 包名 + 类名
4. 在 web.xml 增加标签设置 spring 配置文件的位置
4.1 增加 context-param 和 param-name、param-value 标签
4.2 param-name:contextConfigLocation
4.3 param-value:classpath:applicationContext.xml
-----------------------------------------------
------------- spring-mvc ----------------------
-----------------------------------------------
5. 在 src 下创建 spring-mvc 的配置文件
5.1 复制粘贴
"http://www.springframework.org/schema/beans"
xmlns:xsi="http://www.w3.org/2001/XMLSchema-instance"
xmlns:mvc="http://www.springframework.org/schema/mvc"
xsi:schemaLocation="http://www.springframework.org/schema/beans
http://www.springframework.org/schema/beans/spring-beans.xsd
http://www.springframework.org/schema/mvc
http://www.springframework.org/schema/mvc/spring-mvc.xsd">
5.2 使用默认的 handleMapping 和启用 mvc 中的注解
6. 配置完成后,去 实现 功能:
-----------------------------------------------
------------- 登录注册 ------------------------
-----------------------------------------------

1. 在 src 下创建 controller,service,dao,model,util 包

2. 在 WebContent 下创建 view 文件夹,存放我们所有的 jsp 文件

3. 创建 model 类 User,三个属性 username,password,email

4. 创建 UserService 接口,定义方法

5. 创建 UserDao 接口,定义方法

6. 创建 UserDaoImpl 类实现 UserDao 接口,添加 @Repository 注解
    方便将来注入到 Service 中使用

7. 创建 DBUtil 类,添加 @Component
    默认就是单例模式,方便我们使用

8. 回到 UserDaoImpl,增加 DBUtil 属性和对应的 setter 方法。

9. 在 DBUtil 属性上增加 @Autowired 注解
    创建 UserDaoImpl 的时候,IoC 容器会自动把 DBUtil 对象赋值给这个属性

10. 实现 UserDaoImpl 中的所有功能

11. 创建 UserServiceImpl 实现 UserService 接口,添加 @Service 注解
    方便将来注入到 Controller 中使用

12. 增加 UserDao 属性和对应的 setter 方法。

13. 在 UserDao 属性上增加 @Autowired 注解
    创建 UserServiceImpl 的时候,IoC 容器会自动把 UserDaoImpl 对象赋值给这个属性

14.实现 UserServiceImpl 功能

15. 增加 test 源文件夹和 UserServiceTest 测试类,对 Service 进行测试

16. 在 UserServiceTest 中增加 @RunWith(SpringJUnit4ClassRunner.class)

17. 在 UserServiceTest 中增加 @ContextConfiguration("classpath:applicationContext.xml")

18. 创建 UserController 增加 @Controller 注解,注入 UserService,完成功能

19. 导入 jstl,页面中的所有路径都使用绝对路径
    登录
7. modelController 的代码:
package com.zhiyou100.controller;

import java.util.Collection;

import org.springframework.beans.factory.annotation.Autowired;
import org.springframework.stereotype.Controller;
import org.springframework.ui.Model;
import org.springframework.web.bind.annotation.RequestMapping;

import com.zhiyou100.model.User;
import com.zhiyou100.service.UserService;

@Controller
public class UserController {

    @Autowired
    private UserService service;

    @RequestMapping("/login")
    public String login(User user,Model model) {

        if(service.login(user)){

            model.addAttribute("username", user.getUsername());

            return "welcome";
        }else {
            model.addAttribute("error", "登陆失败");

            return "login";
        }

    }

    @RequestMapping("/register")
    public String register(User user,Model model) {

        if(service.register(user)){

            model.addAttribute("username", user.getUsername());

            return "welcome";
        }else {
            model.addAttribute("error", "注册失败");

            return "register";
        }

    }

    @RequestMapping("/reset")
    public String resetPassword(User user,Model model) {

        if(service.resetPassword(user)){

            model.addAttribute("username", user.getUsername());

            return "welcome";
        }else {
            model.addAttribute("error", "重置失败");

            return "reset";
        }

    }

    @RequestMapping("/list")
    public String listUsers(Model model) {

        Collection list = service.listUser();

        model.addAttribute("list", list);

        return "list";
    }
}

