HOG + SVM 做目标检测、车辆检测
所属知识点:Computer Vision:Feature Extraction;Classifier;Object Detection
微信公众号:“RoboticsCV”(微信号:ModernRobotics)即将运营
归纳和总结机器学习技术的库:ViolinLee/ML_notes
关键概念:梯度计算;直方图统计的方向单元划分(Orientation binning);描述器区块(Descripter blocks);
区间归一化(Block normalization);HOG 特征;SVM 分类器——目标识别;
1. HOG 特征
方向梯度直方图(英语:Histogram of oriented gradient,简称HOG)是应用在计算机视觉和图像处理领域,用于目标检测的特征描述器(feature descriptor)。这项技术是用来计算局部图像梯度的方向信息的统计值。这种方法跟边缘方向直方图(edge orientation histograms)、尺度不变特征变换(scale-invariant feature transform descriptors,简称 SIFT)以及形状上下文方法( shape contexts)有很多相似之处,但与它们的不同点是:HOG描述器是在一个网格密集的大小统一的细胞单元(dense grid of uniformly spaced cells)上计算,而且为了提高性能,还采用了重叠的局部对比度归一化(overlapping local contrast normalization)技术。HOG 特征结合 SVM 分类器已经被广泛应用于图像识别中,尤其在行人检测中获得了极大的成功。
HOG 特征的基础:图像梯度直方图,具体来说就是梯度方向的分布图,因为我们更加关注图像上的形状和纹理。为了观察这些梯度的空间分布,需要把图像分成网格,并由此计算多个直方图。
HOG 的基本思路:首先将图像分成小的连通区域,我们把它叫细胞单元。然后采集细胞单元中各像素点的梯度的或边缘的方向直方图。最后把这些直方图组合起来就可以构成特征描述器。
HOG 提升性能的方式:把局部直方图在图像的更大的范围内(称为 block)进行对比度归一化(contrast-normalized)。通过这个归一化后,能对光照变化和阴影获得更好的效果。
HOG 特征提取算法的实现过程:
- 1)图像灰度化;
- 2)采用 Gamma 校正法对输入图像进行颜色空间的标准化(归一化)。目的是调节图像的对比度,降低图像局部的阴影和光照变化所造成的影响,同时可以抑制噪音的干扰;
- 3)计算图像每个像素的梯度(包括大小和方向)。主要是为了捕获轮廓信息,同时进一步弱化光照的干扰。
- 4)Spatial / Orientation Binning:将图像划分成小 cells(例如:8像素×8像素/cell);
- 5)统计每个 cell 的梯度直方图,即可形成每个 cell 的 descriptor;
- 6)将每几个 cell 组成一个 block(例如3*3个cell/block),一个 block 内所有 cell 的特征 descriptor 串联起来便得到该 block 的 HOG feature descriptor。
- 7)将图像内的所有 block 的 HOG feature descriptor 串联起来就可以得到该图像的 HOG feature descriptor,这个就是最终可供分类使用的特征向量了。
图像的 HOG 特征维度:假设图像尺寸为 64×64;每个 cell 为 8×8;每个 block 包含 2×2 的 cell,即为 16×16;步长为 1 个 cell,共有 7×7=49 个 block;最终得到的特征向量的维度是:49×(2×2×9)=1764,这就是图像的 HOG feature descriptor。
(注:上面 2×2×9 的由来?我们计算方向梯度直方图是针对每个 cell 进行计算的。方向的值会被分割成多个 bin。通常只考虑梯度的方向而不考虑正负。这里的方向值范围是 0°~180°。采用 9 个 bin 的直方图,即方向值得分割间距为 20°。每个 cell 的梯度向量产生一个 bin,该 bin 的权重对应梯度的幅值。)
由此可见,图像 HOG 模型的向量的维度非常高。这个向量就代表了图像的特征,可用于各种物体的分类。为此,我们需要一种能处理这种高维向量的机器学习方法。
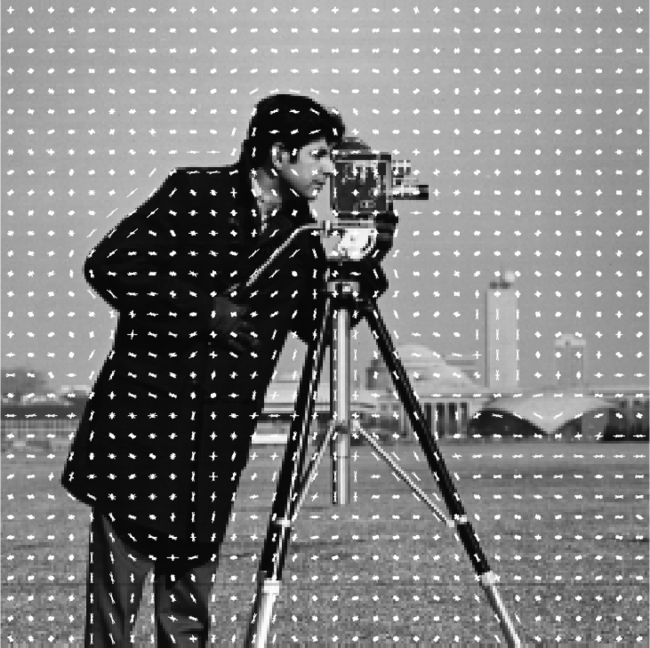
HOG 特征的可视化:HOG 是根据单元格创建的,这些单元格组合成区块,并且区块之间可以重叠,因此很难对它进行直观显示。不过可以通过显示每个单元格的直方图来表示 HOG。显示方向直方图时,不使用柱状图,而是采用更加直观的星形图,每个线条的方向与 bin 对应,长度与 bin 的数量成正比。可以用这种方法在图像上绘制 HOG。
在 Matlab 中提取 HOG 特征并进行可视化:
原图像
Matlab 代码:
img = imread('cameraman.tif');

[featureVector,hogVisualization] = extractHOGFeatures(img);

figure;
imshow(img);
hold on;
plot(hogVisualization);
在 OpenCV 中进行可视化:
原图像
OpenCV 代码(C++):
int main()
{
	cv::Mat image = imread("E:/CV/OpenCV_zhaizhigang/code_hog_svm/girl.jpg", cv::IMREAD_GRAYSCALE);
	cv::imshow("Original image", image);

	cv::HOGDescriptor hog(cv::Size((image.cols / 16) * 16, (image.rows / 16) * 16), // size of the window
		cv::Size(16, 16),    // block size
		cv::Size(16, 16),    // block stride
		cv::Size(4, 4),      // cell size
		9);                  // number of bins

	std::vector descriptors;

	// Draw a representation of HOG cells
	cv::Mat hogImage = image.clone();
	drawHOGDescriptors(image, hogImage, cv::Size(16, 16), 9);
	cv::imshow("HOG image", hogImage);

    cv::waitKey(0);
}
2. SVM 简述
SVM 基于强大的数学工具,在处理超高维空间的特征效果很好。实践表明,当特征空间的维度超过样本数量时,SVM 的效果是最好的。此外,SVM 占用内存很少,因为它只需要存放支持向量(而最近邻法等算法则需要将全部样本点存放在内存中)。构建分类器时,将方向梯度直方图和 SVM 结合使用的效果很好。原因之一是 HOG 可以看作是一个鲁棒的高维描述子,能准确反映一个类别的本质特征。
现在介绍一个提取 STOP 较通标志 HOG 特征,并训练 SVM 的例子,例子摘自《OpenCV 3 Computer Vision Applicatioin Programming Cookbook》第14章节。
代码如下(trainSVM.cpp):
int main()
{
	// generate the filename
	std::vector imgs;
	std::string prefix = "E:/CV/OpenCV_quick_learning/projects/object_detection_hog_svm/stopsamples/stop";
	std::string ext = ".png";

	// loading 8 positive samples
	std::vector positives;

	for (long i = 0; i < 8; i++) {

		std::string name(prefix);
		std::ostringstream ss; ss << std::setfill('0') << std::setw(2) << i; name += ss.str();
		name += ext;

		positives.push_back(cv::imread(name, cv::IMREAD_GRAYSCALE));
	}

	// the first 8 positive samples
	cv::Mat posSamples(2 * positives[0].rows, 4 * positives[0].cols, CV_8U);
	for (int i = 0; i < 2; i++)
		for (int j = 0; j < 4; j++) {

			positives[i * 4 + j].copyTo(posSamples(cv::Rect(j*positives[i * 4 + j].cols, i*positives[i * 4 + j].rows, positives[i * 4 + j].cols, positives[i * 4 + j].rows)));

		}

	cv::imshow("Positive samples", posSamples);


	// loading 8 negative samples
	std::string nprefix = "E:/CV/OpenCV_quick_learning/projects/object_detection_hog_svm/stopSamples/neg";
	std::vector negatives;

	for (long i = 0; i < 8; i++) {

		std::string name(nprefix);
		std::ostringstream ss; ss << std::setfill('0') << std::setw(2) << i; name += ss.str();
		name += ext;

		negatives.push_back(cv::imread(name, cv::IMREAD_GRAYSCALE));
	}

	// the first 8 negative samples
	cv::Mat negSamples(2 * negatives[0].rows, 4 * negatives[0].cols, CV_8U);
	for (int i = 0; i < 2; i++)
		for (int j = 0; j < 4; j++) {

			negatives[i * 4 + j].copyTo(negSamples(cv::Rect(j*negatives[i * 4 + j].cols, i*negatives[i * 4 + j].rows, negatives[i * 4 + j].cols, negatives[i * 4 + j].rows)));
		}

	cv::imshow("Negative samples", negSamples);

	// The HOG descriptor for stop sign detection
	cv::HOGDescriptor hogDesc(positives[0].size(), // size of the window
		cv::Size(8, 8),    // block size
		cv::Size(4, 4),    // block stride
		cv::Size(4, 4),    // cell size
		9);                // number of bins

						   // compute first descriptor
	std::vector desc;
	hogDesc.compute(positives[0], desc);

	std::cout << "Positive sample size: " << positives[0].rows << "x" << positives[0].cols << std::endl;
	std::cout << "HOG descriptor size: " << desc.size() << std::endl;

	// the matrix of sample descriptors
	int featureSize = desc.size();
	int numberOfSamples = positives.size() + negatives.size();
	// create the matrix that will contain the samples HOG
	cv::Mat samples(numberOfSamples, featureSize, CV_32FC1);

	// fill first row with first descriptor
	for (int i = 0; i < featureSize; i++)
		samples.ptr(0)[i] = desc[i];

	// compute descriptor of the positive samples
	for (int j = 1; j < positives.size(); j++) {
		hogDesc.compute(positives[j], desc);
		// fill the next row with current descriptor
		for (int i = 0; i < featureSize; i++)
			samples.ptr(j)[i] = desc[i];
	}

	// compute descriptor of the negative samples
	for (int j = 0; j < negatives.size(); j++) {
		hogDesc.compute(negatives[j], desc);
		// fill the next row with current descriptor
		for (int i = 0; i < featureSize; i++)
			samples.ptr(j + positives.size())[i] = desc[i];
	}

	// Create the labels
	cv::Mat labels(numberOfSamples, 1, CV_32SC1);
	// labels of positive samples
	labels.rowRange(0, positives.size()) = 1.0;
	// labels of negative samples
	labels.rowRange(positives.size(), numberOfSamples) = -1.0;

	// create SVM classifier
	cv::Ptr svm = cv::ml::SVM::create();
	svm->setType(cv::ml::SVM::C_SVC);
	svm->setKernel(cv::ml::SVM::LINEAR);

	// prepare the training data
	cv::Ptr trainingData =
		cv::ml::TrainData::create(samples, cv::ml::SampleTypes::ROW_SAMPLE, labels);

	// SVM training
	svm->train(trainingData);

	cv::Mat queries(4, featureSize, CV_32FC1);

	// fill the rows with query descriptors
	hogDesc.compute(cv::imread("E:/CV/OpenCV_quick_learning/projects/object_detection_hog_svm/stopSamples/stop08.png", cv::IMREAD_GRAYSCALE), desc);
	for (int i = 0; i < featureSize; i++)
		queries.ptr(0)[i] = desc[i];
	hogDesc.compute(cv::imread("E:/CV/OpenCV_quick_learning/projects/object_detection_hog_svm/stopSamples/stop09.png", cv::IMREAD_GRAYSCALE), desc);
	for (int i = 0; i < featureSize; i++)
		queries.ptr(1)[i] = desc[i];
	hogDesc.compute(cv::imread("E:/CV/OpenCV_quick_learning/projects/object_detection_hog_svm/stopSamples/neg08.png", cv::IMREAD_GRAYSCALE), desc);
	for (int i = 0; i < featureSize; i++)
		queries.ptr(2)[i] = desc[i];
	hogDesc.compute(cv::imread("E:/CV/OpenCV_quick_learning/projects/object_detection_hog_svm/stopSamples/neg09.png", cv::IMREAD_GRAYSCALE), desc);
	for (int i = 0; i < featureSize; i++)
		queries.ptr(3)[i] = desc[i];
	cv::Mat predictions;

	// Test the classifier with the last two pos and neg samples
	svm->predict(queries, predictions);

	for (int i = 0; i < 4; i++)
		std::cout << "query: " << i << ": " << ((predictions.at(i) < 0.0) ? "Negative" : "Positive") << std::endl;

    cv::waitKey(0);
}
训练集正样本包含八张 STOP 较通标志图片:
训练集负样本包含八张其他类型图片:
预测结果(分别预测正、负样本的最后两张图片):
3. HOG 优缺点
HOG 的优点:
- 核心思想是所检测的局部物体外形能够被梯度或边缘方向的分布所描述,HOG 能较好地捕捉局部形状信息,对几何和光学变化都有很好的不变性;
- HOG 是在密集采样的图像块中求取的,在计算得到的 HOG 特征向量中隐含了该块与检测窗口之间的空间位置关系;
HOG 的缺点:
- 很难处理遮挡问题,人体姿势动作幅度过大或物体方向改变也不易检测(这个问题后来在DPM中采用可变形部件模型的方法得到了改善);
- 跟SIFT相比,HOG 没有选取主方向,也没有旋转梯度方向直方图,因而本身不具有旋转不变性,其旋转不变性是通过采用不同旋转方向的训练样本来实现的;
- 跟SIFT相比,HOG 本身不具有尺度不变性,其尺度不变性是通过缩放检测窗口图像的大小来实现的;
- 由于梯度的性质,HOG 对噪点相当敏感,在实际应用中,在 Block 和 Cell 划分之后,对于得到各个像区域中,有时候还会做一次高斯平滑去除噪点。
4. HOG 用于目标检测
4.1 人物检测(静态图像)
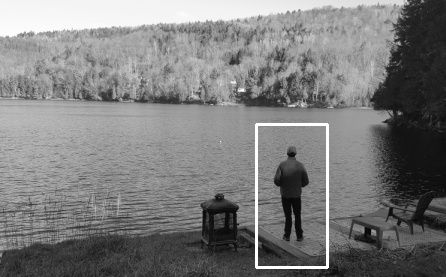
OpenCV 代码如下(直接使用 cv::HOGDescriptor peopleHog 中的 SVM 分类器:peopleHog.setSVMDetector()):
int main() {
	// People detection
	cv::Mat myImage = imread("E:/CV/OpenCV_quick_learning/projects/object_detection_hog_svm/person.jpg", cv::IMREAD_GRAYSCALE);

	// create the detector
	std::vector peoples;
	cv::HOGDescriptor peopleHog;
	peopleHog.setSVMDetector(cv::HOGDescriptor::getDefaultPeopleDetector());
	// detect peoples oin an image
	peopleHog.detectMultiScale(myImage, // input image
		peoples, // ouput list of bounding boxes
		0,       // threshold to consider a detection to be positive
		cv::Size(4, 4),   // window stride
		cv::Size(32, 32), // image padding
		1.1,              // scale factor
		2);               // grouping threshold (0 means no grouping)

						  // draw detections on image
	std::cout << "Number of peoples detected: " << peoples.size() << std::endl;
	for (int i = 0; i < peoples.size(); i++)
		cv::rectangle(myImage, peoples[i], cv::Scalar(255, 255, 255), 2);

	cv::imshow("People detection", myImage);
	cv::imwrite("E:/CV/OpenCV_quick_learning/projects/object_detection_hog_svm/people_detection.jpg", myImage);

	cv::waitKey(0);
}
4.2 车辆检测(视频流)
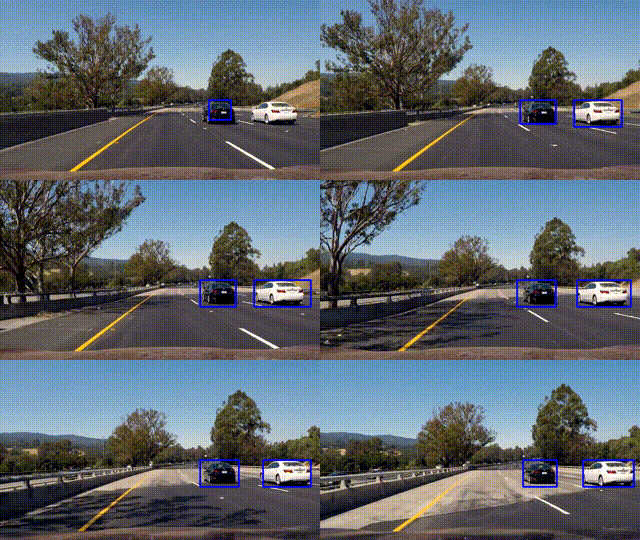
该例子来自 Udacity 自动驾驶纳米学位的一个车辆检测的项目,在文章末尾放有链接,有兴趣的同学可以自行探索解决。下图是解决结果:
项目的流程非常具有借鉴性,大致如下:
- 提取有标签图像训练集的 HOG 特征,并训练线性支持向量机分类器;
- 实现滑动窗口技术,并使用训练的 SVM 分类器搜索图像中的车辆;
- 在视频流上运行上述过程,并逐帧创建循环检测的热图,以移除异常值并跟踪检测到的车辆;
- 最后,估计检测到的车辆的边框(bounding box)。
5. 参考和推荐
HOG 特征学习总结
Histogram of Oriented Gradients:HOG 的 OpenCV 教程
CarND-Vehicle-Detection:Udacity 车辆检测项目实现
OpenCV3Cookbook:OpenCV 3 Computer Vision Applicatioin Programming Cookbook 代码


