可能某个大神说过源码自有黄金屋,源码自有颜如玉。对于react-native这样优秀的框架,不看看他的源码实在是有点可惜,本文通过对react-native 与 java 通信部分的源码阅读探究react-native android的通讯机制及实现。
总体模型

对于传统 Java Js 通信而言,Js 调用 Java 通不外乎 Jsbridge、onprompt、log 及 addjavascriptinterface 四种方式。但在 RN 中没有采用了传统 Java 与 Js 之间的通信机制。而是自己弄一套最新的WebKit作为React-Native的解释器,这样做有两个重要好处就是兼容绝大多少设备版本和方便添加自定义功能。其总体模型如上图
java层
先上一张图

这是从源码中提取的java层实现中关键的类,我们一个一个的来看
JavaScriptModule
在reactAndroid下的com.facebook.react.bridge包中我们可以看到JavaScriptModule的代码
/**
 * Interface denoting that a class is the interface to a module with *
 * the same name in JS. Calling
 * functions on this interface will result in corresponding methods in *
 * JS being called.
 *
 * When extending JavaScriptModule and registering it with a
 * CatalystInstance, all public methods
 * are assumed to be implemented on a JS module with the same *
 * name as this class. Calling methods
 * on the object returned from {@link ReactContext#getJSModule}
 * or
 * {@link CatalystInstance#getJSModule} will result in the methods
 * with those names exported by
 * that module being called in JS.
 *
 * NB: JavaScriptModule does not allow method name overloading
 * because JS does not allow method name
 * overloading.
 */
@DoNotStrip
public interface JavaScriptModule {
}
作为RN各组件的接口其描述在源码中写得有:
1.这个接口在js层中具有同名模块,调用这个接口会调用js层相应的模块
2.所有组件必须继承自该JavaScriptModule接口,并且注册到CatalystInstance中
3.所有public方法都应当在js层同名组件中被实现
4.其方法不允许重载,因为js不允许方法重载
好了,现在我们知道了JavaScriptModule是在js层有同名组件的接口,没有具体实现类。接下来就需要看一下源码中所说的注册到CatalystInstance中这一过程是怎么回事了。
JavaScriptModule 和 NativeModule的注册过程
facebook官方定义了许多组件都组装在CoreMoudulesPackage(图中上方中间)中,这里用户可以自定义组件被组装在mPackages中。在源码中寻找它们被加载到何处,就能揭开注册的过程了吧.
我们知道RNA的启动是这样的:ReactActivity的委托类ReactActivityDelegate创建创建ReactRootView作为应用的容器->调用ReactRootView.startReactApplication()进一步执行应用启动流程
 public void startReactApplication(
      ReactInstanceManager reactInstanceManager,
      String moduleName,
      @Nullable Bundle initialProperties) {
    Systrace.beginSection(TRACE_TAG_REACT_JAVA_BRIDGE, "startReactApplication");
    try {
      UiThreadUtil.assertOnUiThread();

    ...
      Assertions.assertCondition(
        mReactInstanceManager == null,
        "This root view has already been attached to a catalyst instance manager");

      mReactInstanceManager = reactInstanceManager;
      mJSModuleName = moduleName;
      mAppProperties = initialProperties;

      if (!mReactInstanceManager.hasStartedCreatingInitialContext()) {
        mReactInstanceManager.createReactContextInBackground();
      }

      attachToReactInstanceManager();
    } finally {
      Systrace.endSection(TRACE_TAG_REACT_JAVA_BRIDGE);
    }
  }
这里创建了一个ReactInstanceManager,这是一个非常重要的实例,从名字上看,它管理着整个react实例。这里会调用createReactContextInBackground()来创建RN应用的上下文。这个方法最终开启异步任务ReactInstanceManager.createReactContext(),真正开始创建ReactContext。这个方法之后还会提到这里只截取我们感兴趣的部分
private ReactApplicationContext createReactContext(
    JavaScriptExecutor jsExecutor,
    JSBundleLoader jsBundleLoader) {
...
  NativeModuleRegistry.Builder nativeRegistryBuilder = new NativeModuleRegistry.Builder();
  JavaScriptModuleRegistry.Builder jsModulesBuilder = new JavaScriptModulesConfig.Builder();
...
try {
    CoreModulesPackage coreModulesPackage =
        new CoreModulesPackage(this, mBackBtnHandler, mUIImplementationProvider);
    processPackage(coreModulesPackage, reactContext, nativeRegistryBuilder, jsModulesBuilder);
  } finally {
    Systrace.endSection(Systrace.TRACE_TAG_REACT_JAVA_BRIDGE);
  }

  for (ReactPackage reactPackage : mPackages) {
    Systrace.beginSection(
        Systrace.TRACE_TAG_REACT_JAVA_BRIDGE,
        "createAndProcessCustomReactPackage");
    try {
      processPackage(reactPackage, reactContext, nativeRegistryBuilder, jsModulesBuilder);
    } finally {
      Systrace.endSection(Systrace.TRACE_TAG_REACT_JAVA_BRIDGE);
    }
  }
...
好了这下看到CoreMoudulesPackage的去向了,说明方向对了。这个这些截取部分具体做了这些事情:
1.创建 NativeModuleRegistry和 JavaScriptModuleRegistry的builder(建造者模式)
2.使用processPackage方法处理CoreModulesPackage
那么processPackage方法是怎么样的呢
private void processPackage(
    ReactPackage reactPackage,
    ReactApplicationContext reactContext,
    NativeModuleRegistry.Builder nativeRegistryBuilder,
    JavaScriptModulesConfig.Builder jsModulesBuilder) {
  for (NativeModule nativeModule : reactPackage.createNativeModules(reactContext)) {
    nativeRegistryBuilder.add(nativeModule);
  }
  for (Class jsModuleClass : reactPackage.createJSModules()) {
    jsModulesBuilder.add(jsModuleClass);
  }
}
这下明白了,循环处理我们在Application里注入的CoreMoudulesPackage和其他package,处理的过程就是把各自的Module添加到对应的builder中。然后在ReactInstanceManager.createReactContext()中
try {
nativeModuleRegistry = nativeModuleRegistryBuilder.build();
} finally {
Systrace.endSection(TRACE_TAG_REACT_JAVA_BRIDGE);
ReactMarker.logMarker(BUILD_NATIVE_MODULE_REGISTRY_END);
}
生成Java Module注册表 NativeModuleRegistry
诶,那么JS Module的注册表呢,还有源码里说的所有javaScriptModule注册到CatalystInstance中是怎么回事,我们接着往下看
CatalystInstanceImpl.Builder catalystInstanceBuilder = new CatalystInstanceImpl.Builder()
.setReactQueueConfigurationSpec(ReactQueueConfigurationSpec.createDefault())
.setJSExecutor(jsExecutor)
.setRegistry(nativeModuleRegistry)
.setJSModuleRegistry(jsModulesBuilder.build())
.setJSBundleLoader(jsBundleLoader)
.setNativeModuleCallExceptionHandler(exceptionHandler);
ReactMarker.logMarker(CREATE_CATALYST_INSTANCE_START);
// CREATE_CATALYST_INSTANCE_END is in JSCExecutor.cpp
Systrace.beginSection(TRACE_TAG_REACT_JAVA_BRIDGE, "createCatalystInstance");
final CatalystInstance catalystInstance;
try {
catalystInstance = catalystInstanceBuilder.build();
} finally {
Systrace.endSection(TRACE_TAG_REACT_JAVA_BRIDGE);
ReactMarker.logMarker(CREATE_CATALYST_INSTANCE_END);
}
if (mBridgeIdleDebugListener != null) {
catalystInstance.addBridgeIdleDebugListener(mBridgeIdleDebugListener);
}
if (Systrace.isTracing(TRACE_TAG_REACT_APPS | TRACE_TAG_REACT_JSC_CALLS)) {
catalystInstance.setGlobalVariable("__RCTProfileIsProfiling", "true");
}
reactContext.initializeWithInstance(catalystInstance);
catalystInstance.runJSBundle();
在这段代码中createReactContext()方法通过builder模式去创建一个CatalystInstance,并且注意.setJSModuleRegistry(jsModulesBuilder.build()),这里生成了JS Module的注册表 JavaScriptModuleRegistry 。果然像源码注释说的一样所有javaScriptModule注册到CatalystInstance中。
至此,我们生成好了 NativeModuleRegistry 及 JavaScriptModuleRegistry 两份模块配置表,可是还有一个问题,这两份注册表是存在于java端的,那要怎么传输到JS端呢?
答案是将所有JavaScriptModule的信息生成JSON字符串(moduleID+methodID+ arguments)预先保存到ReactBridge中,为什么这么做呢,这与接下来的调用过程有关。至此java层的组件的注册完成。
JavaScriptModule 的调用过程
前面在组件的注册过程中描述了关键的类和方法,再回忆一下开头的图
调用是怎么来完成的呢?
在注册过程的ReactInstanceManager.createReactContext()时有这么一段代码
if (mCurrentReactContext != null) {
      mCurrentReactContext
          .getJSModule(DeviceEventManagerModule.RCTDeviceEventEmitter.class)
 ...
    }
字面意思很好理解,在当前react上下文中获取JSModule,com.facebook.react.bridge 包中有ReactContext类,来看看getJSModule这个方法
public class ReactContext extends ContextWrapper {
...
/**
   * @return handle to the specified JS module for the CatalystInstance associated with this Context
   */
  public  T getJSModule(Class jsInterface) {
    if (mCatalystInstance == null) {
      throw new RuntimeException(EARLY_JS_ACCESS_EXCEPTION_MESSAGE);
    }
    return mCatalystInstance.getJSModule(jsInterface);
  }
...
}
原来调用了CatalystInstance实例的getJSModule()方法,那就来看看这个方法
 @Override
  public  T getJSModule(Class jsInterface) {
    return mJSModuleRegistry.getJavaScriptModule(this, jsInterface);
  }
又调用了 JavaScriptModuleRegistry 的getJavaScriptModule()方法,
public synchronized  T getJavaScriptModule(
      CatalystInstance instance,
      Class moduleInterface) {
    JavaScriptModule module = mModuleInstances.get(moduleInterface);
    if (module != null) {
      return (T) module;
    }

    JavaScriptModule interfaceProxy = (JavaScriptModule) Proxy.newProxyInstance(
        moduleInterface.getClassLoader(),
        new Class[]{moduleInterface},
        new JavaScriptModuleInvocationHandler(instance, moduleInterface));
    mModuleInstances.put(moduleInterface, interfaceProxy);
    return (T) interfaceProxy;
  }
先看上半部分代码,显然,实例中缓存得有得就返回相应的JSModule,但是没有呢?
没有肯定要去创建,可我们之前描述道javaScriptModule组件都是接口定义,在Java端是没有实现类的,被注册的都是Class类,没有真正的实例,Java端又如何来调用呢,代码中给出了答案——动态代理,既然是动态代理,那么委托类,中介类和代理类都是什么呢?
我们来看看 JavaScriptModuleInvocationHandler 类,它是 JavaScriptModuleRegistry 的内部类
 private static class JavaScriptModuleInvocationHandler implements InvocationHandler {
    private final CatalystInstance mCatalystInstance;
    private final Class mModuleInterface;
    private @Nullable String mName;

    public JavaScriptModuleInvocationHandler(
        CatalystInstance catalystInstance,
        Class moduleInterface) {
      mCatalystInstance = catalystInstance;
      mModuleInterface = moduleInterface;

      if (ReactBuildConfig.DEBUG) {
        Set methodNames = new HashSet<>();
        for (Method method : mModuleInterface.getDeclaredMethods()) {
          if (!methodNames.add(method.getName())) {
            throw new AssertionError(
              "Method overloading is unsupported: " + mModuleInterface.getName() +
                "#" + method.getName());
          }
        }
      }
    }

    private String getJSModuleName() {
      if (mName == null) {
        // With proguard obfuscation turned on, proguard apparently (poorly) emulates inner
        // classes or something because Class#getSimpleName() no longer strips the outer
        // class name. We manually strip it here if necessary.
        String name = mModuleInterface.getSimpleName();
        int dollarSignIndex = name.lastIndexOf('$');
        if (dollarSignIndex != -1) {
          name = name.substring(dollarSignIndex + 1);
        }

        // getting the class name every call is expensive, so cache it
        mName = name;
      }
      return mName;
    }

    @Override
    public @Nullable Object invoke(Object proxy, Method method, @Nullable Object[] args) throws Throwable {
      NativeArray jsArgs = args != null
        ? Arguments.fromJavaArgs(args)
        : new WritableNativeArray();
      mCatalystInstance.callFunction(getJSModuleName(), method.getName(), jsArgs);
      return null;
    }
  }
看了invoke方法后,我们就明白了,调用了代理类CatalystInstance的callFunction()方法,看一下这个方法
 @Override
  public void callFunction(
      final String module,
      final String method,
      final NativeArray arguments) {
    if (mDestroyed) {
      final String call = module + "." + method + "(" + arguments.toString() + ")";
      FLog.w(ReactConstants.TAG, "Calling JS function after bridge has been destroyed: " + call);
      return;
    }
    if (!mAcceptCalls) {
      // Most of the time the instance is initialized and we don't need to acquire the lock
      synchronized (mJSCallsPendingInitLock) {
        if (!mAcceptCalls) {
          mJSCallsPendingInit.add(new PendingJSCall(module, method, arguments));
          return;
        }
      }
    }

    jniCallJSFunction(module, method, arguments);
  }
这个方法最后,在 Java 层调用 JS 会调用 JNI 的 CallFunction 的方法。具体作用就是将想用调用的方法对应的moduleId,methodId和arguments通过jni传递到js端进行调用。看到这三个参数有没有回想到我们在注册过程最后描述的,所有JavaScriptModule信息都被以(moduleID+methodID+ arguments)形式生成的JSON字符串预先存入了ReactBridge中.就是为了调用时作为一个索引表。
bridge层
接着java层的图示,再上一张图

前面说到Java 层调用 JS 会调用 JNI 的 CallFunction 的方法我们来看一下
public class ReactBridge extends Countable {
  static {
    SoLoader.loadLibrary(REACT_NATIVE_LIB);
  }

   public native void callFunction(int moduleId, int methodId, NativeArray arguments);

  public native void setGlobalVariable(String propertyName, String jsonEncodedArgument);
}
如上所说是JNI调用,其接口为react/jni中的OnLoad.cpp,里面涵盖了类型操作,jsbundle 加载及全局变量操作等。看一下它的代码
static void callFunction(JNIEnv* env, jobject obj, jint moduleId, jint methodId,
                     NativeArray::jhybridobject args) {
  auto bridge = extractRefPtr(env, obj);
  auto arguments = cthis(wrap_alias(args));
  try {
   bridge->callFunction(
    (double) moduleId,
    (double) methodId,
    std::move(arguments->array)
   );
 } catch (...) {
   translatePendingCppExceptionToJavaException();
 }
又调用了Bridge,实际上是继承自它的CountableBridge,再看其代码中的callFunction()
void Bridge::callFunction(const double moduleId, const double methodId, const folly::dynamic& arguments) {
  if (*m_destroyed) {
    return;
 }
 #ifdef WITH_FBSYSTRACE
 FbSystraceSection s(TRACE_TAG_REACT_CXX_BRIDGE, "Bridge.callFunction");
 #endif
 auto returnedJSON = m_jsExecutor->callFunction(moduleId, methodId, arguments);
 m_callback(parseMethodCalls(returnedJSON), true /* = isEndOfBatch */);
}
回调转接到JSExector.cpp ,来执行js,看看它的代码
std::string JSCExecutor::callFunction(const double moduleId, const double methodId, const folly::dynamic& arguments) {
 // TODO:  Make this a first class function instead of evaling. #9317773
 std::vector call{
   (double) moduleId,
   (double) methodId,
std::move(arguments),
 };
 return executeJSCallWithJSC(m_context, "callFunctionReturnFlushedQueue", std::move(call));
}
这里还有一个地方需要注意前面Java层构造的JavaScriptModule信息JSON串在这里得到处理,作为映射表供callFunction()调用
void JSCExecutor::setGlobalVariable(const std::string& propName, const std::string& jsonValue) {
  auto globalObject = JSContextGetGlobalObject(m_context);
  String jsPropertyName(propName.c_str());

  String jsValueJSON(jsonValue.c_str());
  auto valueToInject = JSValueMakeFromJSONString(m_context, jsValueJSON);

  JSObjectSetProperty(m_context, globalObject, jsPropertyName, valueToInject, 0, NULL);
}
最后将调用转发到 JSCHelper.cpp 中执行evaluateScript 的函数,从而执行 JS 的调用。JSCHelpers对WebKit的一些API做了封装,负责最终调用WebKit.
td::string JSCExecutor::callFunction(const double moduleId, const double methodId, const folly::dynamic& arguments) {
 // TODO:  Make this a first class function instead of evaling. #9317773
 std::vector call{
   (double) moduleId,
   (double) methodId,
std::move(arguments),
 };
 return executeJSCallWithJSC(m_context, "callFunctionReturnFlushedQueue", std::move(call));
}
JSCHelpers.cpp

JSValueRef evaluateScript(JSContextRef context, JSStringRef script, JSStringRef source, const char *cachePath) {
   JSValueRef exn, result;
#if WITH_FBJSCEXTENSIONS
if (source){
   // If evaluating an application script, send it through `JSEvaluateScriptWithCache()`
   //  to add cache support.
  result = JSEvaluateScriptWithCache(context, script, NULL, source, 0, &exn, cachePath);
  } else {
  result = JSEvaluateScript(context, script, NULL, source, 0, &exn);
   }
#else
  result = JSEvaluateScript(context, script, NULL, source, 0, &exn);
#endif
  if (result == nullptr) {
   Value exception = Value(context, exn);
   std::string exceptionText = exception.toString().str();
   FBLOGE("Got JS Exception: %s", exceptionText.c_str());
   auto line = exception.asObject().getProperty("line");

   std::ostringstream locationInfo;
   std::string file = source != nullptr ? String::adopt(source).str() : "";
   locationInfo << "(" << (file.length() ? file : "");
    if (line != nullptr && line.isNumber()) {
    locationInfo << ":" << line.asInteger();
   }
   locationInfo << ")";
    throwJSExecutionException("%s %s", exceptionText.c_str(), locationInfo.str().c_str());
  }
  return result;
}
这样java层到bridge层的调用就完成了,接下来就开始Bridge向Javascript的调用。
js层
与前面两层相同,先上图
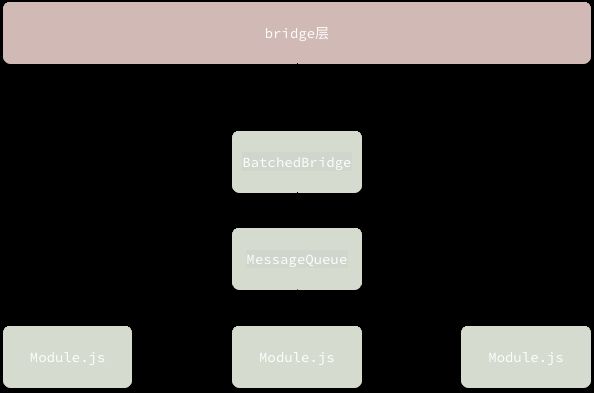
在react-native\Libraries\BatchedBridge中有 BatchedBridge .js和MessageQueue.js作为bridge层调用传递的接口,
BatchedBridge的代码是这样
const MessageQueue = require('MessageQueue');
const BatchedBridge = new MessageQueue();
只是简单的new了一个MessageQueue对象,看来MessageQueue才是真的接口,果然在这里我们看到了__callFunction()方法
__callFunction(module: string, method: string, args: Array) {
    this._lastFlush = new Date().getTime();
    this._eventLoopStartTime = this._lastFlush;
    Systrace.beginEvent(`${module}.${method}()`);
    if (this.__spy) {
      this.__spy({ type: TO_JS, module, method, args});
    }
    const moduleMethods = this._getCallableModule(module);
    invariant(
      !!moduleMethods,
      'Module %s is not a registered callable module (calling %s)',
      module, method
    );
    invariant(
      !!moduleMethods[method],
      'Method %s does not exist on module %s',
      method, module
    );
    const result = moduleMethods[method].apply(moduleMethods, args);
    Systrace.endEvent();
    return result;
  }
而这一方法是在callFunctionReturnFlushedQueue()方法中调用的,它的代码是
  callFunctionReturnFlushedQueue(module: string, method: string, args: Array) {
    this.__guard(() => {
      this.__callFunction(module, method, args);
    });

    return this.flushedQueue();
  }
在调用 CallFunction 执行 Js 后,会调用 flushedQueue 更新队列。在__callFunction()方法中有这样一段代码
const result = moduleMethods[method].apply(moduleMethods, args);
真是通过apply的方法最终将调用传递到js层的对应组件的对应方法上。这就是从java层到js层的整个调用过程。
其中还有一个地方需要注意的是在MessageQueue对象中有一个属性_callableModules数组,它就是用来存放哪些Javascript组件是可以被调用的,正常情况下_callableModules的数据和JavaScriptModules的数据是完全对应的,也就是前文中从java层传递下来的JavaScriptModule信息JSON串所包含的信息。MessageQueue对象通过
const moduleMethods = this._getCallableModule(module);
来对照映射获取这相应模块信息。
总结
前文描述了java->js调用各层的组成原理,和调用过程。在这里总结一下调用过程过程
java
1.Catalystance通过 JavaScriptModuleRegistry 调用对应于js层组件的java层 JavaScriptModule 。
2.如果实例中缓存得有就返回相应的JSModule,没有就由 JavaScriptModuleInvocationHandler 通过动态代理统一处理发向Javascript的所有调用。
3.CatalystanceImpl 进一步将 调用拆分为moduleID,methodID 及 arguments 的形式转交给 ReactBridge JNI 处理。
bridge
1.OnLoad接入ReactBridge传入的调用,并通过 Bridge , JSExector将传入的的调用装成Javascript执行语句。
2.JSCHelper将调用交给WebKit内核 通过evaluateScript 的方法将 moduleID,methodID 及 arguments 借助 JSC 传递给 Js 层。
js
1.调用通过 BatchedBridge 传入 MessageQueue 它预先注册了所有能够接收通信请求的组件_callableModules ,同时也保存着来自Java层JavaScriptModule的两张映射表。
2. MessageQueue 接收到调用后,通过映射表确认具体请求信息,然后通过apply方式调用js层相应组件。
最后再回头看各层的配图,应该对整个过程有更加清晰的理解了。这里只描述的java->js调用的过程,但RNA的通信机制是双向的,js->java的调用及其各层的关键组成将在之后的学习探究中描述。